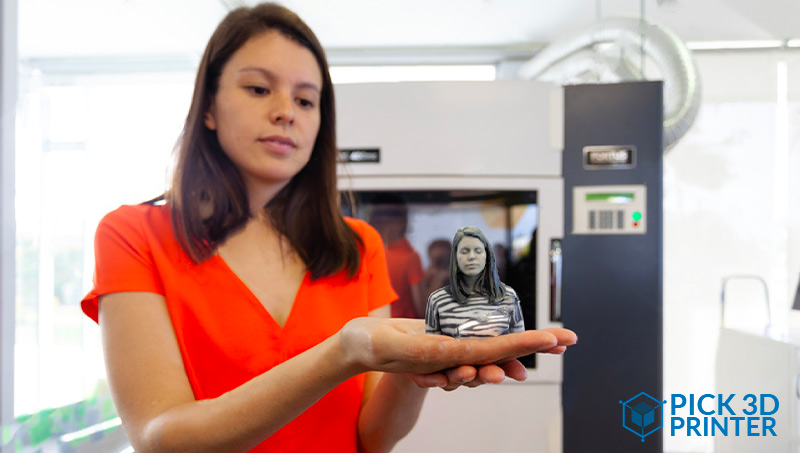
There are no two thoughts about this idea that 3D printing gives life to all the projects. But do you know that it could also give life to your picture?
And if you did, do you know that you could convert your image to a 3D print photo? The fact is that, if you have a picture of it then you can turn it into a 3D model and 3D print it.
There are many solution providers available online that can convert, not just one, but many pictures, into a 3D model.
In this article, we will help you find an overview of different solutions. The article is kept in mind to answer your questions like “how to the 3D print photo?,” “how to convert an image to STL?”
However, the one thing that you need to take care of is that, whatever results are produced, they are highly dependent on the source footage. So, we aren’t saying that the solutions mentioned below will 3D print a bad photo and turn it into a good one.
And that’s why no single solution can be rated in a way that it is the sole solution that is fit-for-all. Based on your experience, some practical advice will be catered to you in this article that will be helpful to you in creating the most efficient shooting.
The complete process i.e. starting from shooting an image to choosing the 3D printing materials, you can do the complete process on your own. If you don’t know how to use 3D modeling software, you can get a little help with operating it from online or from a designer to get a 3D printable file.
How does a Picture Become a 3D Model?
The three things on which the result of your 3D model will depend in this case are:
- The number and quality of the photos you take.
- The more photos that you take during the shoot.
- The higher the resolution of those photos is.
This does not imply that you need to be a professional 3D artist or 3D designer, but it certainly means you need to have at least an ounce of 3D skill and enough time. Provided that, everyone can achieve a good 3D character or object and print it.
With this experiment, you are bound to know a fact that 3D printers can give your life some of the best images. There are a huge number of options that you can create a 3D model.
Some of you might want to create an avatar or model, others would wish to create a CAD model with images from video games. All of that is possible.
The solutions here vary on the number of images that you have already taken to generate your 3D model. There are also ways to create a 3D model even with a single picture.
Creating a 3D model from the number of photos is possible, but you should not forget the possibilities and the details allowed in this option would be more limited.
For instance, expecting a perfect 360° file of your pet or your home based on one picture, would not be possible in that option. To obtain that desired shape with a printing process, it is better to have several pictures go into detail modeling and produce an impressive result.
It might be possible to print a perfect CAD model, but that’s still a dream.
Three Options for Carrying Out the Task to 3D Print Photo
Although it looks intimidating to newcomers, 3D modeling can create models from 2D images. And that could be the one way in which a person can more intuitively enter this field. There are several ways for converting JPG and PNG files to STL files for deriving a 3D model from an image.
But before we starting explaining the options, we would like to talk about what they do not do. Though 3D models can indeed be made from flat pictures, the methods described in this article, in particular, will not produce complete, detailed 3D models.
Instead, what the method intends to produce is flat 2D designs in a three dimensional, yet still more-or-less flat, physical form.
So if in case you’re wondering that you’ll immediately get a bust of the Mona Lisa using a picture of it… Well, friend, you won’t be able to do so. But that doesn’t mean either that the following options don’t have their uses!
Option 1: 3D Builder
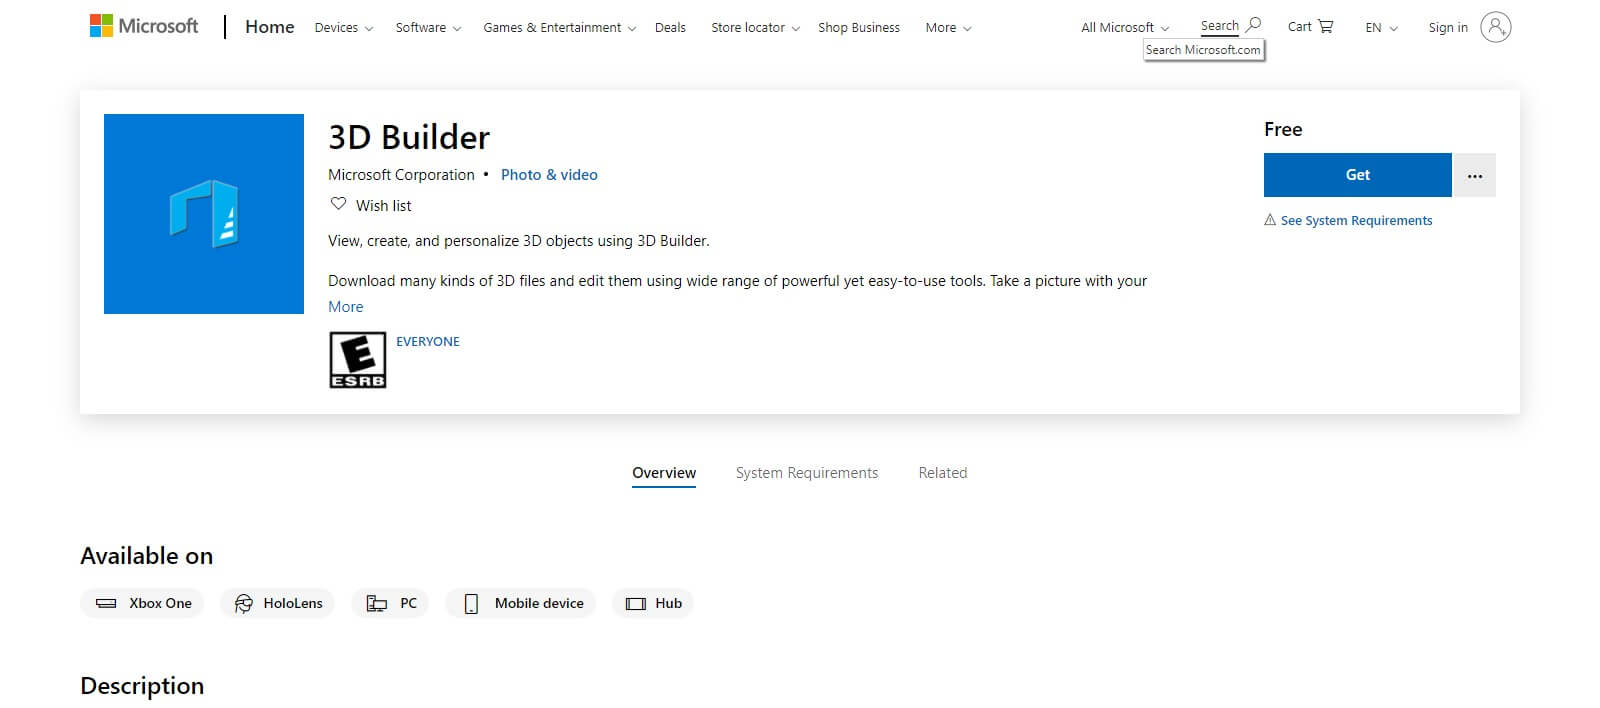
This option is preferred by the users probably because it’s the easiest to use. This application comes pre-installed on almost any up-to-date Windows computer so you do not have to download it from anywhere and care about its safety.
The application also has a feature that can convert an image into an STL or OBJ file very easily which is the first pre-requisite for any application that you plan to use. Also to note is that, this application will not work on Mac.
Finally, steps to the 3D print photo using this application:
- In case your laptop/computer isn’t up to date, you will have to take the pains to download this application from the Microsoft Store.
- After doing so, you will have to drag the image of your choice, onto the workspace or click “Add” in the “Insert” menu and choose the image.
- Step number 3 requires you to first adjust the “Levels” and the “Smooth” sliders. Until your image is crisp and clear, keep on doing so. The other option for you here is to change between the methods “Contour”, “Height Map”, “Edge”, and “Stamp” for getting different effects.
- When you’re happy and can see one of the previously imagined models, you can click the “Import Image” button. This would allow you to change the scale with the “Scale” tool present at the bottom of the workspace. While scaling, it’s a great idea to lock the proportions by clicking the lock in the same menu.
Option 2: Cura
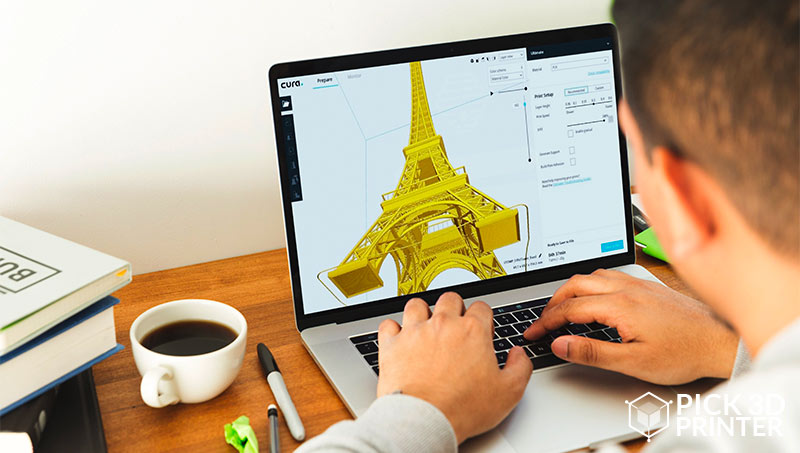
The option preferred by users who do not have a Windows computer is to use a built-in feature of Ultimaker’s Cura. Although arguable, the tool here is not as powerful as the one in the 3D builder, but it works perfectly fine and can even be used for making Lithophanes.
It is also easier to slice using Cura because you don’t need to export and import as much.
All you have to the 3D print photo using this application is:
- Download the Ultimaker Cura slicer from the Ultimaker website.
- Import the image of your choice into Cura by dragging it into the workspace.
- When you completed doing so, there will be a menu with different settings which allows you to change the height, width, thickness, smoothness, and more.
- Finally, you can export the STL or OBJ file of your image. This you can do by clicking “File”, then going “Export”, or you could slice it for 3D printing straightway.
Option 3: Lithophane Converter

This way of converting an image into a 3D printable file involves making the image into a lithophane.
For all those who do not know what a lithophane is, its a three-dimensional object that uses thickness differences for changing the amount of light passing through itself.
The variations inside it create the dark and light parts of an image that are seemingly “embedded” in the object. The image here, however, is only visible when there is light behind, and it can’t be made out of more than one color.
And there are many ways to make a lithophane, but arguably, the easiest one is to use the image to a lithophane converter. This application is a much stronger tool that, not only has more settings but also produces better results than the Cura method.
Steps to the 3D print photo using this application are:
- Clicking on the image menu, upload your image to the website.
- In the model menu, you will have to select the form of your lithophane.
- After clicking on it, go into “Settings.” And in the “Model settings” option, change the “Maximum Size” to the biggest size that you think you will scale the image to.
- Going into the “Image Settings” option in the “Settings” menu you can change many different settings, but the only required change is the first slider to “Positive image”.
- Go back into the “Model” menu and by clicking download the resultant. If you are going to 3D print this STL file, it’s recommended to print it vertically with 100% infill.
The fact that a picture is a 2D file means that you will only be able to play with two dimensions when you are using it to create a 3D model.
For playing here with the file, the tool that will help you to create a third axis for creating a new geometry from a selected component is an extruder.
It is this tool that will help you to give volume to your 2D model based on a specific algorithm. It’s a common tool that you can find on almost any software mentioned above.
How to Convert More Than One Picture Into A 3D Model?
For everyone out there, looking to form a 3D model based on 10 or 20 pictures there is are a special thing that’s needed which isn’t available on applications mentioned above.
To start with, you will have to mentally organize the pictures and sculpt your model based on the measure and details that you can see from the pictures.
To continue, this would take a lot of time for creating models like this. So, the only way if you wish to get an optimal result is to convert a lot of pictures for making a very precise digital design. Only then, you’ll be able to print an interesting model and ultimately get a good print quality.
To sum all of this up, you have 3 solutions to go from 2D to 3D if you wish to convert more than one picture i.e.
- You can try using the solutions described for one photo.
- You can start experimenting with 3D modeling software such as Zbrush or Sculptris.
- You can ask your friend who is also a 3D designer to help you model your 3D file.
Indeed, more perspectives into this would lead to the creation of a more detailed and accurate 3D model.
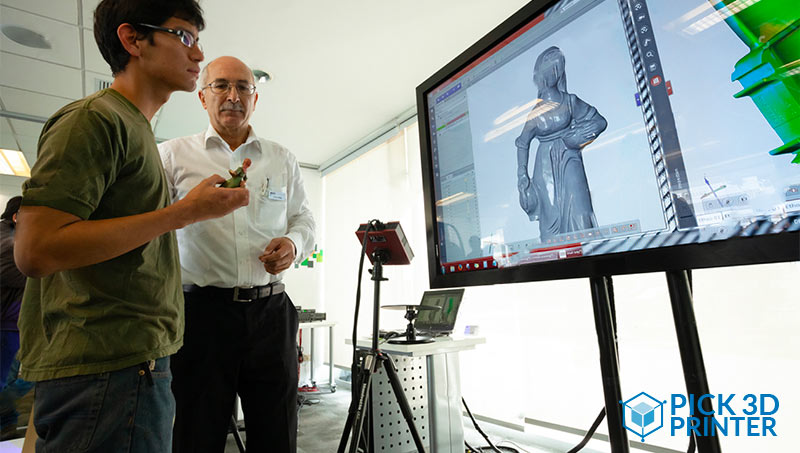
For creating 3D objects from 3D prints, you will have to create a detailed model for getting a valuable result. Here are some tips that you can use to make your picture one of the best that is present in terms of the 3D model. For ensuring this, the best way is to use photogrammetry.
Photogrammetry is a technique that implies a process of collecting various points in space from several photographs. First, you will have to click those numbers of photos of the object from every angle that you can.
Second, you will have to upload them into photogrammetry software and you can generate a file to 3D print it.
The Conclusion
The last step to complete the 3D printing of photos is to finish and optimize your 3D file in another software than the ones described above. We are saying this because it often happens that your 3D file can be non-printable and it’s very difficult to create a solid mesh based on a set of pictures.
So, some 3D software is offering efficient tools for creating proper files. You need to ensure your file is in such software. Only then, you’ll be able to work on the resolution and size of your file or create a high or low poly mesh.
After doing so, you’ll have to pick a format from the very many presents out there like, 3DS, OBJ, C4D, DAE, STL, and STL. The last part of the 3D print photo is to 3D print the file by uploading its 3D image on some online 3D printing service.
There are a lot of possibilities for 3D print models because there are various types of 3D printing materials that are available. You have to choose the 3D printing material and that will determine the additive process.


