Learning about AutoCAD is the goal of many individuals around the globe. And, it is always fun to experience new apps and tools that could make your work easier and simpler.
However, with lack of time and many other reasons, we often miss out on what entails ahead. Hence, we have brought a glimpse of the AutoCAD 3D tutorial who wishes to know about the nitty and gritty of application before barging into the comprehensive courses later.
AutoCAD training starts with basic knowhow. You must get to know the various tools available with the application and what features it flaunts.
This would provide better knowledge and understanding of what to expect from the software. You certainly can opt for AutoCAD classes, if you find this tutorial interesting.
Or, can you look for online courses too? What makes you feel comfortable, given your priorities, you can certainly pick that option.
But for now, let’s find out what it takes to create your first 3D object. And, would the lesson intrigues you to get deeper into the abundance capabilities that the AutoCAD app embodies.
Before you start going through the various steps of the AutoCAD 3D tutorial, you must first download the free trial version of the application. Because just reading the text may not do any good to you until you practice the process yourself.

AutoCAD 3D Tutorial – Basic Learning
Do you know that the AutoCAD app isn’t free to install and you would need to pay thousands for dollars for a yearly subscription?
Knowing the fee would help you set the expectation for the software. But you may not want to pay the entire fee without getting to know the app a little bit closer.
For the same reasons, we prefer installing the trial version and use the app for a month before you plan the next step.
So, you must download and install the trial version before paying any fee. This would provide you access to the full features of AutoCAD. Hence, letting you explore every bits and piece of this wonderful application.
How to Work Out the Workspace?
The first thing you would require before being able to create the 3D designs is to explore the workspace. Right after you open the AutoCAD app, you would be asked to click on various options including ‘Start Drawing’.
You must select this one. This would take you to a new DrawSpace. By default, you may not find the option for the Workspace.
Hence, you must optimize the quick action toolbar for necessary modifications. So, add the workspace. After this, change the Drafting and Annotation toolbar to 3D Modeling. Doing this would bring you all the tools you need to start the 3D sketches.
Before using the tools, you must ensure that the metric system is a complaint to your usual routine. If you think you need to make changes to the units, you must do it before starting the drawing process.
To do so, you must click on the big ‘A’ on the left corner. This would pop up the menu. From this menu, hover the mouse on Drawing Utilities and then select Units.
From here, you will get the option to change the measurement scale to your desired unit.
There are other variants of the workspace that you must know about.
Command Bar: This is available at the bottom of the screen. This bar helps in activating the command directly without the need for searching. You just need to type the command and press enter. This also suggests the tips for executing the command properly and without any error.
AutoCAD Orientation: Can you find out the compass at the right corner of your DrawSpace? Hover your mouse over it to get the house icon. After clicking on this house, you will get the 3D coordinates located in the middle of the workspace. It shows all three axes. When entering the isometric view, the compass changes to a cube. It shows the various faces, corners as well as the edges. You can click on the desired view from here. It also lets you orbit around the DrawSpace. Just explore the options and find out what all you can do here.
Moving on to Sketches
Before moving to 3D modeling, you must be aware of 2D sketches. This is how you can work with 3D designs. And to do so, you must know how to use a snapping option. Press the F9 button to activate the grid snap. Later press F3 to work around the corners, points, lines, and many other areas of the sketch. You can make changes to the snapping depending on the sketches you wish to create.
Start with First Sketch: Click on the top View of the compass. Press F9 to disable the grid snap you just activated. Use the command bar to type ‘line’ and click on Enter. This would let you specify the first point in the workspace. If you can, enter the coordinates or use the random point. Carry the mouse to the positive end of the X-Axis. Specify the line length as desired. When you have completed the sketch, enter escape to deactivate the line command.
Drawing Tools: You can make use of various drawing tools to edit and prepare your sketches for perfection. For instance, you can use a spline command for creating a continuous curved shape with connecting points. You have a trim command for erasing unnecessary lines and sketches. You can even mirror sketches to complete the drawing without needing to work extra for the other similar half of the sketch.
To better your sketching abilities, you must run through the different tools available to make your goals easier.
Moving to 3D Modeling
You can only draw on the XY plane. That does seem confusing. How can we prepare a 3D model without being able to draw along the three axes? Do not worry, it’s possible.
You just need to change the redefine the coordinate system to make 3D models. This helps in plotting or changing the direction of your sketches to achieve a 3D model.
For instance, you can draw a square or circle in the top view. Later, you just need to switch to the front view and activate the UCS command.
This command helps you change the coordinates. Use V to set the current viewing workspace as the new coordinates for a referral. Draw the square or circle and check the same by rotating the DrawSpace. To do so, use the shift with the mouse wheel. You would be able to see your 3D object.
You can also create basic shapes using the AutoCAD software. For instance, draw balls, cubes, spheres, Cylinders, and many other standard shapes.
Just to give you an idea, let’s understand how you can create a cube using the AutoCAD application. At first, you need to ensure that the coordinate system is set to World.
If not, use the UCS command to do so and use ‘W’ for the world. Get back to an isometric view. Here, you must type in Cube in the command bar.
Start sketching the base of the cube with the desired radius. When it’s done, click the mouse. Later, move the mouse in the upward direction and set the height of the cube. Once done, press enters to confirm.
There are various other tools and features for 3D Modeling. Here are a few of the most common ones for the starters.
Extrude: As the name suggests, the feature is used for extruding the images directly.
Fillet: We do wish sometimes to smoothen the corners of our 3D design. With AutoCAD, the entire process is just a breeze. You can easily chamfer the corners without needing to put huge efforts using the Fillet feature. In order to do that, you can reach out to the solid tab and look for Fillet Edge. Later, just select the top edges and use the Radius command to set the fillet size and smoothness. Once you find the possible match for your fillet value after previewing a few options, click enter twice to confirm.
To further enhance the looks, turn around your model and go for the chamfer feature. This is available under the Fillet feature. Use the loop command to select the edges of the model.
Make sure to click next until the complete rim is selected. And, accept. You can now enter the distance of the chamfer length. After pressing enter, type the second length and confirm the entire value by pressing enter twice.
Union Command: You can merge and combine two different solid objects into one using the Union command.
There are many other tools such as subtract, intersect, sweep, loft, etc. Learning about each of these tools and features would help you get a clear idea of how AutoCAD works and what all is possible with the use of this app.
You also have the option of creating technical drawings with AutoCAD. You can make technical drawings for the models you created using AutoCAD using the template sheets. And, it’s easy to find one.
There are free templates available on the website of AutoCAD. You just have to browse and pick one. After you download the metric, you can use it with your AutoCAD software for creating the technical drawing.
You can also accomplish a lot of other important tasks using this amazing application. Once you have a complete understanding of the AutoCAD software, you will be the right position to assess the capabilities of this app.
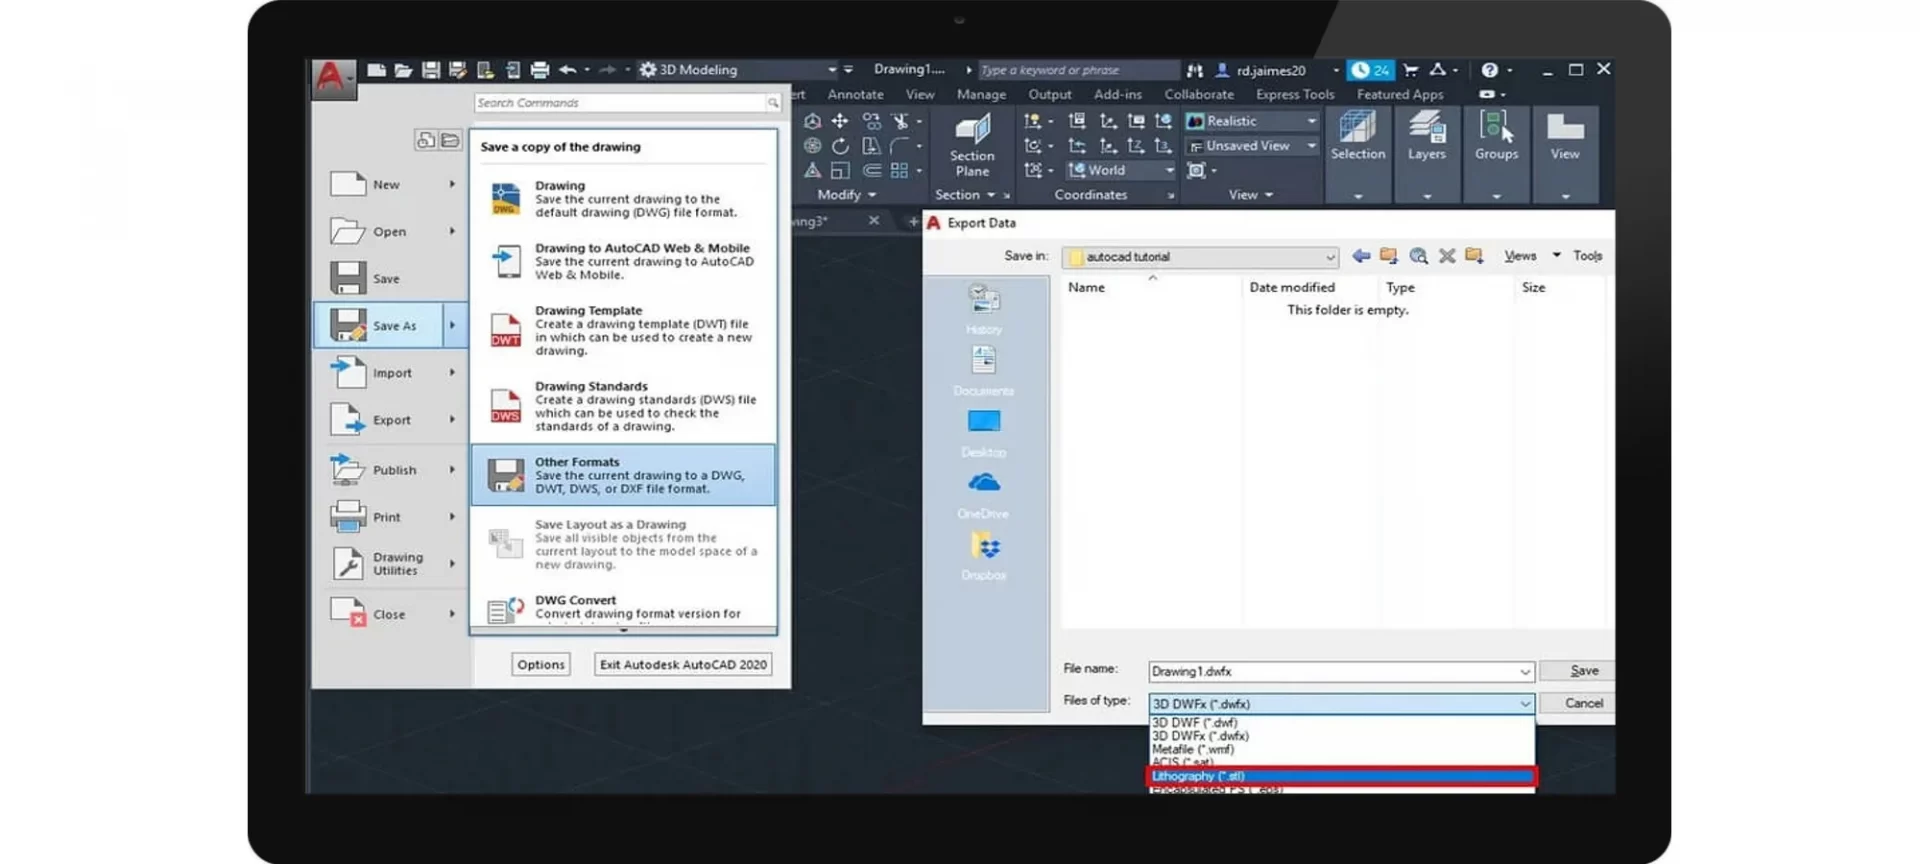
Import and Export STL
There is one thing you must know about AutoCAD. It cannot import STL or other mesh files. However, you do have an option to import the 3D design and make changes to it using AutoCAD.
As you would know, AutoCAD accepts .dxf (an Autodesk format for STL files). So, to import the.STL file, you must convert the file into .dxf extension. Hence, you would need to use free converters such as Inventor. The same can be done using FreeCAD.
By uploading the .STL files to these apps, you can convert the 3D files into. dxf extension. As easy as it sounds. You may have to make a little extra effort at this front.
But trust this, working with AutoCAD pays off for all your dedication. And, it’s easy to manage the conversion. Once you have the desired file extension, you can import the same to the AutoCAD DrawSpace and change the visualization later.
Do not worry, there are no such extra steps for exporting into .STL format. AutoCAD can do that directly. You just need to click on the AutoCAD logo and select export. Go to other file formats and choose .stl file type from the file browser. And, the job is done.
The Conclusion
AutoCAD is a very extensive tool. You cannot just expertise all the features of the app in a day. It takes time and it’s worth it. With various features available with the app, you can give dimensions to your creativity.
The nuances of tools and a plethora of options are all lying on your fingertip if you learn how to utilize AutoCAD for its best results.
That is why learning about AutoCAD is such a great achievement and many individuals spend months to master the app. It opens new opportunities for those wanting to get into 2D or 3D designing. From jobs to a personal passion, one can explore the many choices the app provides to you.
With AutoCAD, one can achieve huge success. The app is very popular and in high demand. A lot of businesses seek experts with knowledge of AutoCAD. And, the demand is definitely be growing in the future, looking at the rate with which 3D printing is surging.
Hence, the AutoCAD 3D tutorial could become your first step in order to know what the field entails ahead of it. You can find out the basic features and tools reading this article to know what you must expect. And, take the learning forward with experimenting with various designs. You can even take up paid courses to master the app.


