Did you ever try and fail at finding the optimum layer height 3D printing for your 3D parts? We all must do go through that problem once in a while.
This is because the setting isn’t the same for all your designs and models. You may have to tweak the height of layers depending on a lot of parameters.
And, failing to do so, could put you through stress and frustration when not able to achieve the desired results. Almost every 3D maker can relate to the problem.
This being one of the most common errors among the users of 3D printers, one must be willing to spend time and effort to master it.
Hence, you must take care of every minute detail when finalizing the layer height of your prints. The question is: Why does the layer height 3D in printing matter so much?
Well! If you do not know, there is a lot that one can better when having a perfect layer height for the printing parts. From surface finish to avoid the hassle of post-processing, users can optimize the parts for the best output.
And, how can we forget the print speed that, if not solely, but majorly depends on the layer height of the 3D Prints?
So, how about learning about all these facts in detail. The information could really help you find out the best setting for your parts in terms of the height of the different layers. After all, at the end of the day, the results matter.
What is Layer Height in 3D Printing?
Before we go ahead and jump into the tricks for perfecting the layer height 3D printing, let’s just refresh some basic memories. It is important to understand what is the layer height.
Most of us can make out with the name itself. Layer height is the measurement of each layer of the 3D part created using a 3D printer. Either it’s the FDM or the SLS or the SLA 3D printer, the layer height determines the height of the layers present in the 3D Models.
To adjust the layer height, you can check the slicer settings. To measure the height of the layers, the most common unit is micron. And, one micron makes up for 0.001mm.
When selecting the correct layer height, users can considerably fasten their print speed, perfect the resolution and smoothness of the end parts.
Not just that, layer height could help you decide on the printer that you are planning to buy. The 3D printers offer varying layer height ranges for the 3D parts.
For instance, the standard range of layer height present with most of the 3D printers lies between 50 microns to 100 microns.
The budget printers are usually not very accurate and do not offer a very precise layer height in the lower range. These often start from 100 microns of layer height. So, you must consider this factor when getting the machine for your specific use.
If your application demands a highly smooth surface finish, it would be difficult to suffice the same through a cheap 3D printer that does not offer considerate layer height range.
One can even look for SLA 3D printers and choose the same over FDM machines if layer height means high for their needs. The laser-based operation present in SLA 3D printers offers even thinner layer height, making the parts detailed and prints highly precise.
How Does Layer Height Matters?
Is there a better way to stress on this subject any further, then we would be happy to use that! Layer height is a very crucial parameter in changing the overall 3D printing result and affecting the performance of the machine as well.
Hence, its always best to find out solutions for making your layer height closest to the required unit. And, the reasons are pretty obvious.
Here are the things that would directly depend on the layer height settings:
Print Speed
The layer height is directly proportional to the print speed. In other words, if you increase the layer height, the print speed surges, and the vice versa is also true.
When using a thicker layer height, the 3D printer would use fewer layers to finish the parts with the desired total height. In short, with a lesser number of layers (with increased layer height), one can increase the print speed to achieve the same measurements for the parts.
However, before you decide to increase the layer height, you must understand the implications of the same. The larger layer height results in lower resolution.
Hence, the hack to increase the print speed does not work in every scenario. To be precise, increasing layer height works for larger parts where the difference in layer height won’t matter much. Or, the surface is later smoothened through post-processing methods.
For smaller parts though, you must not go for a very large layer height. Or else, you may ruin the entire resolution. Also, the setting would highly depend on the 3D printer you are working with. Hence, you must test a few settings to find the one that suits your needs the best.
Print Resolution
Not many people know about the fact that the 3D printers can achieve a higher resolution to their vertical axes than the horizontal ones.
Usually, the lead screws take longer when moving around to process the layer, hence, resulting in more accurate results. However, this is not the case with timing belts used for the vertical axis.
Hence, when lowering the print height, one can process better resolution in their printed parts. The change does affect the print speed. But when you all care about the print resolution, this may not put you through a situation where decision making seems tough.
Surface Finish
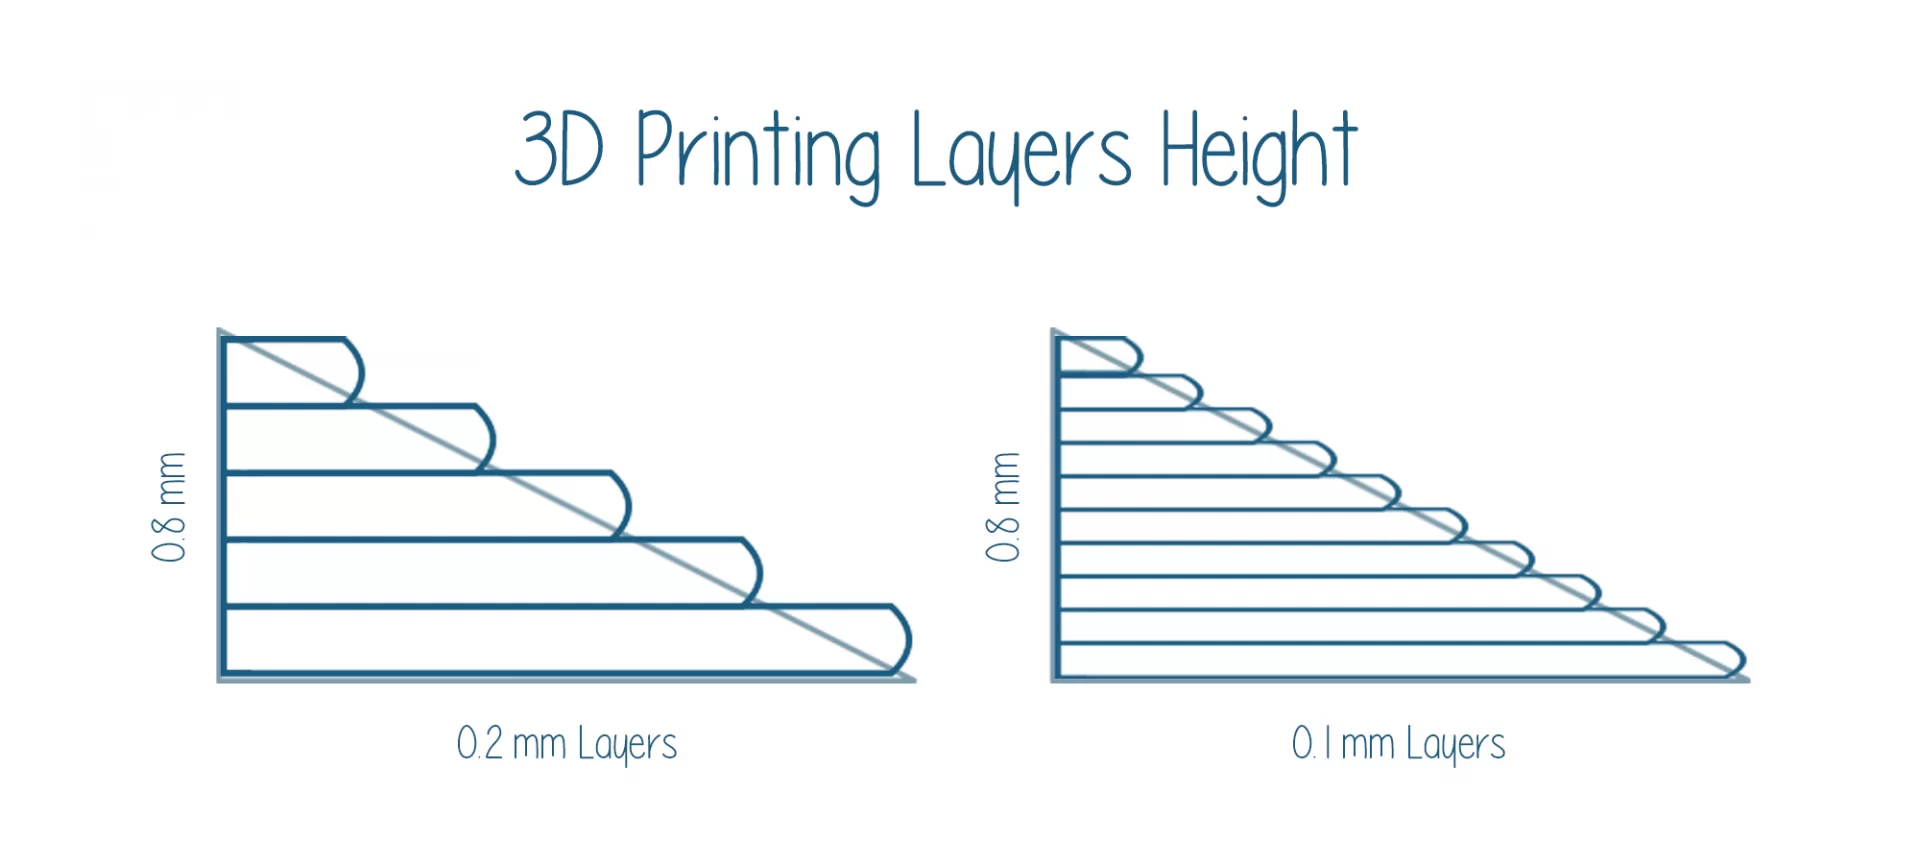
One more factor that makes layer height such a huge contributor to the overall result is the surface finish. By reducing the layer height, one can easily create a smoother finish with less visible layers.
On the other hand, when using a higher layer height, the surface becomes rough and one must go through various post-processing methods to null the effects.
Once again, when printing with longer parts, you must decide the layer height accordingly. In case you keep it too low, you may end up printing for days. This isn’t a sustainable option as well. And, not at all cost-effective.
How to Choose the Right Layer Height 3D Printing?
Now that you have already understood the various factors and parameters that depend on the layer height of the 3D parts, its time to move a step ahead.
We must understand the various scenarios where lower layer height becomes evident and when it’s better to stay with a higher layer height setting.
The Geometry and Design of Your 3D Parts
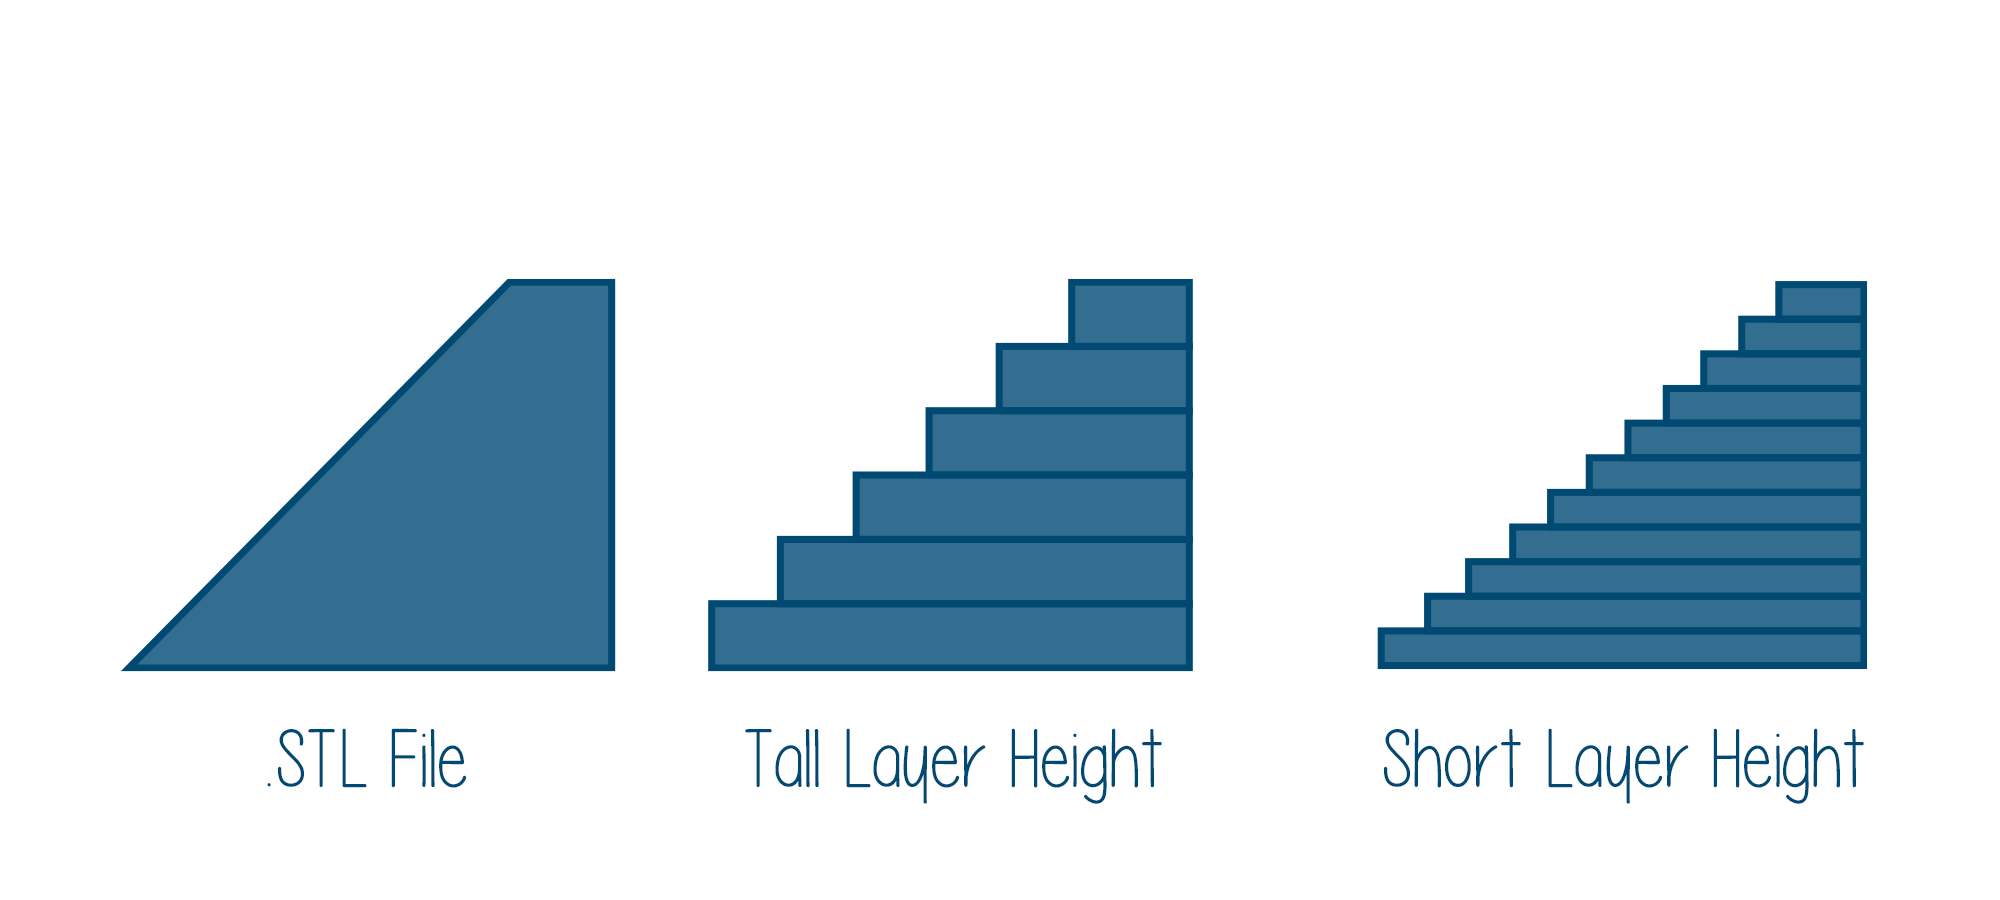
When setting the layer height, you must check the part geometry to set the layer height. If your design contains curves and angles, you may not like your parts to come up with a staircase like edges. To avoid the same, keeping the minimum layer height is preferable.
On the other hand, when you are working with designs that have vertical alignments, you can speed up your print process by increasing the layer height.
Let’s understand the same by taking an example. If you wish to create a hole designed alongside the horizontal plane, your printer will have to create multiple layers with a hole in it.
Then, it will connect those layers one over another. However, when using a larger layer height, you will end up with staircase edges. This is also known as the stepping effect.
And, when printing surfaces with higher curvature, the problem is highly susceptible. You do not wish to go through this trouble, right?
Hence, when printing such geometry, you must consider a lower layer height 3D printing method.
Choosing Between Appearance and Functionality
As mentioned before, the change in layer height calls for changes in the resolution and surface finish of the printed parts.
Hence, when working for a project where visual appearance is the key, keeping a minimum layer height will play the trick. This would get you the smoother finish and better looking 3D models.
However, this is not true for the parts that need high mechanical strength. If your application demands functional prototypes or the models that may go through a certain amount of considerate physical stress, you must keep the layer height a bit higher.
For instance, if you are working with an FDM 3D printer, using a 300 μm layer height will offer 20 percent higher mechanical strength than the parts printed with a layer height of 100 μm.
Is Post Processing the Last Step?
If you are printing with a support structure, you must go through the post-processing steps. In such a case, you already are going to carry sanding and smoothening of the surface.
So, why to worry about layer height. You can even keep the higher layer height which anyway would be further processed into a smoother surface.
There are a number of post-processing methods available such as using sandpaper, acetone, and others. And, if you plan to paint the part, it’s even better.
How to Calculate the Layer Height for Your Specific Printer?
As stated, the layer height will depend on the 3D printer you own. When deciding the layer height for your prints, you must consider the range that won’t put you into any other trouble later.
For instance, if you choose a layer height that is too low, you may end up pushing the plastic back into the nozzle and the extruder may find it impossible to extrude it back for preparing the layers of the 3D parts.
This can even get worse. The plastic, inside the hotend may react and change their state, making it even scarier for you and your 3D printer. You can even ruin the filament in such a case.
Taking the next scenario, when you set the layer height too high, your layers may not stick together to create a strong bond between them. Hence, providing a poor internal strength and unsatisfactory finish.
So, how to calculate your layer height that is safe to use? To do so, you must consider the size of the nozzle.
For minimum layer height, you must check the diameter of the nozzle and divide it by four. In other words, you can use a minimum layer height which is quarter the unit of your nozzle diameter.
On the contrary, when calculating the maximum layer height, you must divide the nozzle diameter by two. Yes, it’s half of your nozzle diameter.
But this won’t end here. You must draw a calibration pattern to further test your settings and find the layer height that provides you the best results, lying in between the range you just calculated.
There are few other factors too that would decide the optimum layer height for your 3D printer. These are the micro-stepping that you would find in the firmware settings, motors steps per turn available with electronic settings and Z-axis threaded rod steps.
Do not forget to keep your layer height an integer value because the firmware isn’t designed to accept float values. In case you miss this fact, your end part may be bigger or smaller in height than the expected value.
The Conclusion
3D printing is not as easy as it seems. It’s not only about the printer adding layers, one over another, but a lot of effort that users put to find the right settings before the machine takes over.
Hence, it is important to go through the basics of layer height which could have dramatic effects on your resulted prints.
Layer height 3D printing calculation may not feel a straight forward measurement. However, with time, as you learn to work with your 3D printer, you would know what it takes to decide the optimum value for your layer height.
Check-in with your preferences and finalize the layer height that goes perfectly with your specific design. Hence, achieving perfect models every time.


