Many manufacturing companies use 3D printing technology which is a form of additive manufacturing, for prototyping or turning out production parts.
This process is a computer-based method that lays down layer after layer of a product until it is complete on a whole. This process uses different materials like metal or plastics and starts with a 3D digital model of the final object.
Amongst the very many steps that are required for 3D printing, you need to pay special attention to avoid 3D printing fails.
In this article, we are going to discuss the top 8 pieces of advice that are needed to avoid the most common 3D printing failure to happen. These failures are very important to know if you are a beginner experimenting in the field of 3D printing.
These tips would also help you to 3D print quality parts and functional prototypes. All you have to ensure is to carefully read this article and the parts of the 3D printer or the setting to which it applies. And you will be producing a part that will stand out in the 3D printing market.
Top 8 Advices to Help Avoid 3D Printing Fails
3D printing is quite tricky for all those who have just started using it. The reason for this can be anything, the inclusion of more than one part which makes up a 3D printer, the setting that is to be done in the 3D printing software, or the post-processing or maintaining part.
Everything can be found confusing at first sight and during that time, if you have a guideline to direct you with what to do, when to do and what to avoid, it can be very much of help. Below given are eight such advice.
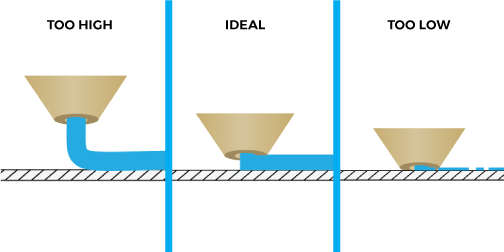
Adjusting the bed and setting the correct nozzle height
 Credit: matterhackers.com
The easiest failure to avoid while 3D printing and improve the quality of a part or functional prototype that you are manufacturing is to make sure that the print bed of your 3D printer is leveled. This you can also do by checking the nozzle distance properly.
Although nowadays almost every printer has the option that recommends the correct distance that is needed between bed and nozzle, you must ensure it is such.
Something that can help while doing this setting is a feeler gauge or a simple piece of paper. What you need to do is set the nozzle properly and position it. While doing this you should observe that the gauge or paper should slide under the nozzle, if that is not the case, you should avoid doing it.
Most people do not notice this happening and that is their biggest mistake. Not following this leads to 3D printing fails of many parts and functional prototypes. Understand that there is no force needed to get the paper to go underneath the nozzle.
Again if you are requiring force, there is something which you are doing wrongly. And this process should be repeated at least three times and only then you can make sure that it’s working well.
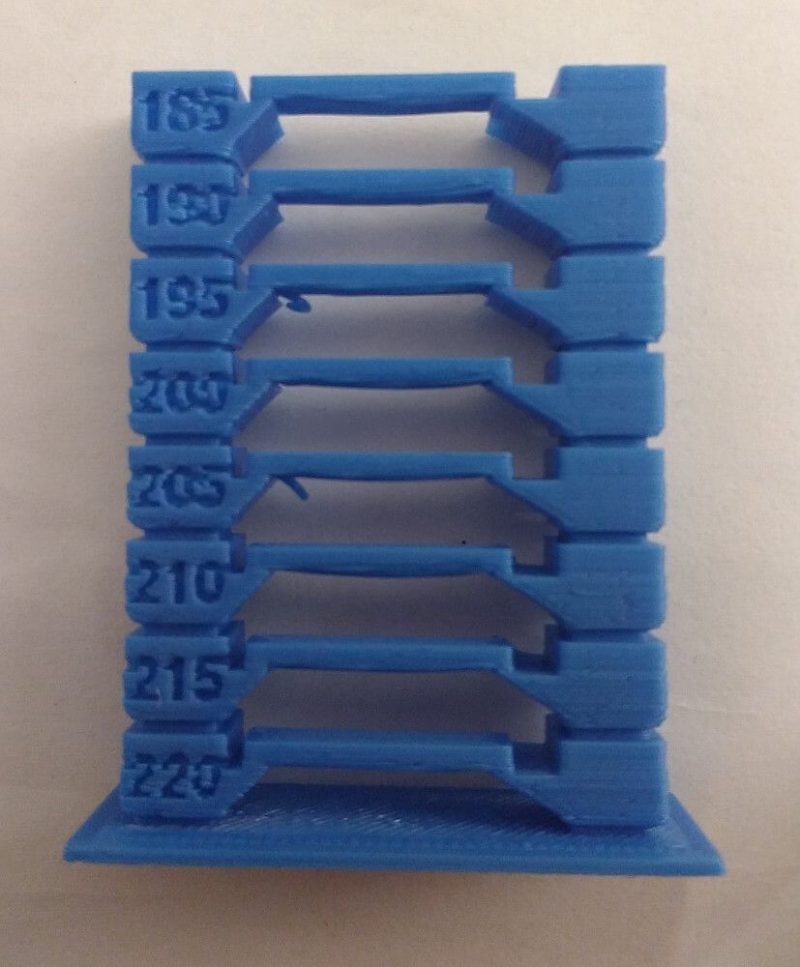
Checking the nozzle’s temperature
 Credit: Pinterest.com
This factor is something that straightway affects the appearance of the 3D printed part or a functional prototype. Whenever the nozzle is too hot, there are possibilities that it could leave strings of filament between separate parts.
So when you are manufacturing parts or functional prototypes which have taller pieces, if you have high temperatures of nozzle they would easily melt the earlier layers and result in malformation.
In 3D printing of parts and functional prototypes, the first layer is something that has immense importance, so if you do not take care of it, chances are high that the complete part’s design would be a failure. Here are some tips to 3D print the perfect first layer.
Another thing to make sure to not let 3D printing fails is when building taller prints, you have to include a one-centimeter cube built on i.e. on the opposite side of the build plate.
Doing this removes the hot nozzle from the print and allows time for cooling, arguably this would increase the built time but then it would also ensure good quality prints. If in your part you notice there are strings of filament between structures, you are advised to use a wall or ooze shield structure, and this is a common feature in almost all the slicer programs.
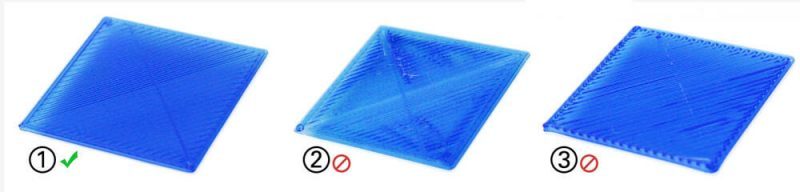
Different effects can be created by using different print build plates
 Credit: Ultimaker.forum.com
Often while 3D printing parts and functional prototypes you want textures over it. And you are mostly thinking that using one type of build plate is going to let you create different textures over it. This is a wrong belief. Using bed materials such as PEI, glass, or Kapton tape leaves a smooth surface finish on the 3D printed object.
So, whenever you want to ensure smooth surfaces, you are advised to use these materials. Apart from these materials, the painter’s tape or polycarbonate sheets leave a matte finish. So, whenever you need matte finish on the 3D printed part or prototype you may use these materials.
One point to remember here is that if you’ll be using glue or spray on the surface, use it just enough to cover the complete build plate. Also to be noted is that using too much glue or paint deforms the object and creates dents. So, use it in a particular measured way.
Otherwise, it would be difficult to remove the object from the plate, and if you try forcing it off, it won’t work, instead, it can damage the object and break the plate of the 3D printer.
All you have to do here is to play around and experiment which will give you a determined best way to create a surface finish that compliments the object.
Printer Adjustment and maintenance needs special attention
This is something that cannot be applied in general because everyone would have a different 3D printer and so, a different set of features. But some rules still exist that can lead to an improvement in print quality. Just to give you an example, the printer named Anet A6 and A8 which are inexpensive printers, benefit from upgrading.
What happens is when you upgrade that printers they tend to give you the same features that a costlier printer gives to you. So, on one side you have a printer that costs some hundred dollars and on the other side, you have a printer that costs hundreds of dollars more than those hundred dollars. But both of them work in the same manner.
Optimizing your printer involves many smalls steps. You can start with cleaning and lubricating the rails that you are using, check for manufacturer’s recommendations on it.
If your 3D printer has two stepper motors for the Z-axis, ensures that the gantry is at the same height on each side of those two motors. Check to see whether or not there is any sort of wobbling anywhere in the frame, if there is any, make sure you contact the manufacturer.
Look at the bolts, are they tight or loose, and ensure that all of them are at 90-degree angles and square. Keep a check on the manufacturer’s website for updated firmware regularly.
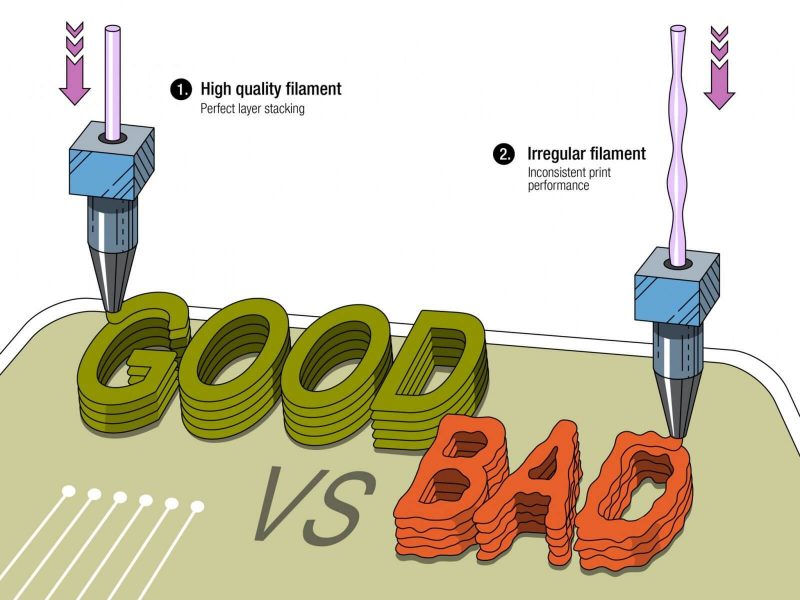
Take utmost care of the filament
 Credit: bootsindustries.com
The filament is the raw material that you are using for the 3D printing part and functional prototype. If the filament is not handled nicely, there are high chances that your 3D printing fails. Not only the 3D printing, but you may also end up damaging the 3D printer.
Filaments are of many different types. Some love water, so they keep on absorbing it from the surrounding air. For example, consider exposed filaments such as ABS, nylon, and flexible materials, they are known to drink moisture in, resulting in all sorts of problems.
Then there is the damp filament which expands during extrusion as the water inside it turns to steam and hence results in bubbling out of the plastic. Pops or crackles coming out of the filament start to come out of the nozzle, and when observed closely, something that looks like smoke may be present inside.
The biggest problem, here is that the print will look rough when finished. So if you need a smooth finish, you wouldn’t be able to have that and end up with a rough finish.
This should be specially taken care of when you are 3D printing medical equipment. Filaments come in spools, so if you are willing to do the business using 3D printing technology you will have to store stock of spools. Storing of this requires having plastic bins with desiccant between uses.
In some special cases, it is also possible to dry the spool of filament in the oven over a few hours at very low temperatures. You can also build your heated bin that feeds into your 3D printer are a fun and easy project! If this is not done, there are chances that the 3D printer fails to deliver quality print required.
Find a Slicer of your Choice and Learn Using It
 Credit: 3daddict.com
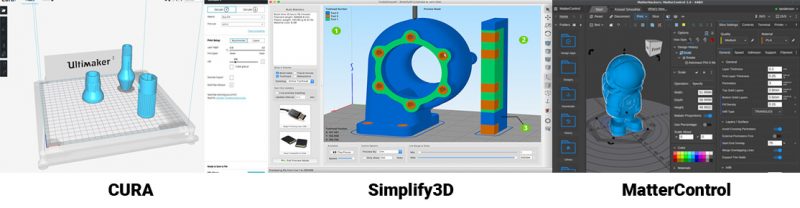
Slicing software is the tool that will allow you to do almost all the settings that you wish to do with the 3D print of part or a functional prototype. So, it is necessary for you, if you do not want your 3D printing fails, you have to know the tool and the things that it allows you to do.
Understand this, to speak about 3D printing quality is almost impossible without mentioning slicers. A slicer is a tool that converts a 3D model into instructions which are technically known as (G-codes).
These codes drive the printer. And hence, there are many options available that will let you do the same, you need to find out the one that you are compatible with.
Most of these slicers are free. While using a slicer if there is a print that isn’t as neat as you wanted it to be, then see if there is a fine or hyper quality setting available in the slicer. Clicking upon it would slow the print down a bit, but the results may be worth the wait.
Don’t keep on jumping from one slicer to the other, because chances are that you may find the other too bumpy. Instead, let a few prints come out bumpy. Research the quality problem, and then try changing one setting at a time. Print again the same parts and see if it helps.
Remember that there are many settings so changing anyone of them can make the print bad or good. Learn what settings to do for helping your printer improve quality, regardless of the slicer chosen.
Using support overhangs
 Credit: thefabricator.com
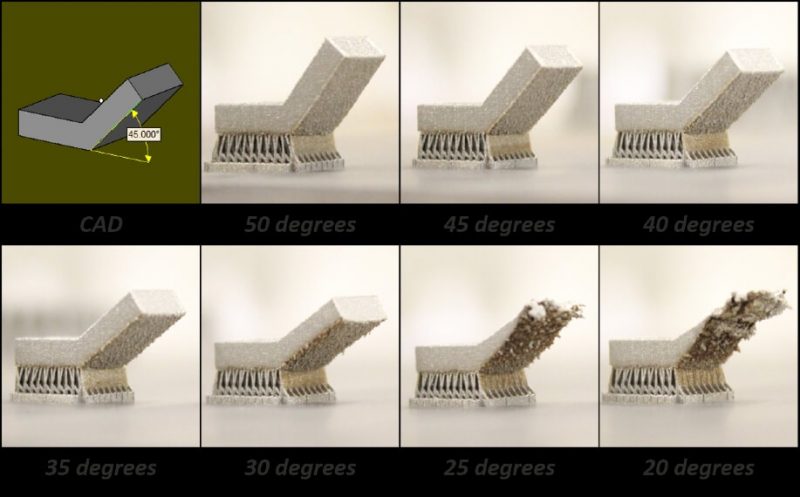
In FDM 3D printing technology, the melted filament is pushed out and it is this pushing out which bonds the layer which is present below it. And while printing the last layer, you have nothing to bond with, below it, this is when you need to bridge the overhang.
If the bridge is too long, there will be sagging, or your 3D printing fails. When you are using support, a bit of post-processing helps to hide the attachment places.
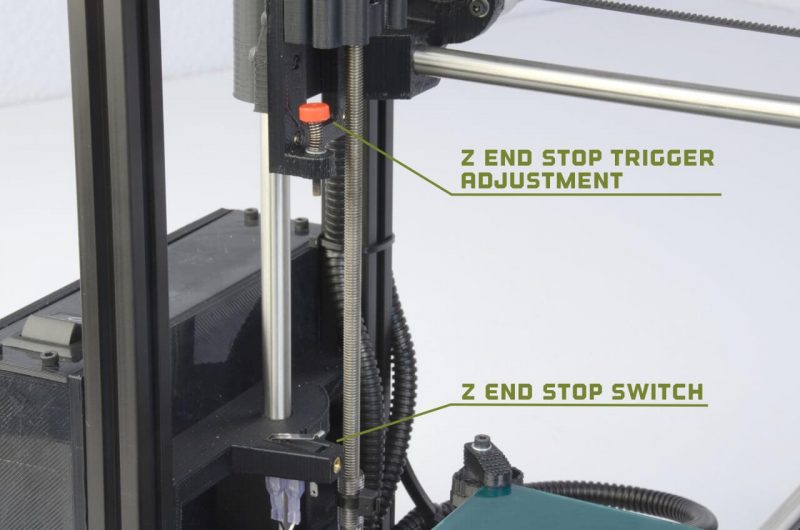
Z-Axis movement should be adjusted
 Credit: lulzbot.com
When the first layer sticks, there’s a line present where the nozzle drags across the surface or perimeter of the print. This happens because of the lack of filament retraction. In such cases, you have to simply adjust this setting to improve the print.
The Conclusion
If you have just started to 3D print, be patient, and don’t expect to not see any 3D printing fails perfect prints. Remember to treat every filament change as a new filament, that too when the roll sits in an open environment.
And whenever you encounter quality problems, look at your setup and change only the setting that needs to be changed, rather than changing too many things at a single time.
Note the changes you have made and then see how the new print differs from the previous one. Remember, every print will allow you to learn something and improve the quality of the next!


