Have you experienced creating models with a 3D printer? If not, you may not understand the frustration that one has to go through when the prints aren’t produced as desired.
Those who believe that 3D printing is all about some kind of standard process haven’t actually understood the technology in the first place.
3D printing cannot be learned without actually getting your hands completely immersed in its working. The technology brings with itself different limitations and problems with unique reasons.
It is not possible to realize the best print results all the time. Hence, users must recognize the problem, investigate different reasons and finally, come up with the right solution.
The same stands true when trying to resolve the 3D printing pillowing problem in the 3D printed models.
The problem is very frustrating, for beginners as well as for experienced users. This is because one realizes the problem has already occurred once the print is more than halfway completed. It leads to failed prints and wastage of filament and effort of users.
In the case of pillowing, users cannot cancel the prints any sooner as the problem only appears while the print is almost completed. Hence, if not sorted, one can end up with multiple failed prints and at the same time wasted resources.
What Exactly is 3D Printing Pillowing?
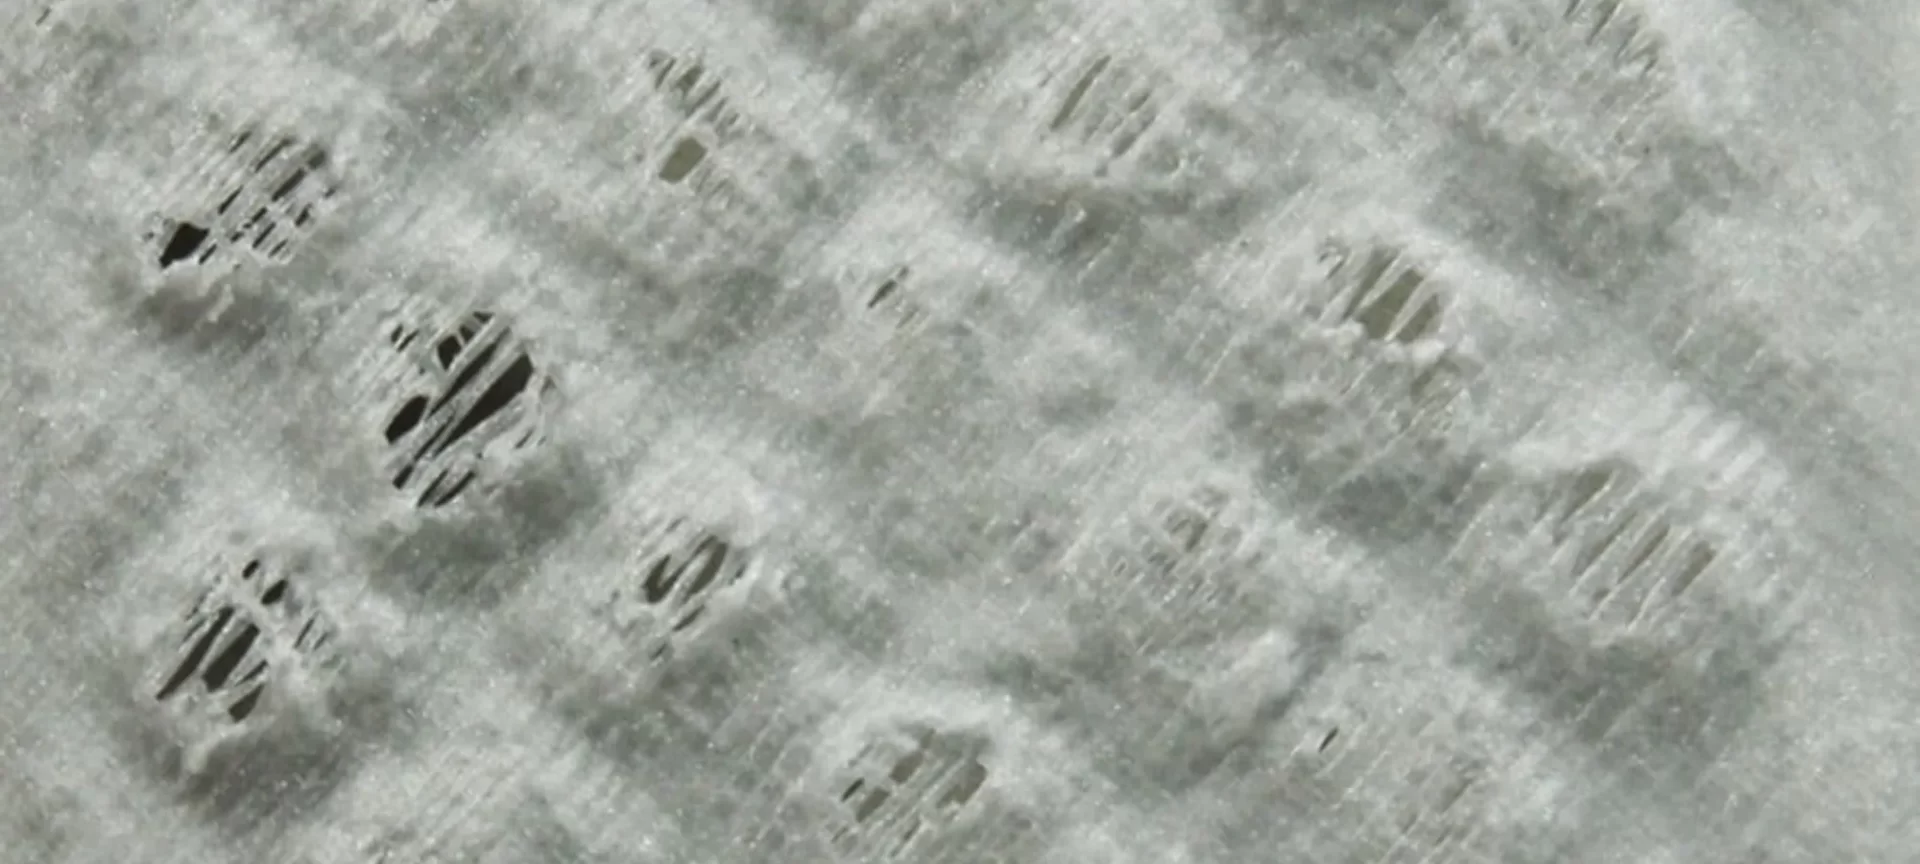
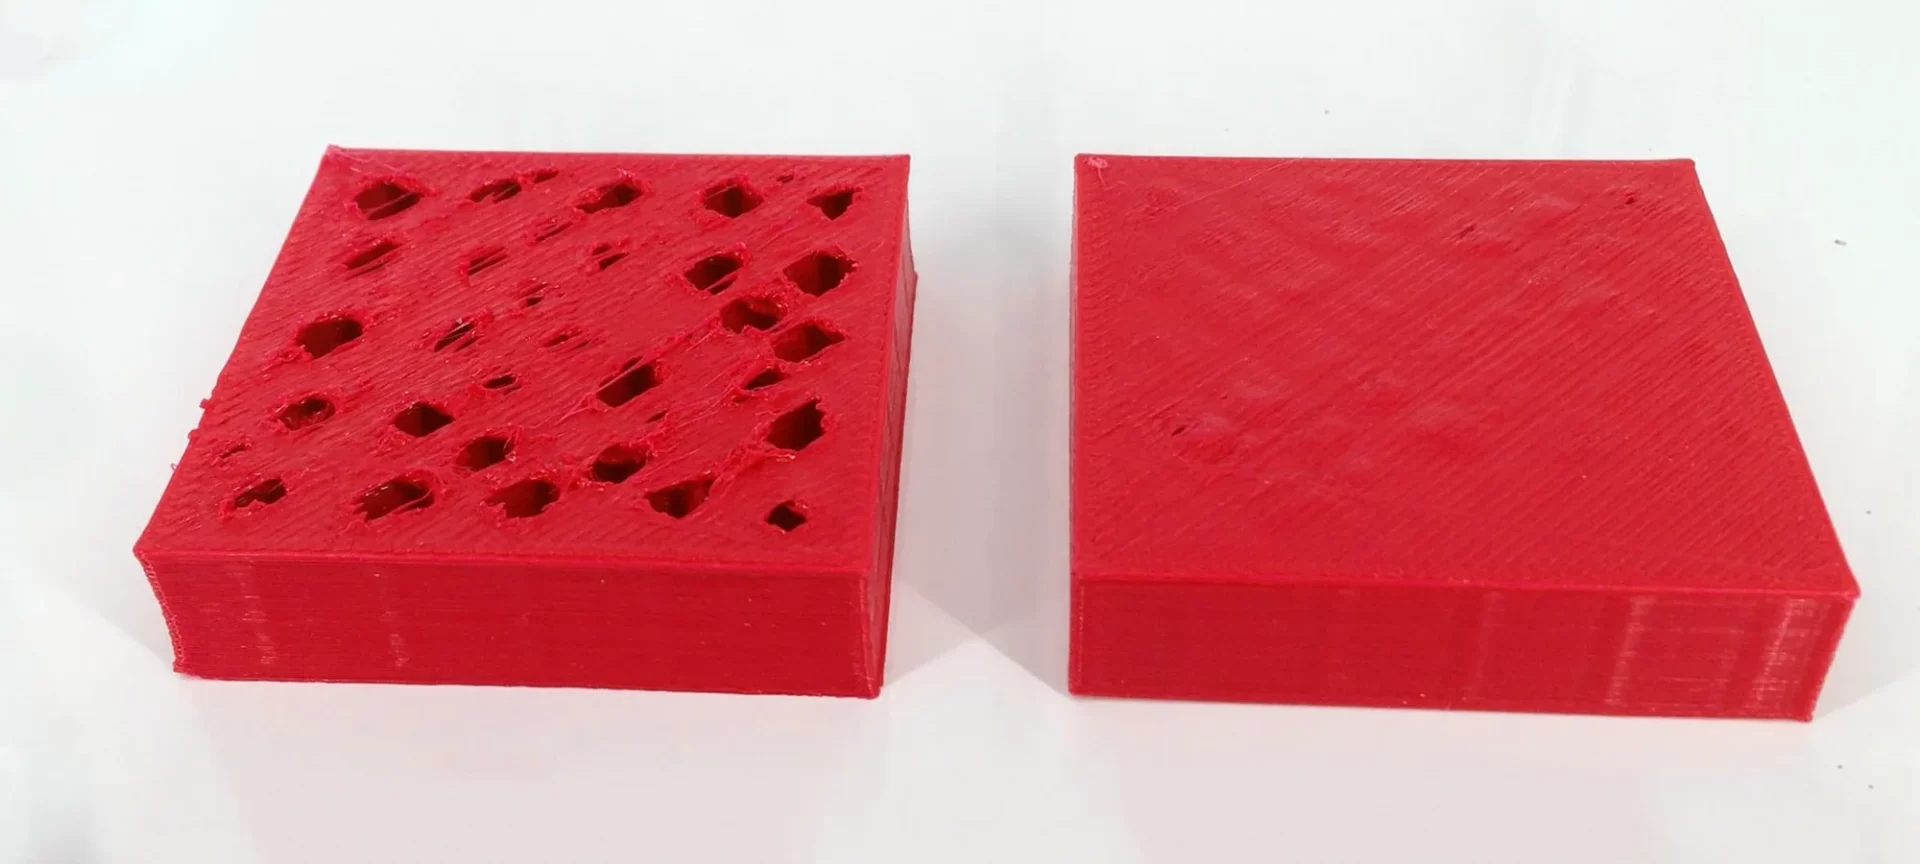
Pillowing is related to the top layer problems. Because of 3D printing pillowing, the top surface of the model is hampered uneven bumps.
The problem could also lead to a rough top surface and even the occurrence of small gaps in the top layer. This one remains to be the most common issue within the 3D printing community.
This problem can happen to any model, regardless of the filament or FDM 3D printer used. However, it is more susceptible to a few particular types of materials, explained later in the article.
No one likes ugly 3D prints. Hence, pillowing is very frustrating to encounter. Moreover, the fact that it happens at the end of the prints, make it even more irritating.
Hence, taking useful precautions before every print, either you faced it earlier or not, is a must. Or else, you may end up ruining your prints more than just a few couple of times.
What Causes Pillowing in 3D Printing?
If you have heard about warping, you would know what causes it. Pillowing is somewhat similar to warping and a similar phenomenon is responsible for pillowing.
The only difference is that the problem takes place on the top layer, unlike warping that happens in the bottom layer. As it is with warping, the problem is due to the improper cooling of the top layers.
When the cooling isn’t proper, the layers start to warp around the infill structure under the layers and results in a pillow-shaped pattern.
In other words, pillowing is caused by the top layer warping that takes place around the infill structure present underneath. These further pave way for the pillowing pattern.
As already mentioned, the problem can happen with any type of filament with few materials being more prone to pillowing.
The reason that thinner layer wraps easily, the printers taking 1.75 mm filament are more likely to encounter pillowing than those printing with 2.85 mm. Moreover, flexible filaments are more vulnerable to the issue.
Filaments Vulnerable to 3D Printing Pillowing
It is true that pillowing can occur to any filament available for 3D printing. However, it is also true that the severity differs depending on the use of filament when printing.
In case, you are printing with the one that is more susceptible to pillowing, you must consider taking required precautions, discussed later, to stay away from the problem.
Filaments with High Melting Point
Different filaments have different melting points. When 3D printing, the extruder temperature must reach that temperature to smoothly deposit the molten filament on the print bed.
However, those filaments that require high printing temperature to melt, such as ABS, also do not cool down easily and take longer time while completely set up to become rigid. Every filament goes through a steep temperature difference as they leave the hot end.
And, becomes highly prone to warping. Hence, those needing high temperatures become more susceptible to the problem than those requiring considerably lower temperatures to melt.
In case, you are working with a high-temperature filament, lower the hot end temperature as soon as the print is about to complete the top layer. Also, install a cooling fan running at a maximum setting to further ease the temperature.
This is to make sure that the top layer cools down at the earliest after being deposited on the previous layer. Hence, unable to sag into the spaces available to them between the infill.
Soft Filaments
Another type of filament that can make the problem more prominent is soft filament. These are also highly prone to pillowing and can create problems with the top layer of the 3D prints.
These can easily destroy the entire print by falling for pillowing. However, there are ways to tackle this too. Using a higher infill rate is one of the solutions you can try. It is explained later in detail.
Want to Fix Pillowing? Try These Solutions
All the solution that works to reduce or eliminate pillowing targets the same aim to save the top layer by strengthening it. There are several ways to realize the same.
How About a Thicker Top Layer?
With the strengthening of the top layer, the first thing that comes to mind is a thicker layer to make it robust and strong.
This works for warping, hence, works for pillowing too. And, it is the easiest fix for the given problem. To prevent warping, the bottom layer is set to a thicker value.
This is done to provide greater mechanical resistance in turn for the thermal stress that results due to the filament cooling.
The same way pillowing can be tackled. In the case of pillowing, the top layer thickness is increased for helping the layer sustain the deformation which results due to the cooling of the material.
The question is: How thick the top layer must be to save itself from pillowing? To measure the optimum layer height, you can follow a simple formula.
Keep the layer thinness of the top layer five to six times thicker than the layer height of the other layers. Sometimes, this may not work in case you have set your standard layer height to be particularly thin.
You may have to increase the top layer height to more than six times as well. Using your slicer, you can change the layer settings for the top layer easily. You can try out different settings and find out what works for you best.
By Increasing the Infill Percentage
As discussed, a lot of times in this article, the problem occurs when the weight of the top layer is not sustainable for itself, making its way to the spaces between the infill.
It finds its way through the gaps that are available between the infill structure making pillowing very probable in such prints.
If you would check the rules around the web, you would find that 12% of infill is enough to print the models without having trouble when passing through the gaps between the infill.
However, when facing issues with pillowing, you must set the infill percentage to 25% for preventing pillowing.
Although this is an easy solution, makers opt for this as the last option when finding trouble fixing pillowing. The settings can be changed within the slicer software without any hassle. However, it has its own consequences.
The amount of filament required for the print increases as well as the printing time also exceeds. Hence, those whose priorities are high speed or cost saving by using as less filament as possible, may not like the solution very much. For others, it may sound like the best solution right before trying any other on the list.
Cut Down the Speed of the Printing
If you have seen pillowing resulting in holes, you must have hated that look. These are ugly and destroy the print completely.
These result because of the weight of the top layer itself as it tends to buckle under its own weight. The good news is that this can be completely removed.
To do that, you must lower the printing temperature only for the top layer. This would allow it to set fast while at the same time allowing it to become stiff and strong.
Moreover, the lower temperature won’t affect the layer adhesion as well because it would be the last layer of the print.
One thing to make a note of. You must adjust the speed of the print according to the changes in the print temperature.
Hence, making sure that the print completes without problem such as under-extrusion. If not taken into consideration, you can also end up jamming your nozzle right before you can finish your model.
Adjust the Cooling of the Printer
This can be used as an alternative to the previous solution, i.e. lowering the print temperature or can be used simultaneously as well.
By increasing the cooling, you would be helping the top layer to cool as soon as possible, hence allowing it to set easily.
Using rapid cooling, you can ensure that the top layer is strong as well as rigid and it happens right away after being deposited. Set the cooling of the fan to the maximum setting to make this possible.
If you think that the printer’s cooling isn’t enough to get rid of the pillowing problem, you can also use desktop fans to further increase the cooling of the top layer. You would find this solution working its magic if carried properly.
By Increasing the distance between the Print Head and Build Plate
This is also a good idea when trying to sort the problem related with pillowing. By setting the print head away from the build plate, one ensures that the top layer cools as fast as possible.
This is possible because the nozzle temperature is high and it tends to raise the temperature of its surroundings as well.
When setting the print head away from the build platform, it becomes unlikely for the print head to affect the top layer by increasing its surrounding temperature.
However, it is not recommended for beginners as it is not easy to accomplish with success. One can get into other kinds of trouble such as poor layer adhesion and many others.
Hence, you must try the other on the list if you are not experienced.
The Conclusion
Users may find it difficult to get acquainted with the technology in the first few months of their encounter with the 3D printer.
The experience would take you from a lot of turns from misprints to false starts to a lot of other problems.
You would have to go through the tinkering of the printer settings, manual settings of the parts, adjusting the settings of your slicer and what not.
Sometimes, nothing would seem working and sometimes, the first attempt would get you success. This is part of learning 3D printing.
When talking about pillowing, the major part would consist of detection of the problem that is causing the problem in the first place. Only after you have realized the right track to follow, your solution would work just fine.
Pillowing can be highly frustrating as you do not get the chance to cancel the print any sooner. You only discover the problem once the print is almost completed.
This makes it even more important to curb the problem before it could happen. By using the precautions listed above, you can certainly be able to keep a check on the problem.
The problem is very common and you must not be worried as there are quite a few ways to ensure 3D printing pillowing does not bother you. As long as you are cautious and take care of the top layer, you are good to go.


