Technology has taken a huge leap in all space of existence. People from different walks of life are getting involved with upgraded tools and devices to explore higher goals.
A few years back, thinking of a printer that can create real objects may have sounded like a dull idea.
However, it is not an imagination anymore. People know that it is completely possible to print 3D objects as simple as printing pages from the comfort of their homes.
Seeking a new toy for your kid, why not print it inside your house? All these ideas have given new meaning to the 3D printing industry which is shaping itself to become huge in the coming years.
This does not mean that every house will start owning 3D printers but the solution would be able to give many aspiring entrepreneurs their first nook for creativity.
What Is 3D Printing?
Are you still not able to relate what 3D printers are capable of achieving and you don’t know what you can do with a 3D printer?
Not a problem. To put it in simple words, you can manufacture real objects by using their digital prints.
Like usual printers where you have a word, PDF, or image file to feed to your inkjet printer, you will need a digital design file.
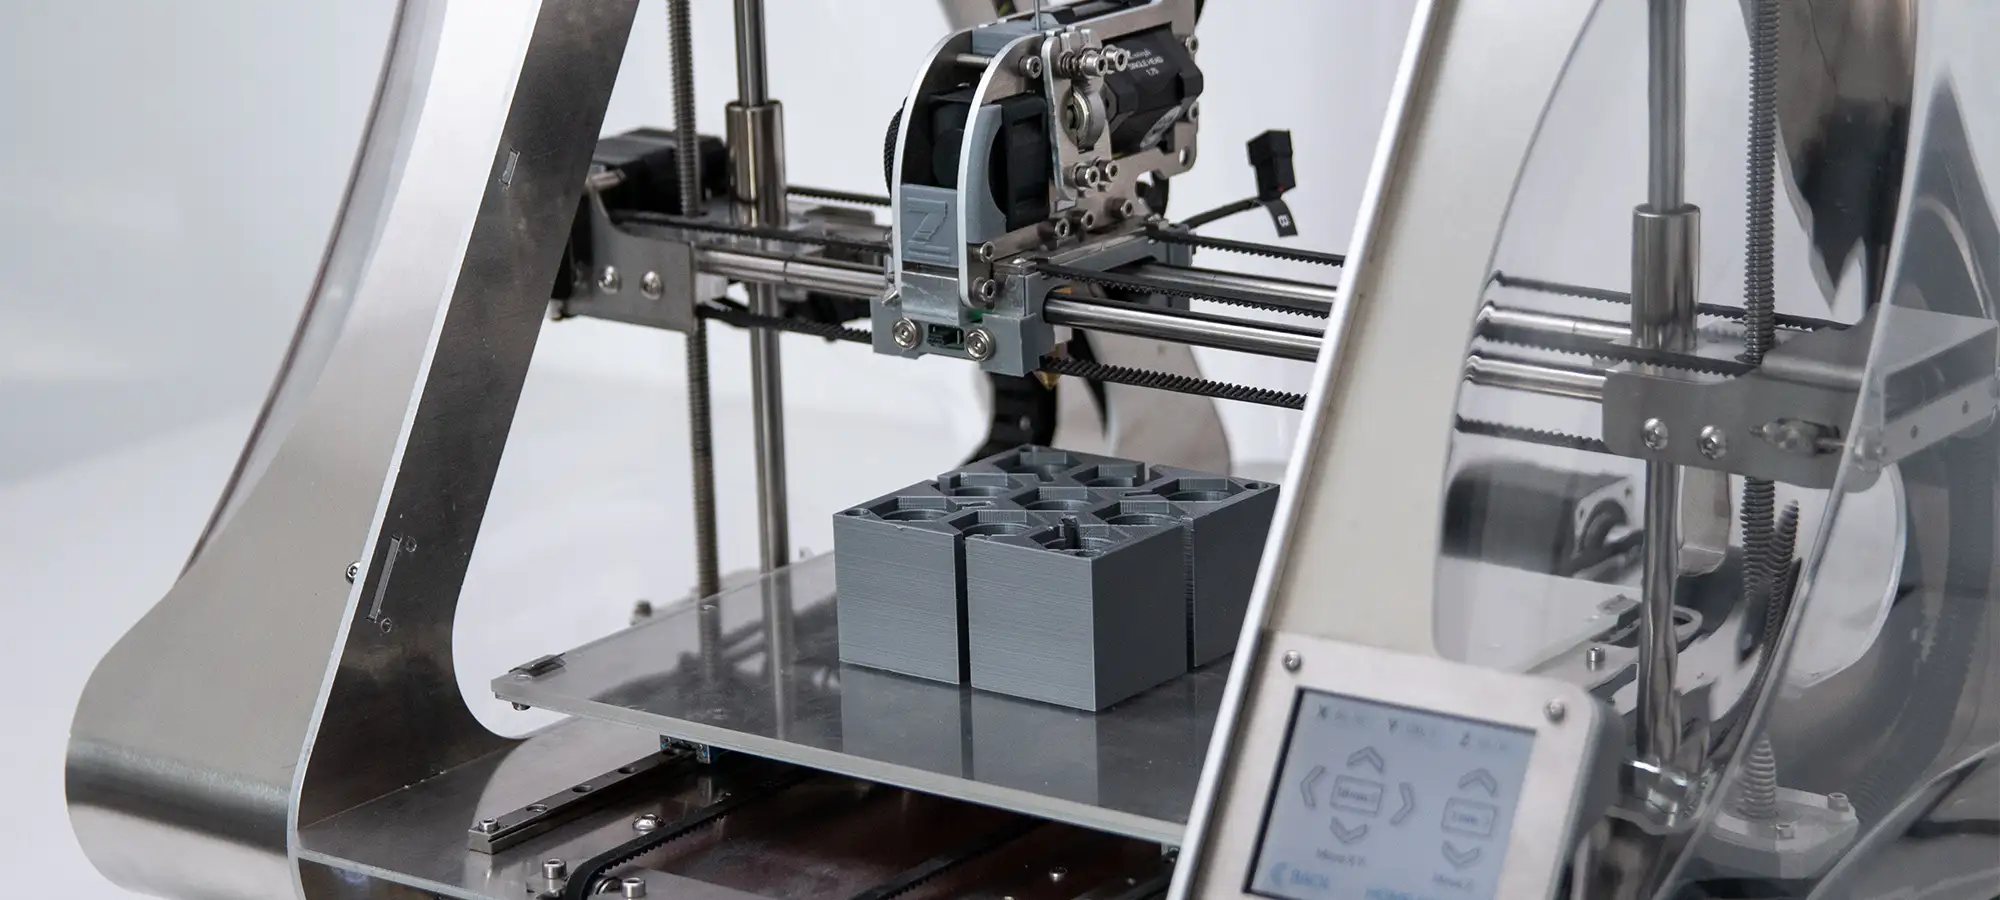
The 3D printer will then print the object layer by layer in a few minutes or hours.
Using a similar methodology were digital prints and turned into a physical model, every 3D printer is capable of creating already used designs to their customized forms.
How about creating a teacup with two handles? I am sure you would be able to come up with something better.
3D printing is also known as additive manufacturing. If you are aware of various methods of printing, you must have come across terminologies such as CNC machining or Injection Modelling.
However, 3D printing is nothing like these methods. You will not require any special tool for as you require in the other two methods of manufacturing listed above.
Instead of needing a molding or cutting tool, you will only work with your 3D printer.
Blueprint for 3D printing
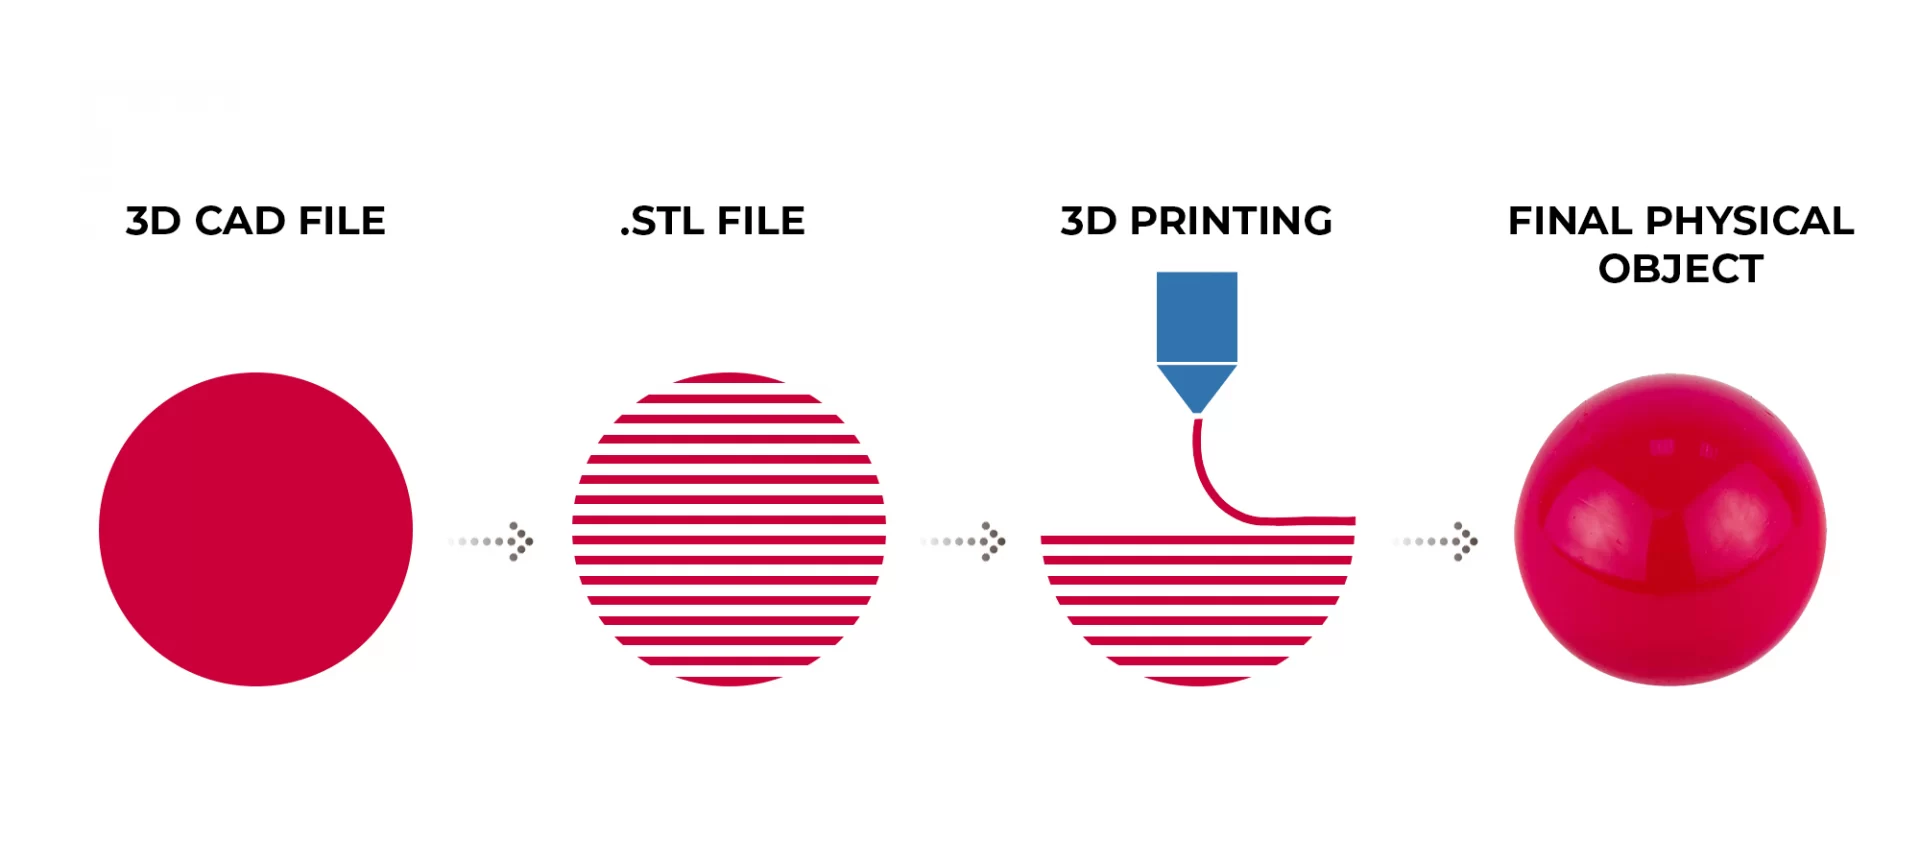
As mentioned earlier, 3D printing requires its digital blueprint to understand what it must manufacture. This digital model explains the printer the physical object that is desired.
The model is converted into thin layers with the help of its software and is fed to the printer in the form of machine language. The only language machines understand.
This 3D model gives the idea of the product one is looking to achieve from the 3D printer.
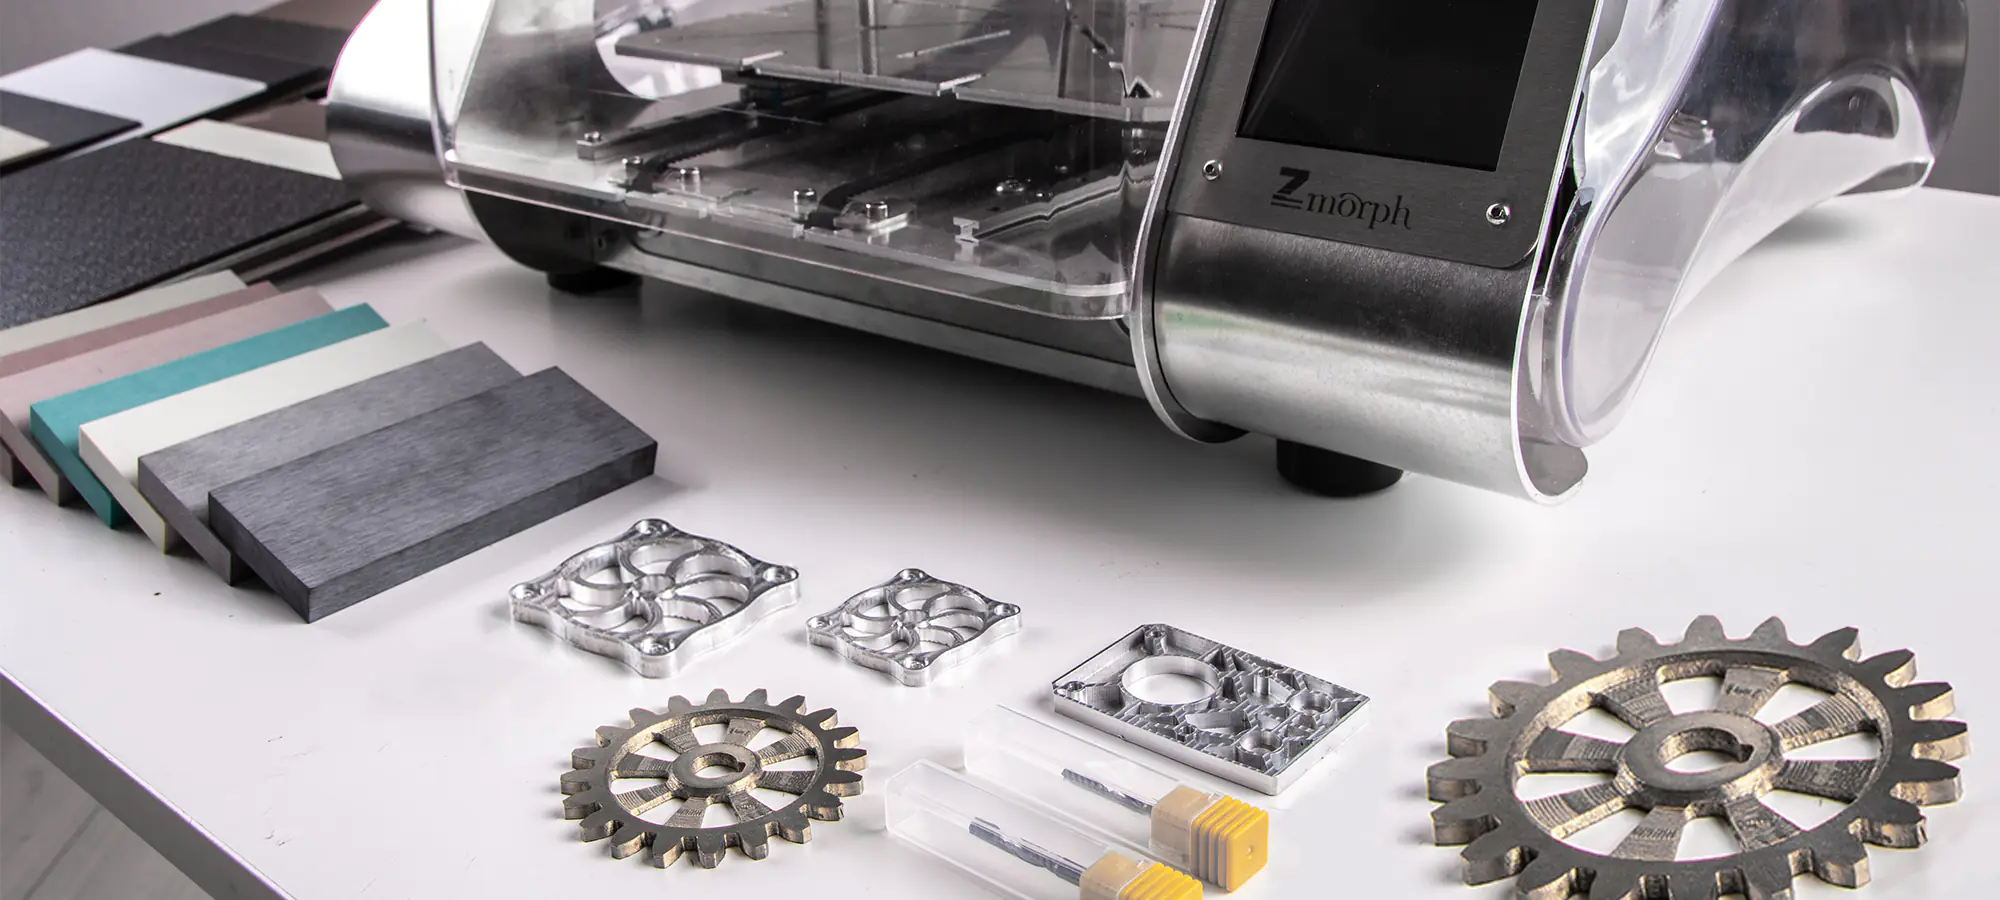
The 3D printer uses different materials to create these images into real objects. The processes differ too from printer to printer which is discussed later in the document.
It could take from 4 hours to 18 hours for a 3D printer to manufacture parts depending on its size. However, the work does not finish only after getting the object out of the printer. You may need to ensure the finishing is perfect through manual intervention.
History of 3D Printing and Terminology
Many believe that 3D printing is not old enough and is an innovation from the 21st century. However, the revolution dates back to the ’80s. To be precise, the first patent issued comes from 1986.
Let us take a peek into the history of 3D printing and how it managed to become such an integral part of various industries over time.

From 1981 to 1984
This project wasn’t successful in a year’s time and was abandoned because of a lack of funds. However, the idea again gained attention when three sets of people wanted to explore the idea further.
Jean-Claude Andre, Olivier de Witte, and Alain le Mehaute.
Jean worked at the French National Center for Scientific Research (CNRS), Alan worked at Alcatel researching fractal geometry parts, and Olivier at the Alcatel’s subsidiary firm.
These three people tried to research further on the idea of a rapid prototyping device which was rejected by CNRS debating it to lack proper equation and application into substantial areas.
The patent application filed by the trio could not be worked out because of a lack of funds.
From 1984 to 1988
Charles Chuck Hull who worked at a furniture manufacturing company suggested using UV lamps for curing photosensitive resin layer-by-layer for ultimately manufacturing a part.
Hull applied for the patent which was finally issued in 1986. Soon after, Charles started 3D Systems, his company in California, and released his first product, SLA-1.
This product was released commercially in 1988. Hull named his technology, stereolithography.
From 1988 to 1992
Carl Deckard, studying at the University of Texas filed a patent for SLS in the year 1988. The printer manufactured simple plastic chunks.
The patent was not even approved when the application for another patent was submitted to the US government. This was known as FDM.
This is the simplest one and was invested after the other two technologies. The patent for FDM was issued in 1992 to Stratasys.
Current Developments
Further, 3D printing started to be recognized as an industrial manufacturing technology. 3D printers are being highly utilized from creating mobile phone covers to replicating human organs and prosthetics.
However, these developments would have been far-fetched if the invention of SLA, SLS, and FDM wouldn’t have surfaced in the early years.
What is 3D Printing Used For?
What can you do with a 3D printer? The application of 3D printing is endless. It has appealed a lot of sectors from healthcare to the entertainment industry because of its ease of use and ability to create complex objects using a single tool.
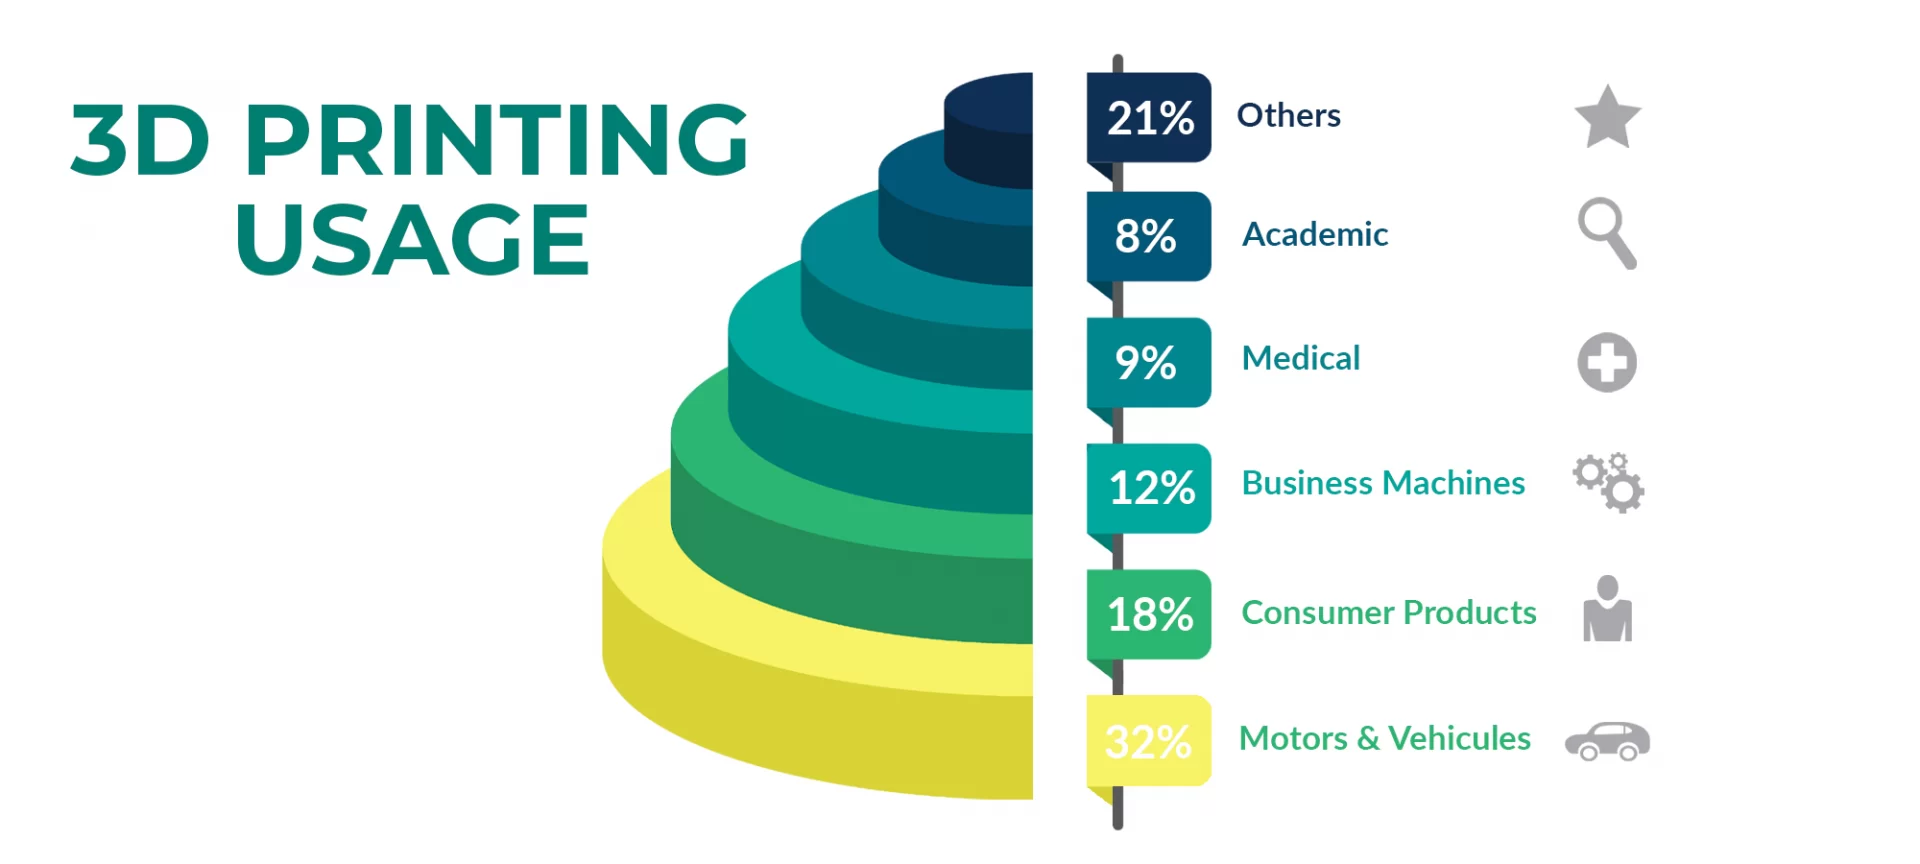
Aerospace
It is not a cakewalk to create topology optimized structures which is capable of delivering high strength and weight ratio in conjunction with the ability to combine multiple parts into a single entity.
Design Industry
Entertainment
Making movies is a difficult job, especially when it requires creativity and unusual demands. 3D printing has made it easy at a very affordable cost.
Robotics
The ease of modifications and time-saving processes let engineers produce the best versions of their creations in no time with the help of 3D printing.
Healthcare
Education
Automotive
However, with 3D printing, it is easy to create parts in less time and with simplicity and precision. Moreover, one can test customized parts in not less than a day.
Companies like Volkswagen and others have adopted this technology for creating parts and testing them within a day.
Food Industry
By using edible material, 3D printers are allowing to uncover greater spaces.
Construction Niche
It is not far when 3D printers would be used for building houses and apartments.
Fashion Industry
Real-Life Examples 3D Printing Application
You must be able to access the importance of 3D printing in every sphere of life and how it can change the way we have been doing things. There are countless things to make with a 3D printer, here are some examples:
Engineers from the University of Southampton design, UK created the digital blueprint and printed the first-ever unmanned aircraft.
This cost around $7000. So, if you are thinking that 3D printing is only capable of creating small objects, think again.
Moreover, a prototype car was also designed using 3D printing to create its body by the TEDxWinnipeg conference that happened in Canada.
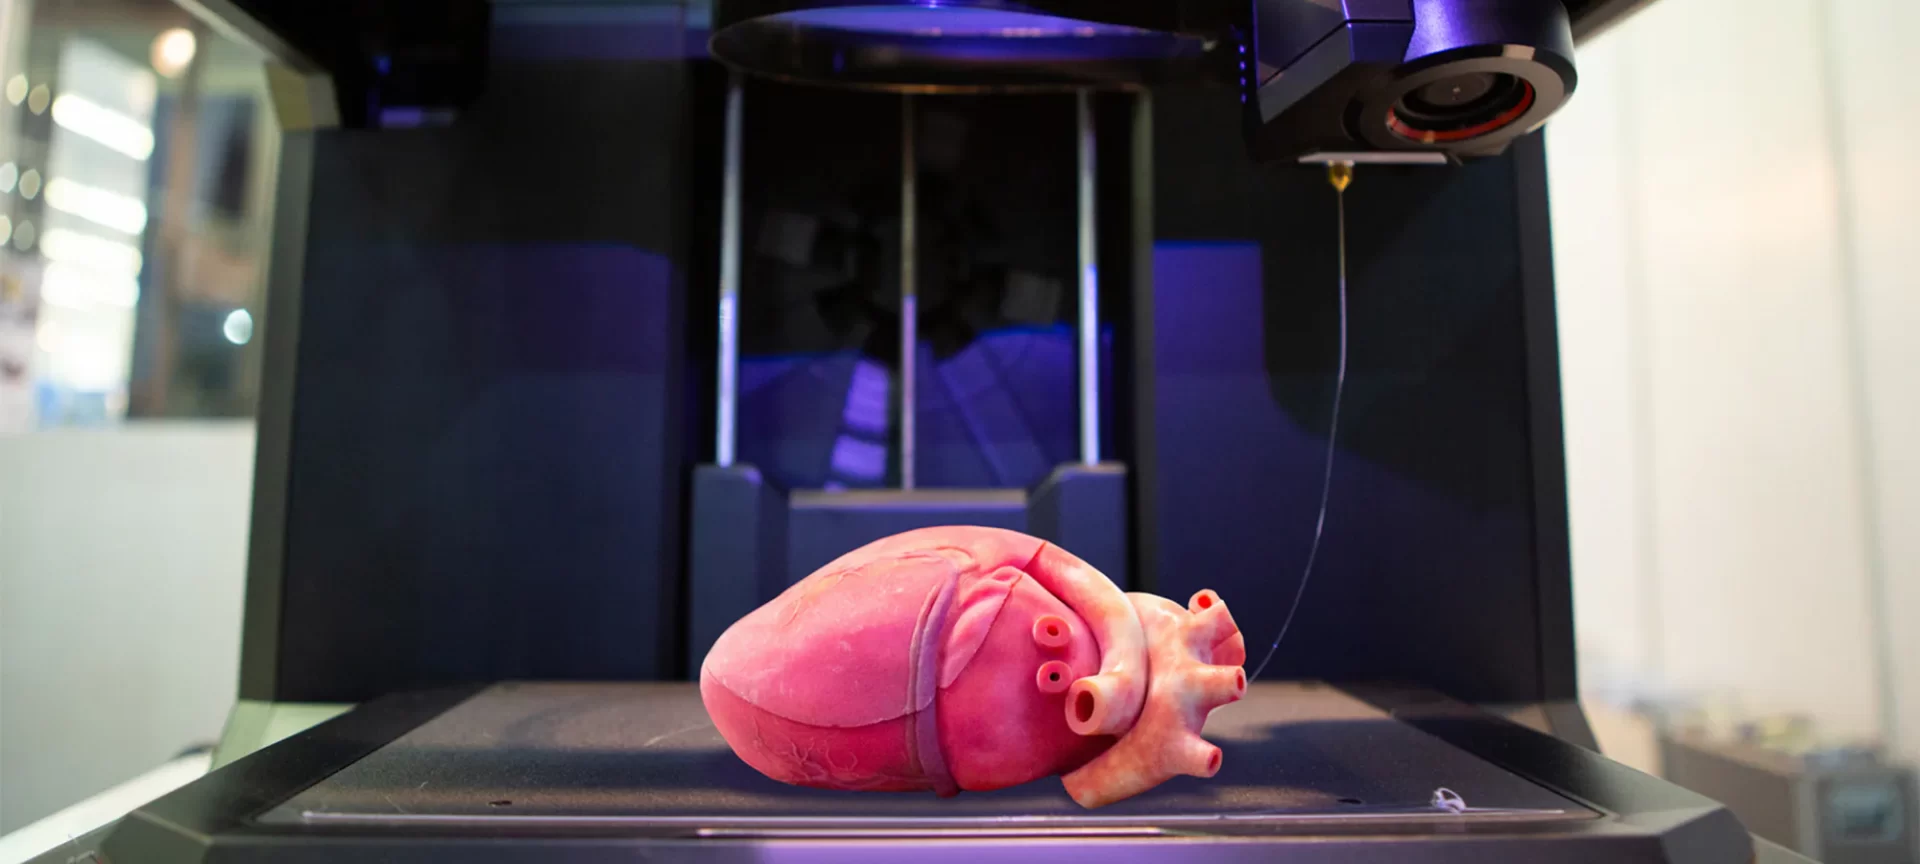
Wake Forest Institute for Regenerative Medicine devised the technology which 3D printed the urinary bladder of a patient through the bladder’s picture taken during CT scan.
The tissue’s sample was taken from the patient’s bladder to grow the 3D printed bladder. Finally, the cells were layered to create a urinary bladder for successful transplantation.
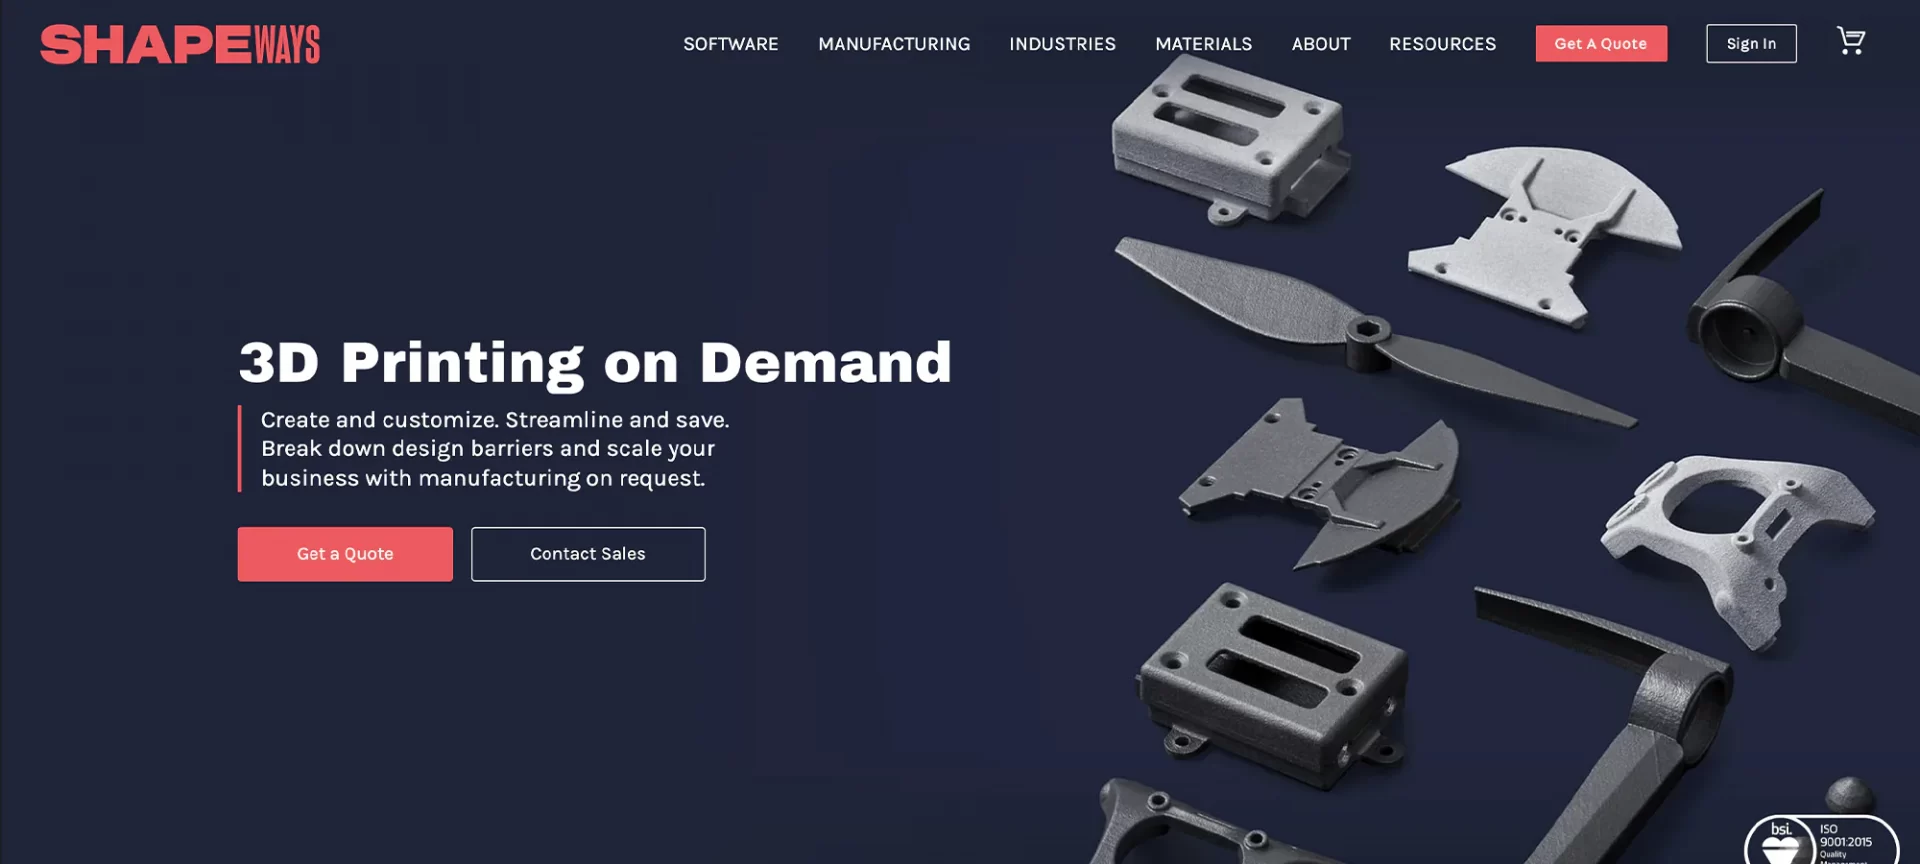
This company is the Netherlands was launched to help people realize their imagination into real objects through 3D printing. You can submit the blueprint and the company will 3D print and ship back the object to your address.
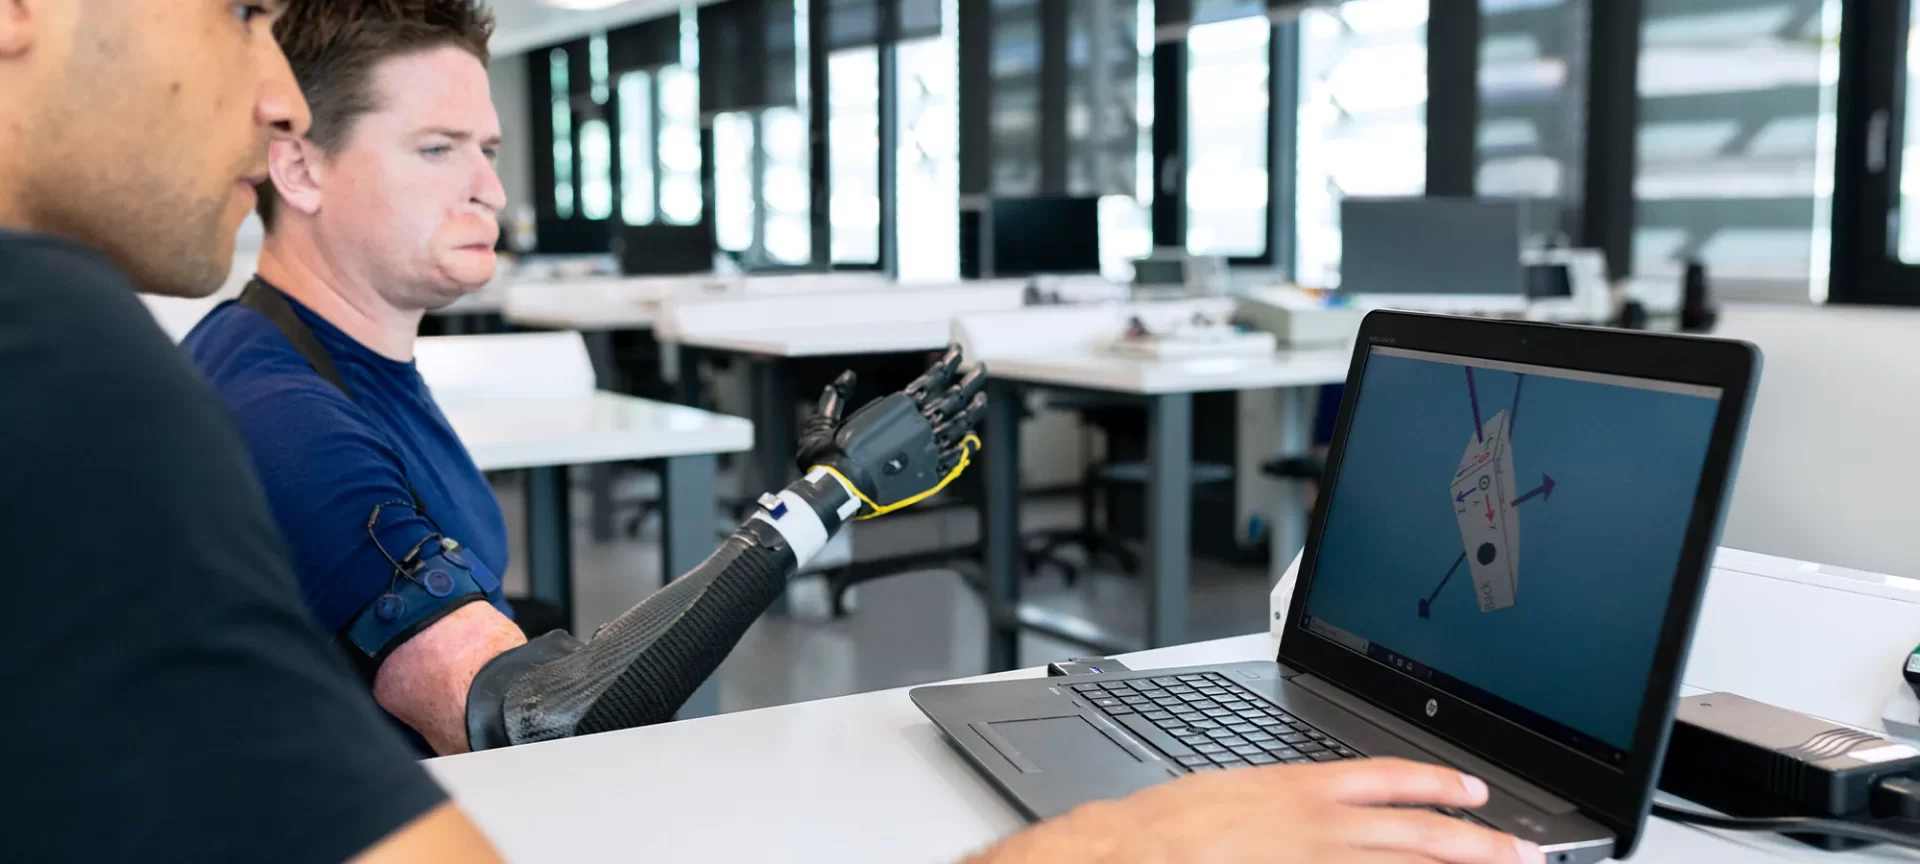
This is one of the revolutionary ideas that generated through 3D printing. The prosthetic legs created using 3D printing does not require any assembly later.
The Advantage of 3D Printing Technology
There must be some good reasons why 3D printing is been adapted so quickly within different industries. The answer is YES. This technology has certain limitations, but the benefits overshadow everything else.
✔️ No Overdose of Processing Cost:
Unlike other methods and technologies were molds and casts are used to create different shapes before joining the parts together to complete the process.
3D printing only requires the material used to create objects.
The custom tools that are required every now and then cost a lot and increases the processing value.
However, this is not the case with 3D printing.
✔️ Made Prototyping and Testing Simple and Faster:
For every industry, testing new designs or prototyping happens to be the most time taking the stage.
Each newly designed part takes days and even months to manufacture.
With a 3D printer, one can create these parts in a few hours or days and can be sent for testing the very next day.
This not only quickens the turnaround time but creates room for further changes without any stress.
✔️ Easy Risk Mitigation:
For creating a prototype using the traditional method, a designer needs mold or must involve fabrication methods that are costly.
What if the prototype needs to be changed?
Even for a little change, the mold requirement changes and one has to invest again for another mold. All this costs huge money.
However, with 3D printing, one can easily mitigate risk to considerate levels.
✔️ Easy Customization:
Do you believe that one size fits all? It is not possible.
But traditional methods usually manufacture standardized sizes as it keeps their manufacturing cost lower.
With 3D printing, you do not have to worry about any extra cost involvement when customizing something.
You can customize every part and it will not put any extra burden in terms of cost.
To do so, you only need to change the blueprint and feed that to the computer from where you want to generate the signals for printing.
One can easily meet a customer’s specific needs through this technology in no extra time.
✔️ No Wastage of Material:
If you are thinking of a traditional process to create certain products, the first thing that comes to mind is shapes.
To achieve a certain shape, traditional methods such as CNC milling removes excess material that cannot be reused and is wasted.
With 3D printing, you use the exact material required to provide the desired shape.
✔️ One-Step Process:
It is as easy as it sounds. 3D printing in a one-step process where you do not need to connect different parts together has resulted in the huge popularity of 3D printing.
You may need some finishing at the end, but you can create one complete object without involving any other process.
✔️ Can Create Complex Shapes:
Geometrical shapes are the most difficult models to manufacture.
There are certain shapes that cannot be created using any other manufacturing methods.
However, 3D printing does this with ease. A perfect example is its application for aerospace where every minute details matter.
In short, you can think of it as an added advantage because you can create complex geometric shapes without investing any extra cost.
3D printing has also some limitations that you should know about: The Limitations of 3D Printing Technology.
3D Printing Basics
The reason why 3D printing is getting into homes is that it is easy to learn. Are you from a non-technical background?
Not to worry. You can still learn how this works.
Once you have gathered the basic steps of 3D printing and its fundamentals, you can better access for yourself, if this is your thing or not.
Step 1: Designing a 3D model for 3D Printer
As I have been saying all along, you will need a blueprint to start 3D printing.
This works as an input for your 3D printer just like the document file works for an inkjet printer.
So, this becomes your first step. If you are thinking of getting some brushes and colors to paint, relax.
You will not need any such tool to start designing your 3D design file.
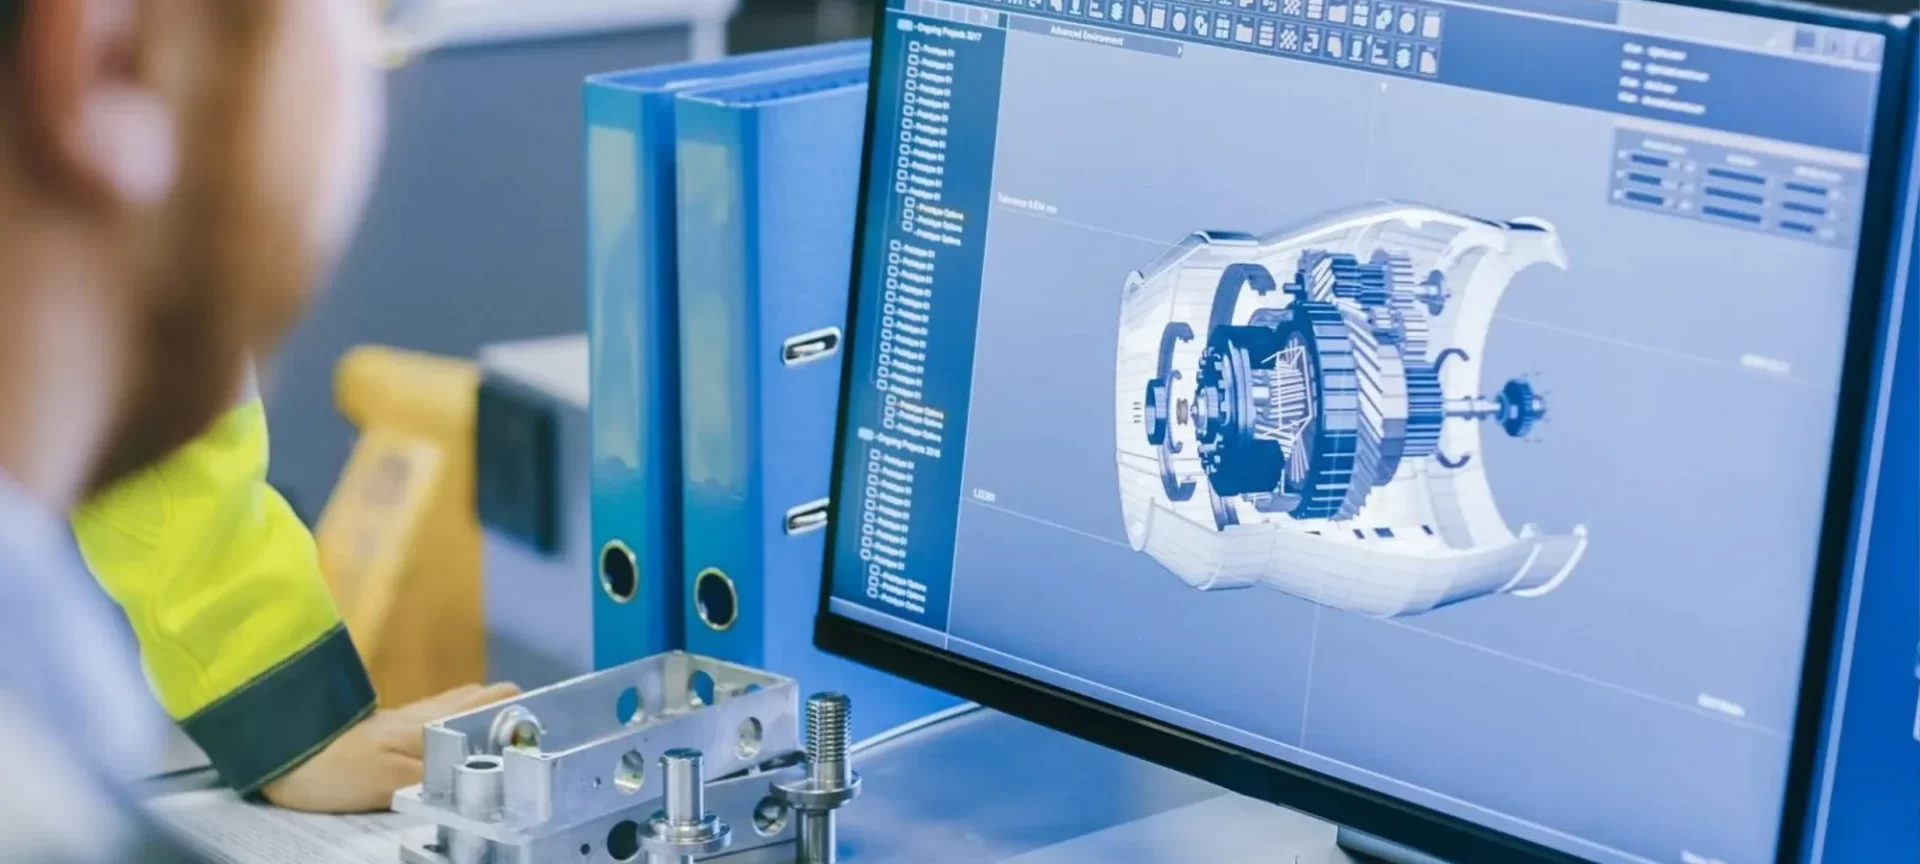
In 3D printing, you will only require CAD software which is also known as Computer-Aided Software.
This software is a 3D modeling software usually required to create blueprints of the building and every architect uses it to create floor plans and other specifications using this software.
This same software is utilized to create 3D design files.
It is easy to use and you will find it similar to Photoshop, Illustrator, or similar software if you have used it in the past. It has the shapes and tools which you can select to create your own design.
CAD Software:
CAD software is used for creating 3D models. There are many options available and some come for free as well.
If you have not worked with CAD software before, try the ones that are specially designed for beginners. You will also find software for intermediate designers and experts.
Step 2: How to Get STL file for 3D Printing?
STL file is the digital footprint of the model one wants to build using 3D printers. Hence, creating an STL file is a very crucial part of the entire process. So, how can one create an STL file? There are two ways to get an STL file.
#1 Create it from scratch:
If you are interested to design your own file, you can choose from a plethora of 3D modeling tools available. Such as SketchUp, MeshLab, FreeCAD, and many others.
Many of these tools are free and some are designed especially for those who have no experience with 3D modeling.
Using the easy to use tools with drag and drop feature, one can create STL files. There are many tips available online.
It may be a tough task for beginners but gets easier as one starts getting to know these tools better.
With few trials and errors, one can certainly learn to create STL files on their own.
#2 Download it:
If you do not want to get into the technicalities of 3D modeling, you can directly download it from online repositories for example Cults3D.
You can find many free STL files and designs that can be printed right away.
There are also paid 3D designs for those looking for specific details in their 3D model.
Once you have the STL file, you can build the model, layer by layer, using your 3D printer.
Step 3: Slicing Using a 3D Printer Slicer Software
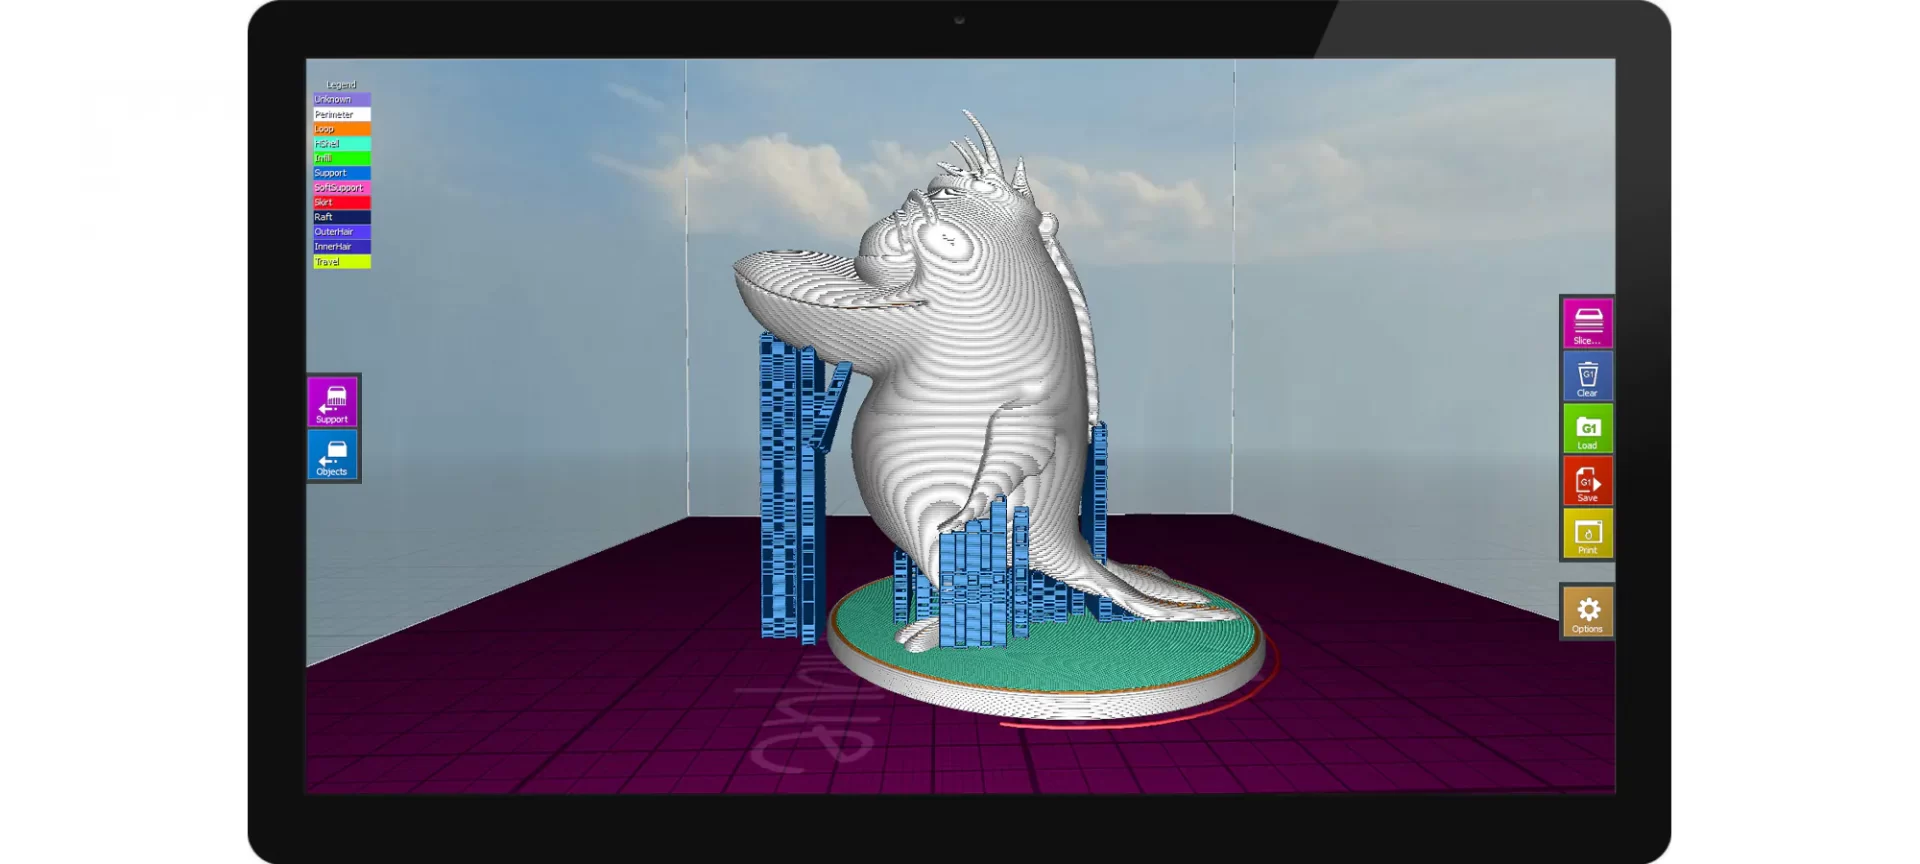
After you have completed your design, prepare your design for slicing by exporting it as a .STL file format.
For doing so, you will require a slicer software. You can change the settings of the printer using this software.
For example, which nozzle to use or which material to be used and much more.
The slicer will then create instructions for the 3D printer.
It will break the 3D designs into horizontal layers and hence is named slicer. By using slicer software, you get control of different printing processes.
The job of the slicer is very crucial. It plans ahead of the best way that the printer should be moving to create fine objects.
It plans about the movement while creating the first slice, then the second and next till the object is completely printed.
To start using a slicer, you must drag and drop them.STL file or open it to use the 3D design and make changes to it.
Once your design opens in the slicer, you can check its rotation, change the size and other inputs, select nozzle, and other details of how the object would be filled from inside.
All these settings help you in creating the exact 3D design you have on your mind.
Once you are done, simply save the file in an SD card for a 3D printer to print the design.
Slicer:
There are times when you will not find a slicer software with your 3D printer as not included by the manufacturer.
Or sometimes, you may not find satisfactory results with the included slicer software with the printer.
In that case, you can use free software available online. One such software is Cura slicing software which you can use for free.
Step 4: Printing the 3D Model
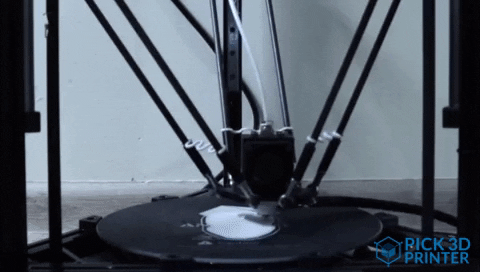
This is the final step of the printing process and the simplest among all as well. Connect your printer to your computer.
Once done, click print and sit back. The printer will start printing the design to create a physical object.
On occasions, you may have to load the G code file to the designated memory to let your 3D printer work without any halts.
As the command reaches the 3D printer to print, it starts working to create the object layer by layer until the complete object is created.
Printing is an easy task and involves creativity if you are looking for innovative customized products.
But it is also easy when you are using 3D printers to give life to your imagination.
Knowing all 3D printing basics is essential if you’re wishing to start 3D printing at home or for your business.
Types of 3D Printing Processes
Since its innovation, there have been many advancements in the technology of 3D printing.
There is a total of seven processes as per the ISO/ASTM 52900 standard categorization.
SLA & DLP (Stereolithography & Digital Light Processing)
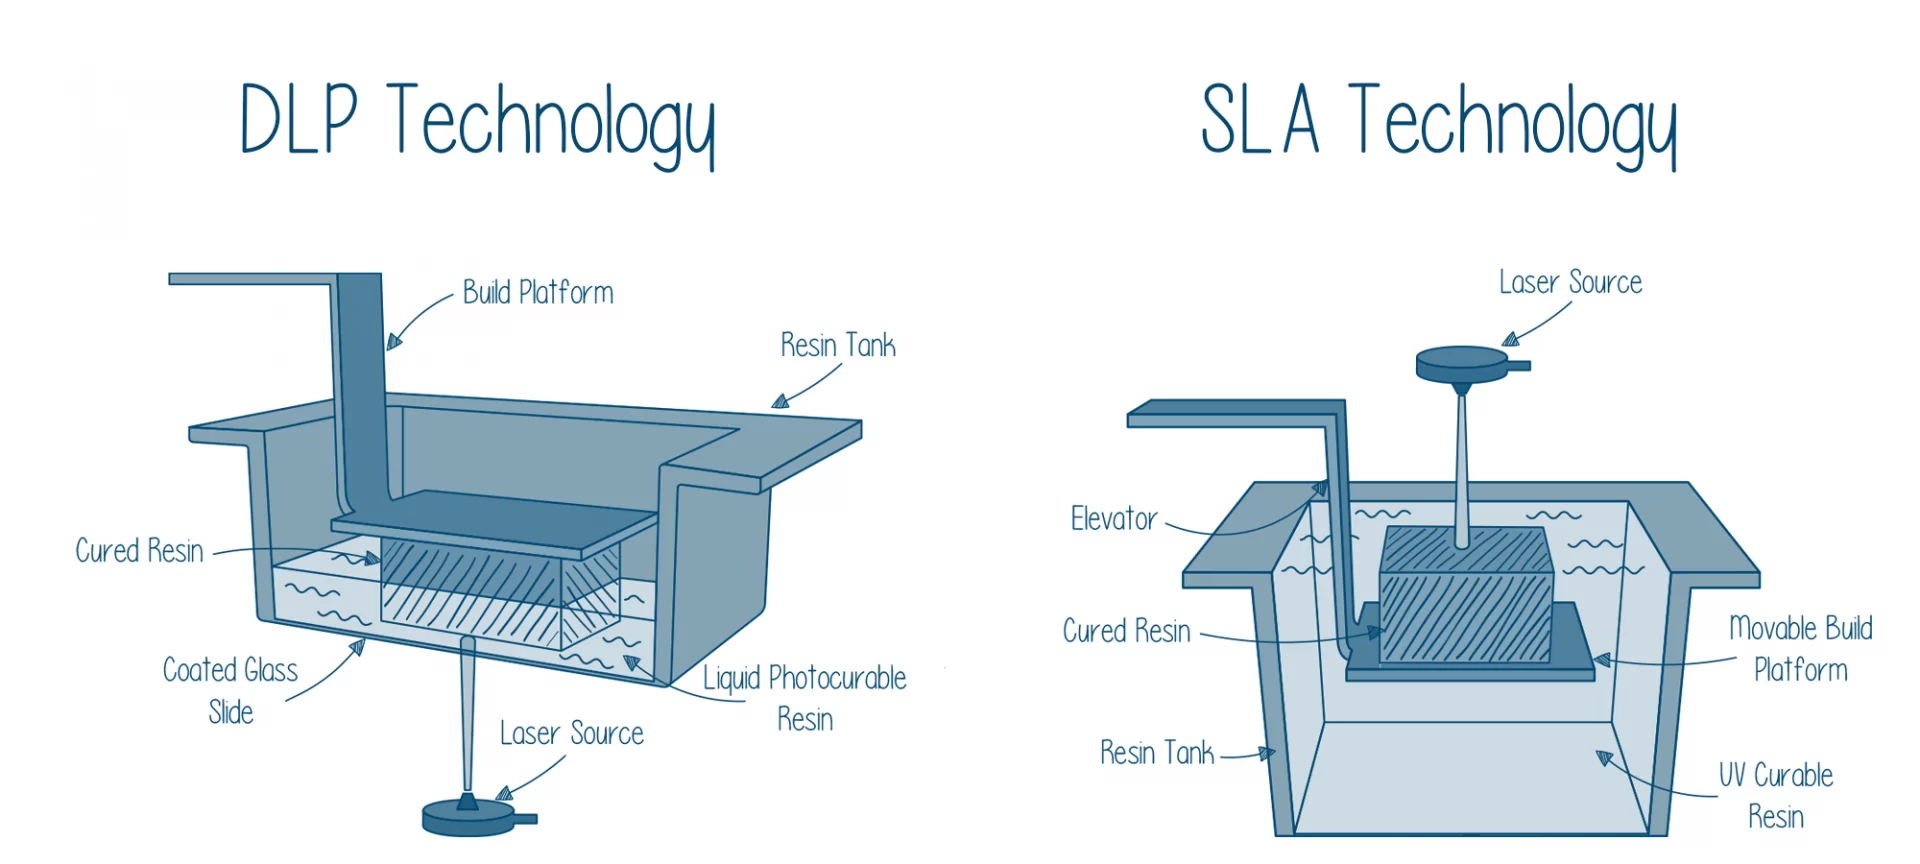
SLA, as well as DLP, uses a similar method to create finished products through 3D printing.
Both of these processes require a UV light source which is used to solidify the liquid resin. This happens in layers. In SLA, point laser is used whereas DLP makes use of a digital light projector.
Once the printing is completed, the parts need to be cleaned before exposing it to more UV rays for better strength and improved body.
Later, the support structures are taken away, and further, post-processing is done to achieve even better finishing.
With SLA, one can print parts with precision taking into consideration the perfect dimensional accuracy. The surface smoothness is also better than many other 3D printing processes.
One can create visual prototypes with ease by using SLA techniques. A various range of material is available to support the SLA and DLP 3D printing process.
However, the parts created with the help of these processes are brittle and not suitable for printing functional prototypes.
Because the parts created with SLA Process are prone to degrade when in contact with UV rays, they are also not best suited outdoors. Sun’s UV radiation may alter the mechanical and color properties of these parts.
SLS, DMLS & SLM (Powder Bed Fusion)
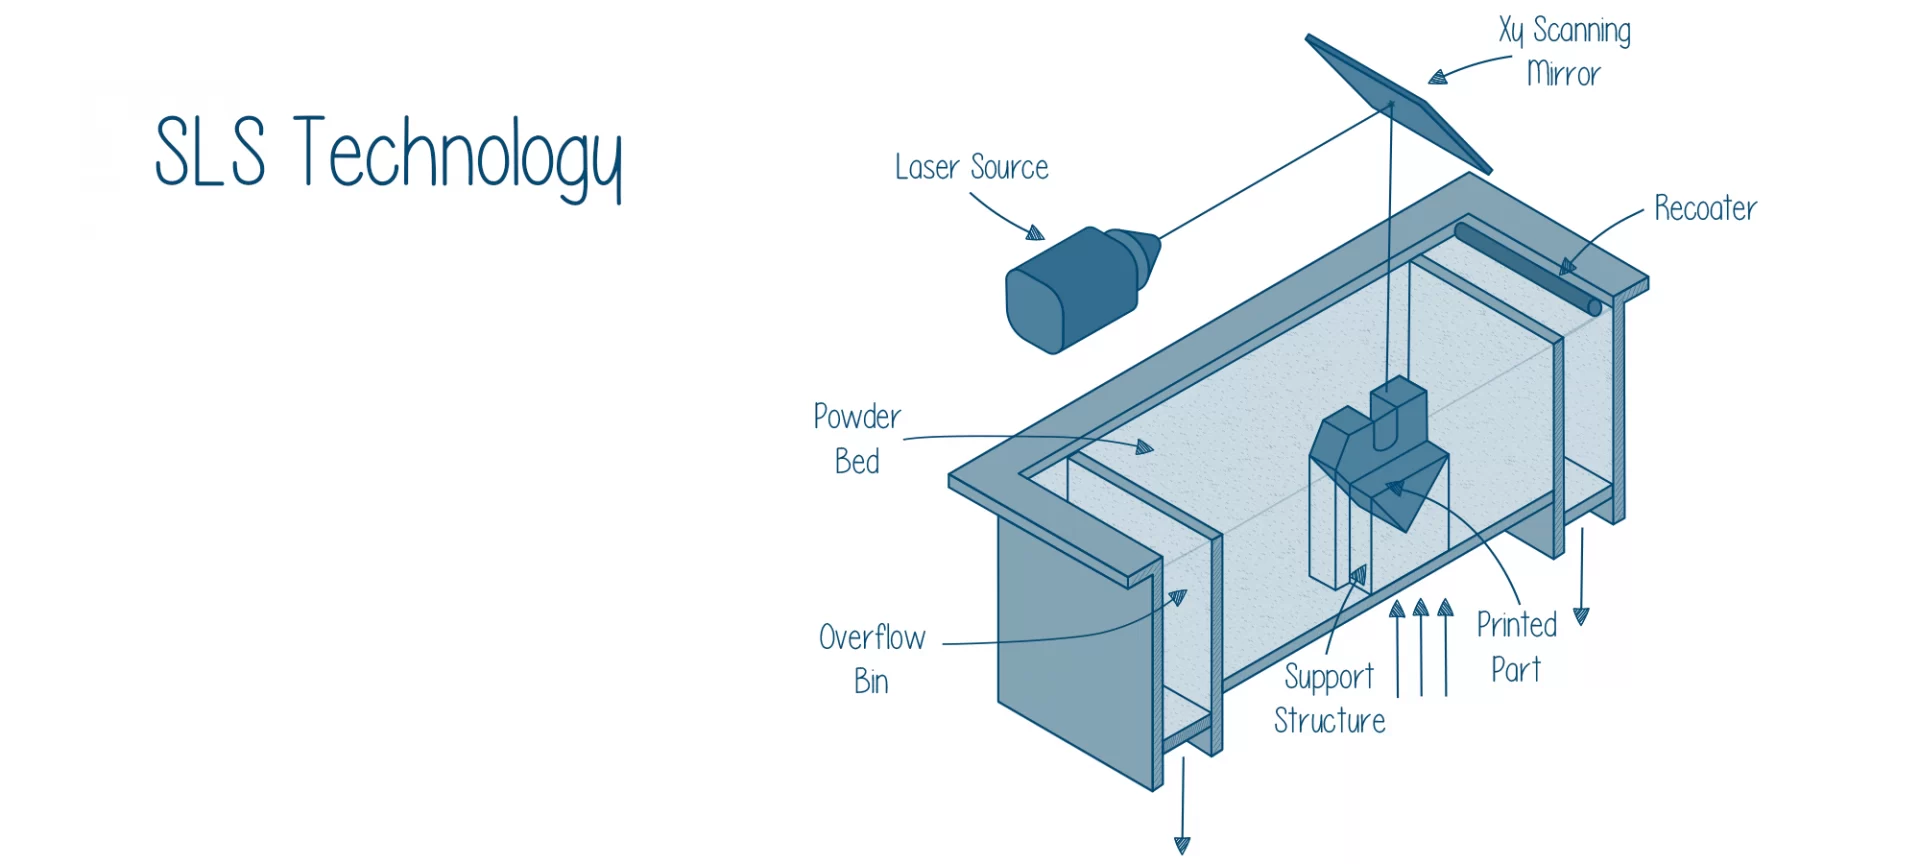
SLS process is different from SLA in many ways. It uses a box of polymer powder which is heated until the temperature reaches just below the melting point of the material.
The printer’s roller deposits around a 0.1mm thick coat of powder on the build platform.
The process works with the CO2 laser. This laser scans the platform for the surface of the deposited powder and helps in binding the particles together.
Once the scanning completes for one layer, the platform moves down for creating the second level. This goes on until the part is ready and complete.
Once the printing completes, and before the parts are cleaned, the bin is cooled down.
There are some post-processing steps required to achieve the desired look such as dying or polishing.
The parts created with SLS are suitable for prototypes as well as functional jobs.
These have great isotropic mechanical properties and do not require a support structure.
This is the reason one can 3D print complex geometric designs with the help of SLS. Also, one can print multiple parts at a time.
Because of all the advantages listed above, SLS Process is usually preferred to be used for industrial usage.
This makes it expensive and not feasible for small businesses or home use. The high turn around time also makes it difficult for single use.
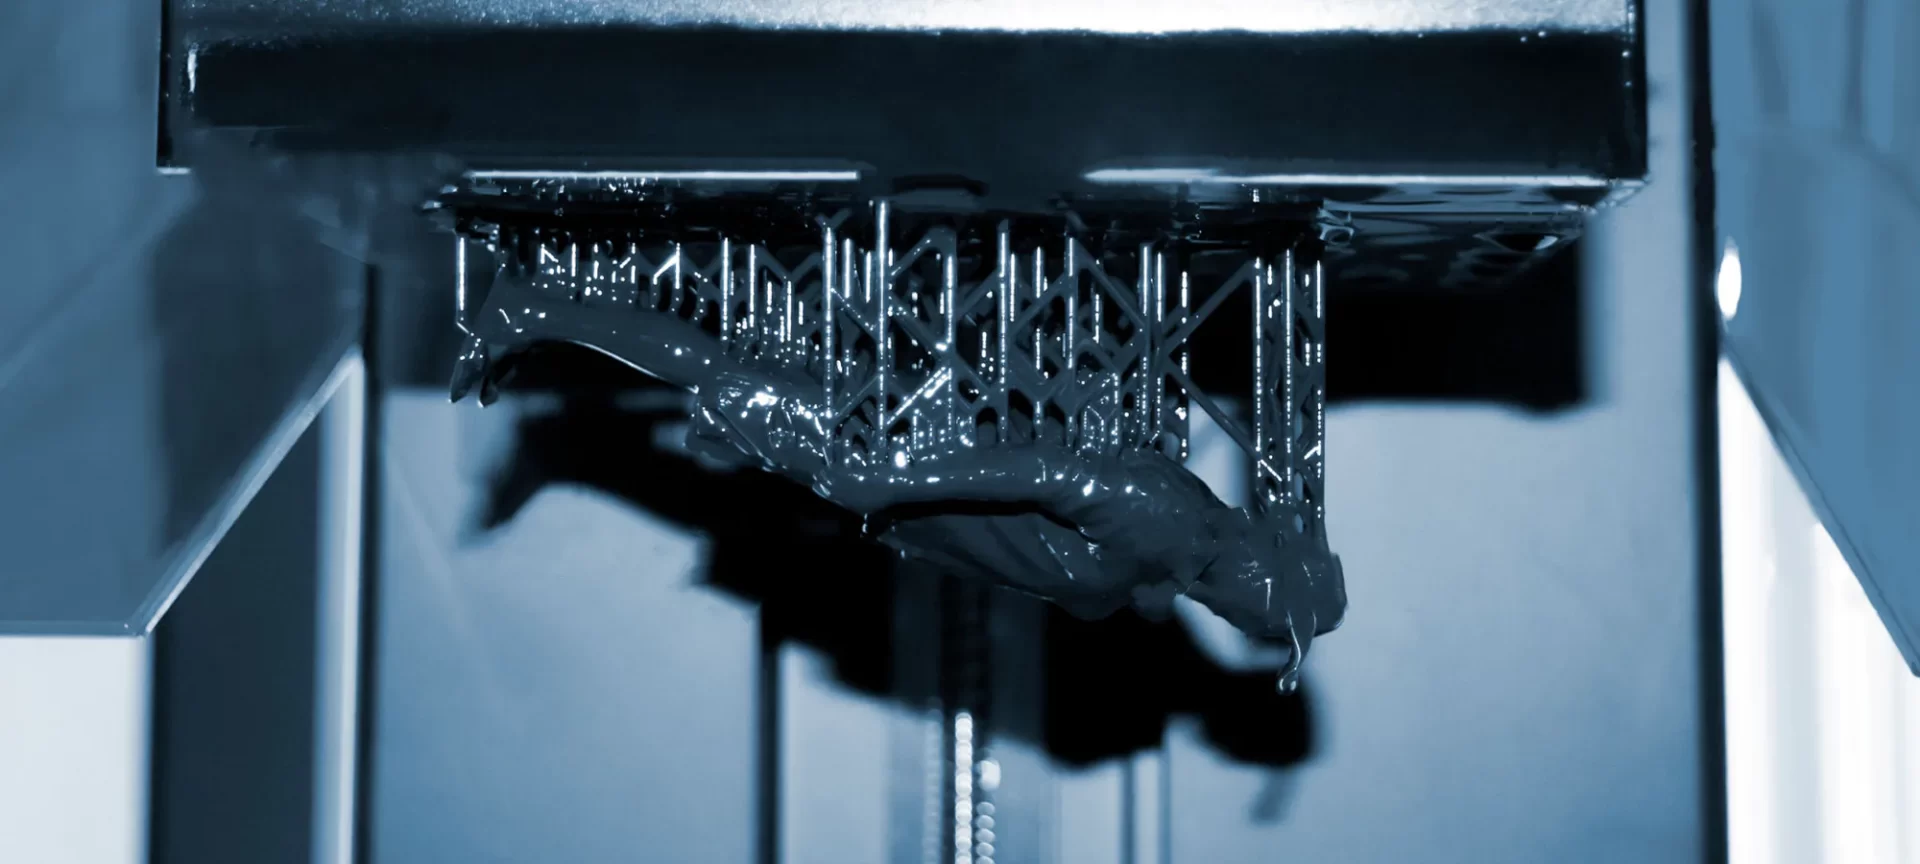
FDM (Material Extrusion)
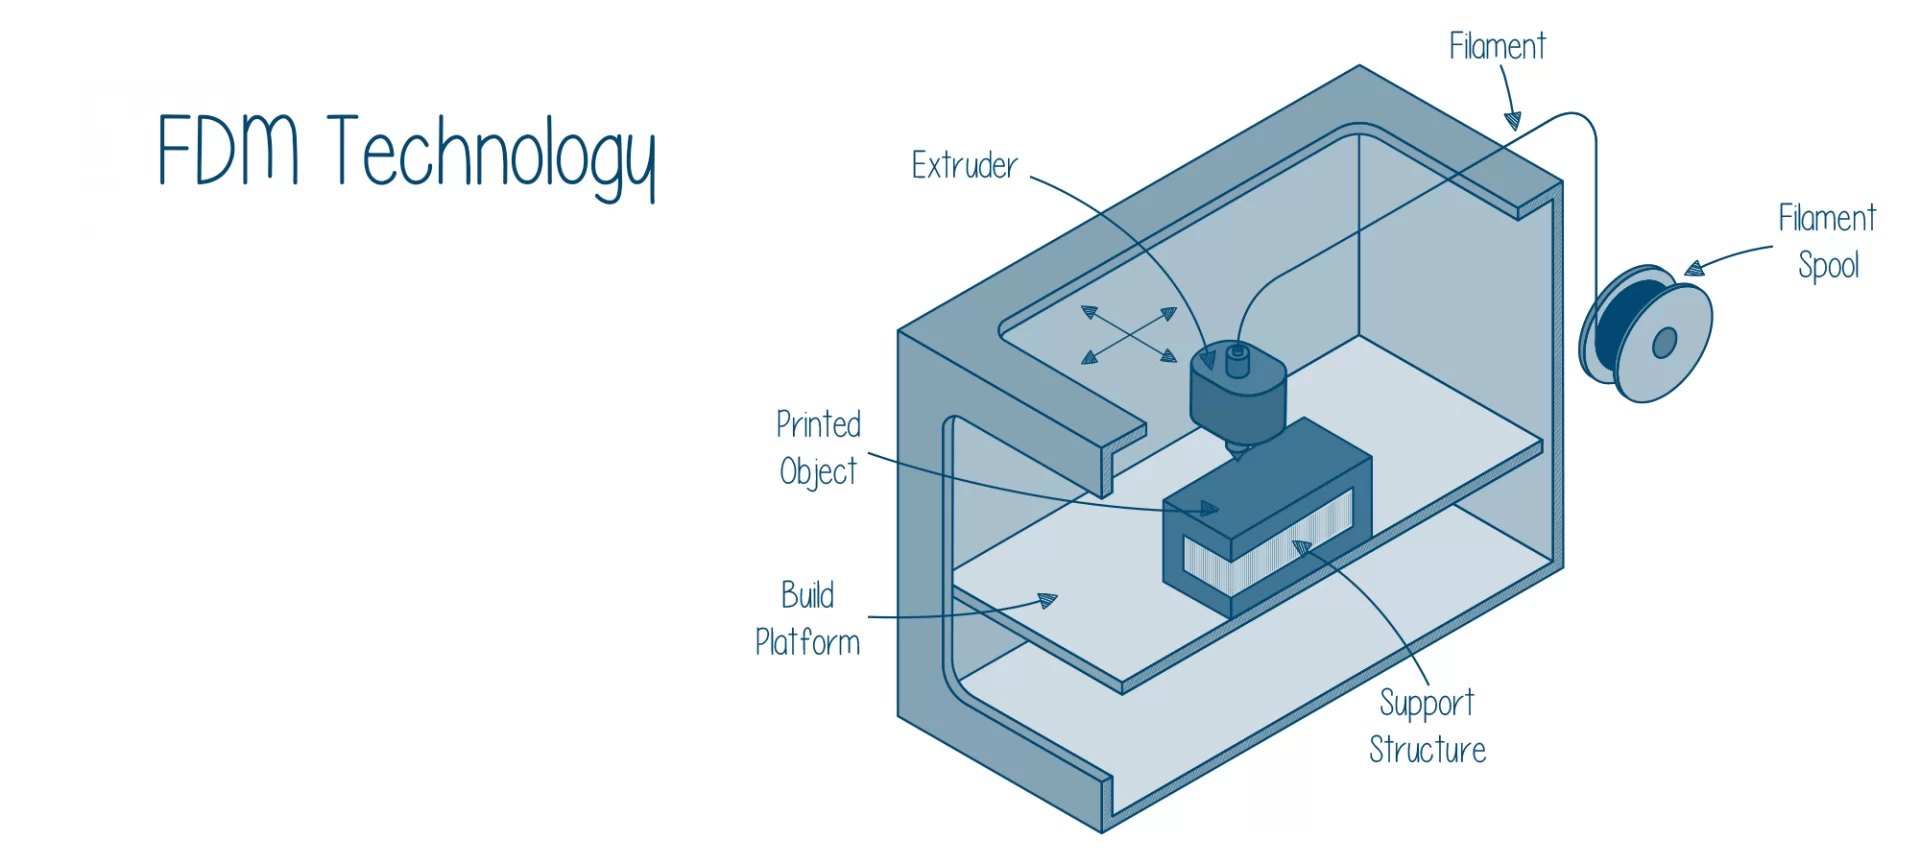
FDM which also stands for Material extrusion requires a spool of filament which is loaded into the printer to be further fed to the extrusion head.
The head is connected to the heated nozzle. There is a set temperature for the nozzle and when that temperature reaches, a motor helps drive the filament through it.
After passing through the nozzle, the filament melts before laying down on the desired locations. Once it meets the platform, the filament solidifies.
The extrusion head keeps moving as per the instructions to create layers.
Once a layer is complete, the platform moves down preparing for the second level and so on.
You may require to make some human intervention when the item is ready. For example, smoothing of surface or removal from the structure.
This is the simpler process of all the listed ones. And, one of the most cost-effective choices.
It is best for creating custom thermoplastic prototypes as well as various parts. By providing the shortest lead time, you can complete a task in a day and delivery by the next day.
However, there are certain limitations to FDM as well. FDM provides the lowest accuracy when it comes to dimension perfection when compared with other processes.
Because the surface may appear layered after printed through the FDM printer, manual intervention is usually required to smoothen the surface.
MJ (Material Jetting)
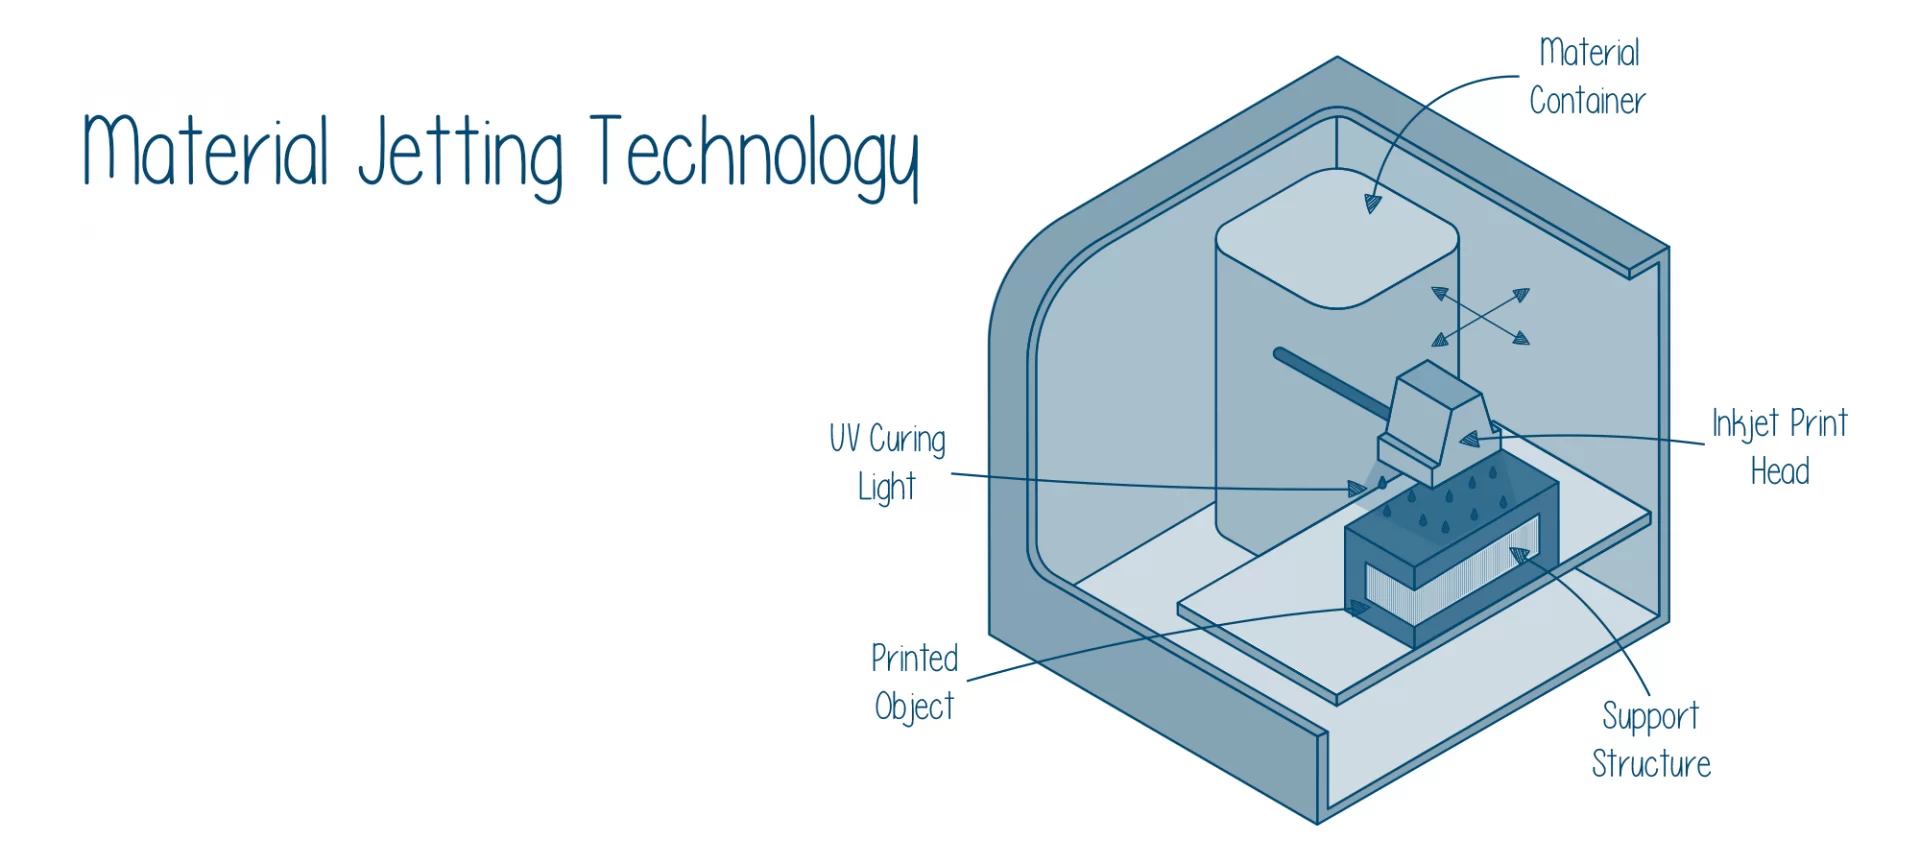
Material Jetting can be considered similar to the inkjet printing, however, printing multiple layers. The material is deposited in multiple layers to form a physical part with a 3D dimension.
In machine jetting, the print head jets multiple droplets of photopolymer on the platform which are exposed to the UV light which in turn solidifies the material forming each layer.
After the layer is complete, the platform moves downward making room for the second layer.
Machine jetting cannot work without a support structure which in the case of machine jetting is a water-soluble material. This is further dissolved during post-processing to achieve the final part.
There are many benefits of the machine jetting process and it is also the most accurate printing process when dimensional accuracy is considered. This also offers multiple material support with full-color printing.
The surface achieved of the parts is also smooth. Great for creating functional prototypes and those parts are need an extraordinary outer appearance.
However, it is expensive and not feasible for many applications that are financially unviable.
Also, the parts are a bit brittle and sensitive to UV light. So, outdoor applications may result in the degradation of color and other properties over time.
BJ (Binder Jetting)
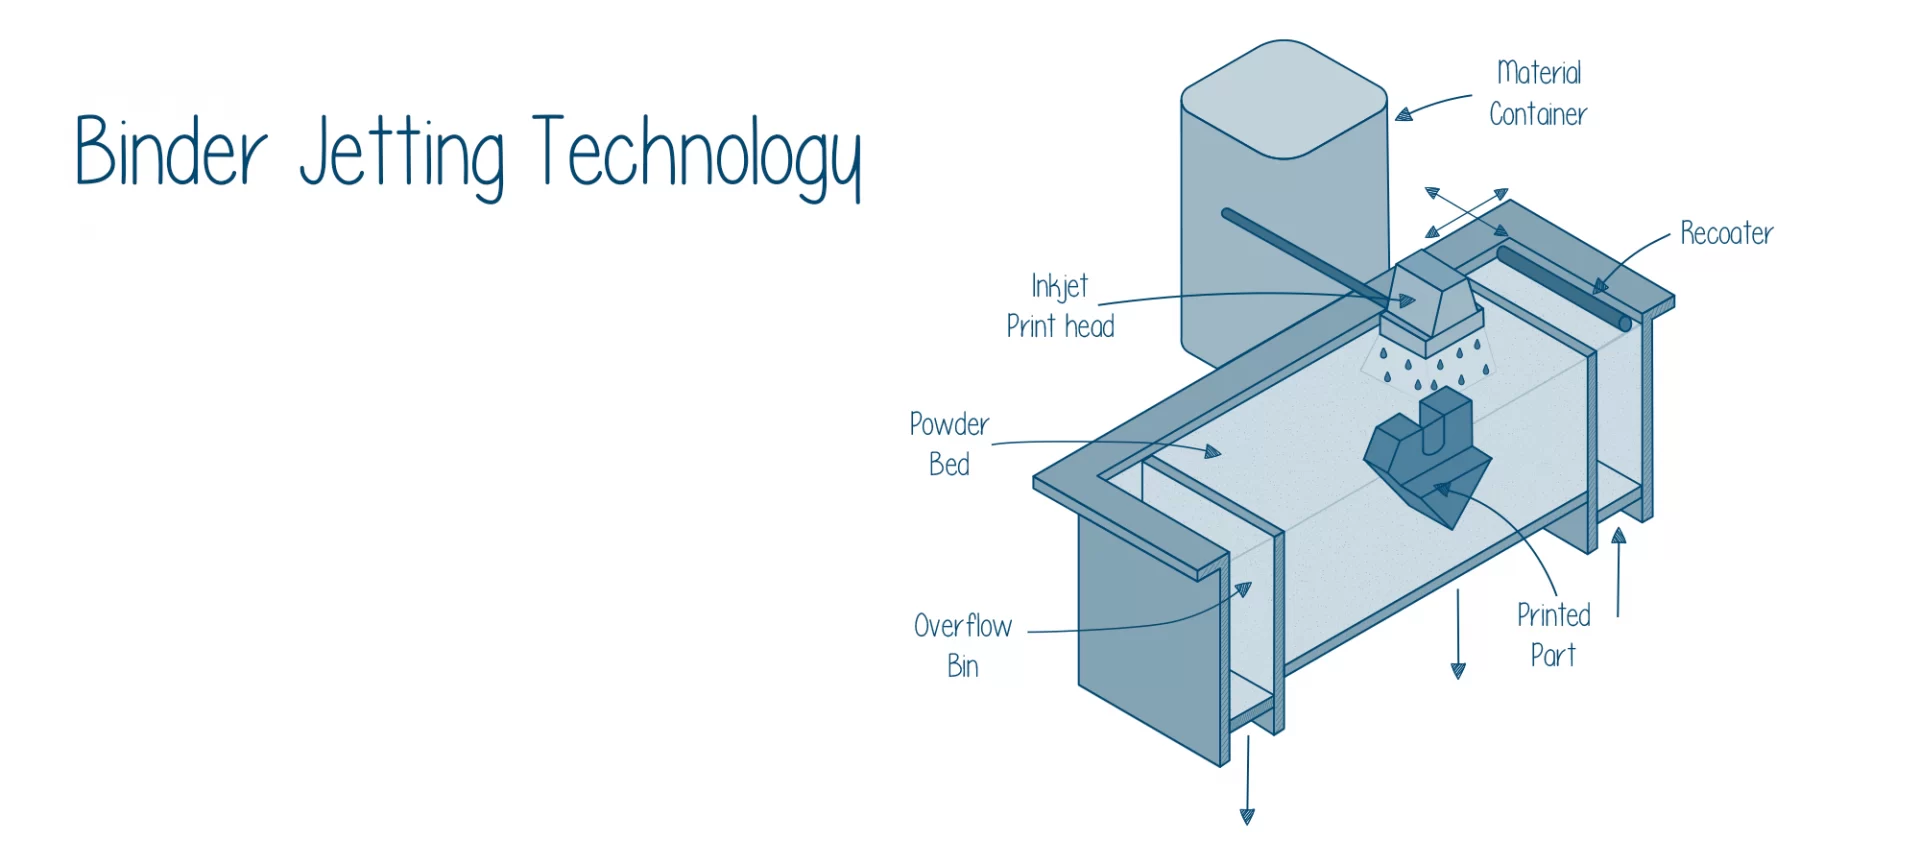
This technology is flexible as compared to all other processes and can be used for a variety of applications.
One can use binder jetting to create low-cost metal 3D printing as well as large molds.
To know how binder jetting works, let’s take a look at its working.
The 3D printer uses metal, sandstone or acrylic which is deposited in the powdered form over the platform.
Following this, an adhesive is ejected as droplets over the particles through an inkjet head. This helps bind the particles together to create the first layer and so on.
At last, the part is removed from the printer’s surface and post-processed as it is too brittle to be used right away after printing.
Processes like thermal sintering or infiltration are involved in further strengthening the final product.
Unlike DMLS and SLM where the manufacturing cost is too high, binder jetting comes for a low price. One can also create large sandstone parts with the help of binder jetting.
The process can also be involved in creating complex geometrical designs as the support structure is not required at all for this kind of printing. Moreover, multiple parts can be printed at once.
The other side is that binder jetting is not as great at various other processes in printing high mechanical properties for the parts because of porosity.
Also, the special process involving manual intervention after printing restricts it for few special designs.
DMLS & SLM (Direct Metal Laser Sintering & Selective Laser Melting)
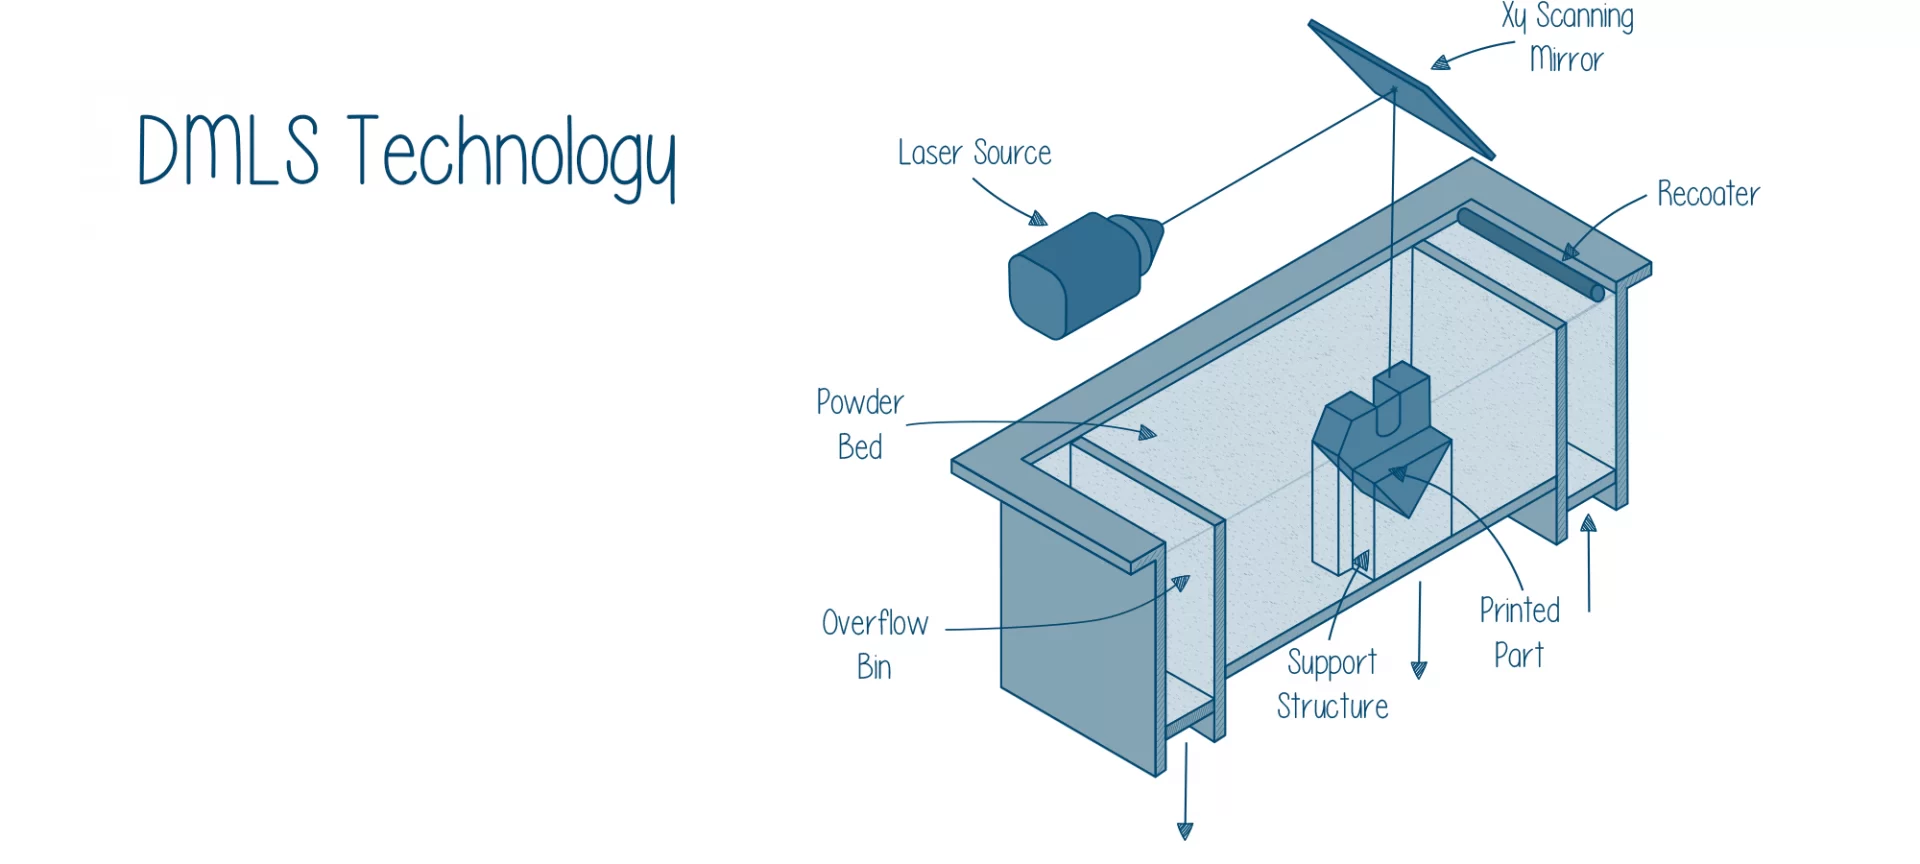
DMLS and SLM are similar to SLS with one difference: Unlike SLS, DMLS, and SLM prints metal parts.
Similar to SLS, DLMS and SLM also use powder particle which is bonded together to form each layer. The laser source is used to bind these particles together.
There is a difference between DMLS and SLM as well. In DMLS, metal particles are heated to fuse them at a molecular level together. However, SLM works for the full melt of particles of powder.
Also, DMLS and SLM always require a support structure.
Once the printing is completed, the support can be taken out manually or with the help of CNC machining. At last, the heating is done to take off any residual stress from the desired parts.
Both of these two processes are great for manufacturing metal objects.
And, can provide perfection to the complex geometric designs. The strength of the parts obtained through these processes has been stronger than the metal itself.
These processes can even help in manufacturing complex alloys such as superalloys with ease.
The 3D printers running with these processes are highly expensive.
3D Printing Materials
3D printing can be done through various materials. And, when you think about the applications, the sky’s the limit.
The material can be categorized as follows:
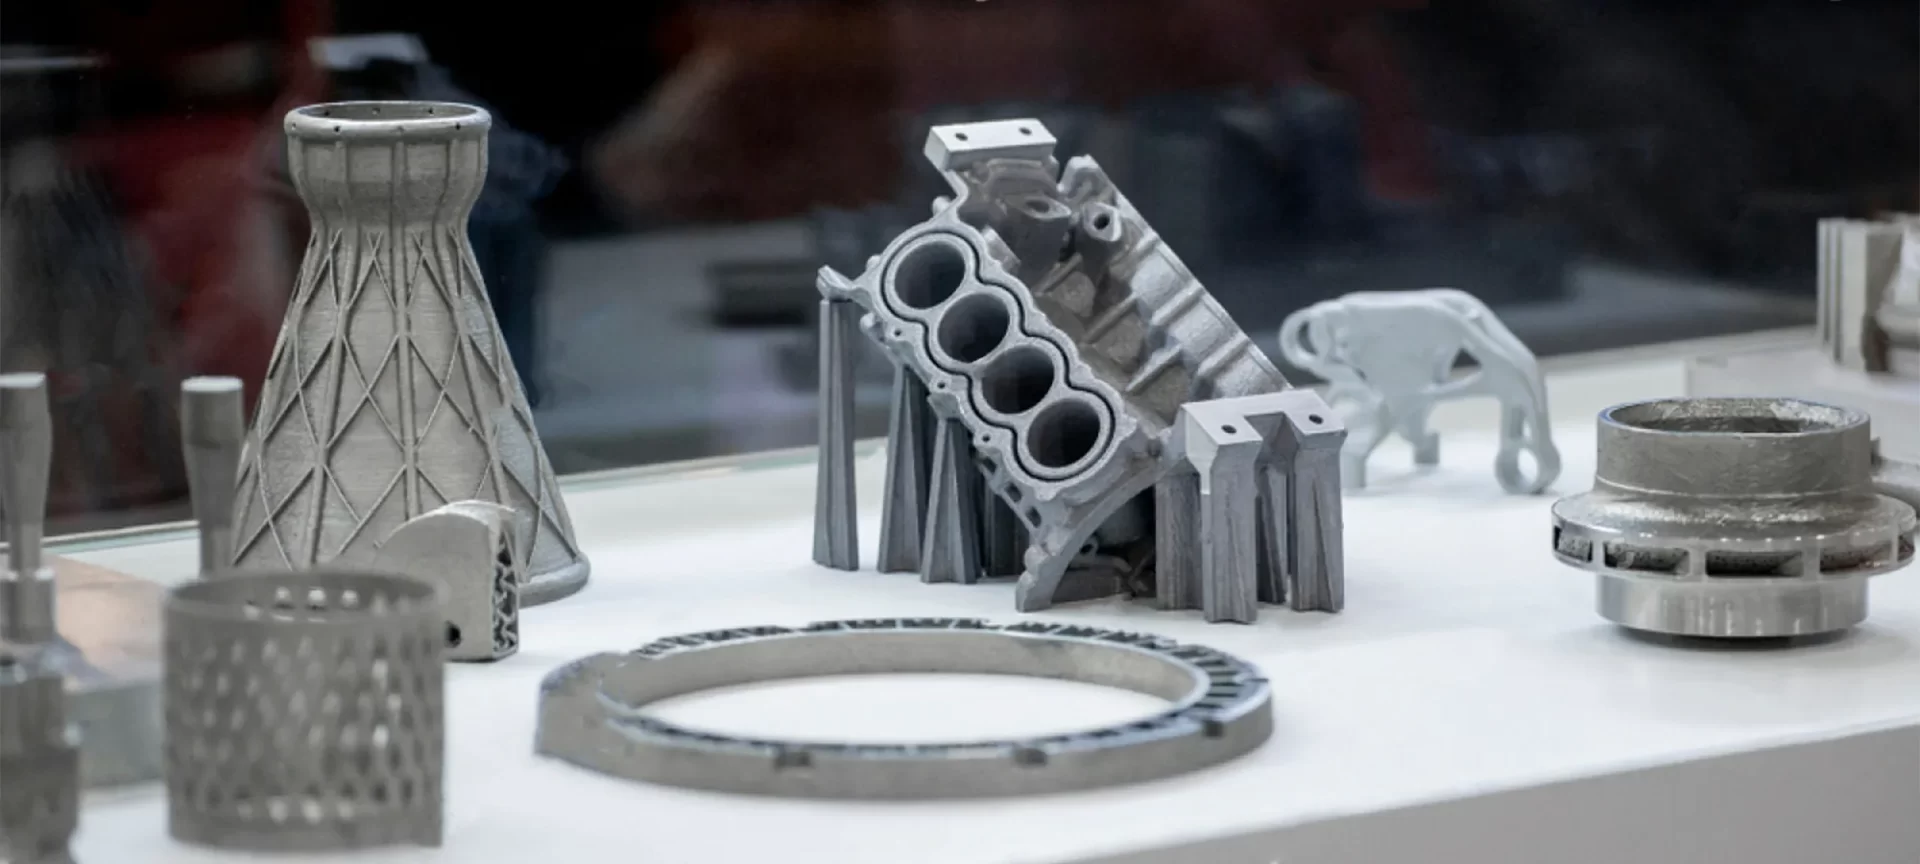
Metal
Metals are very important material when it comes to 3D printing. Because of its great mechanical properties, metals can be used to create huge parts for multiple applications for different niches.
Either you talk about tooling implants or engine parts, metals can be utilized everywhere.
The best part is that 3D printing can help realize designs of metals with complex structures with ease.
Examples of some metals used for 3D printing are Dunlee Tungsten, SLM Solutions Maraging Steel 1.2709, etc.
Polymer Powder

This material is used by printers using powder bed fusion technology. For example, SLS uses this material to manufacture parts.
BASF Ultrasint PA6 FR Black is a polymer powder used to print flame retardant objects and parts. Other examples of polymer powder are DuraForm PA White, HP PA 11, etc.
Resin
This was the first material used for 3D printing. This material was usually good for creating vacuum casting molds and visual prototypes.
However, with the advancement in technology, resins can now be used to build various other parts as well.
Some of the examples of resins are Ameralabs AMD Line, Carbon EPX 82, BASF Ultracur3D RG25 LV, etc.
Filament
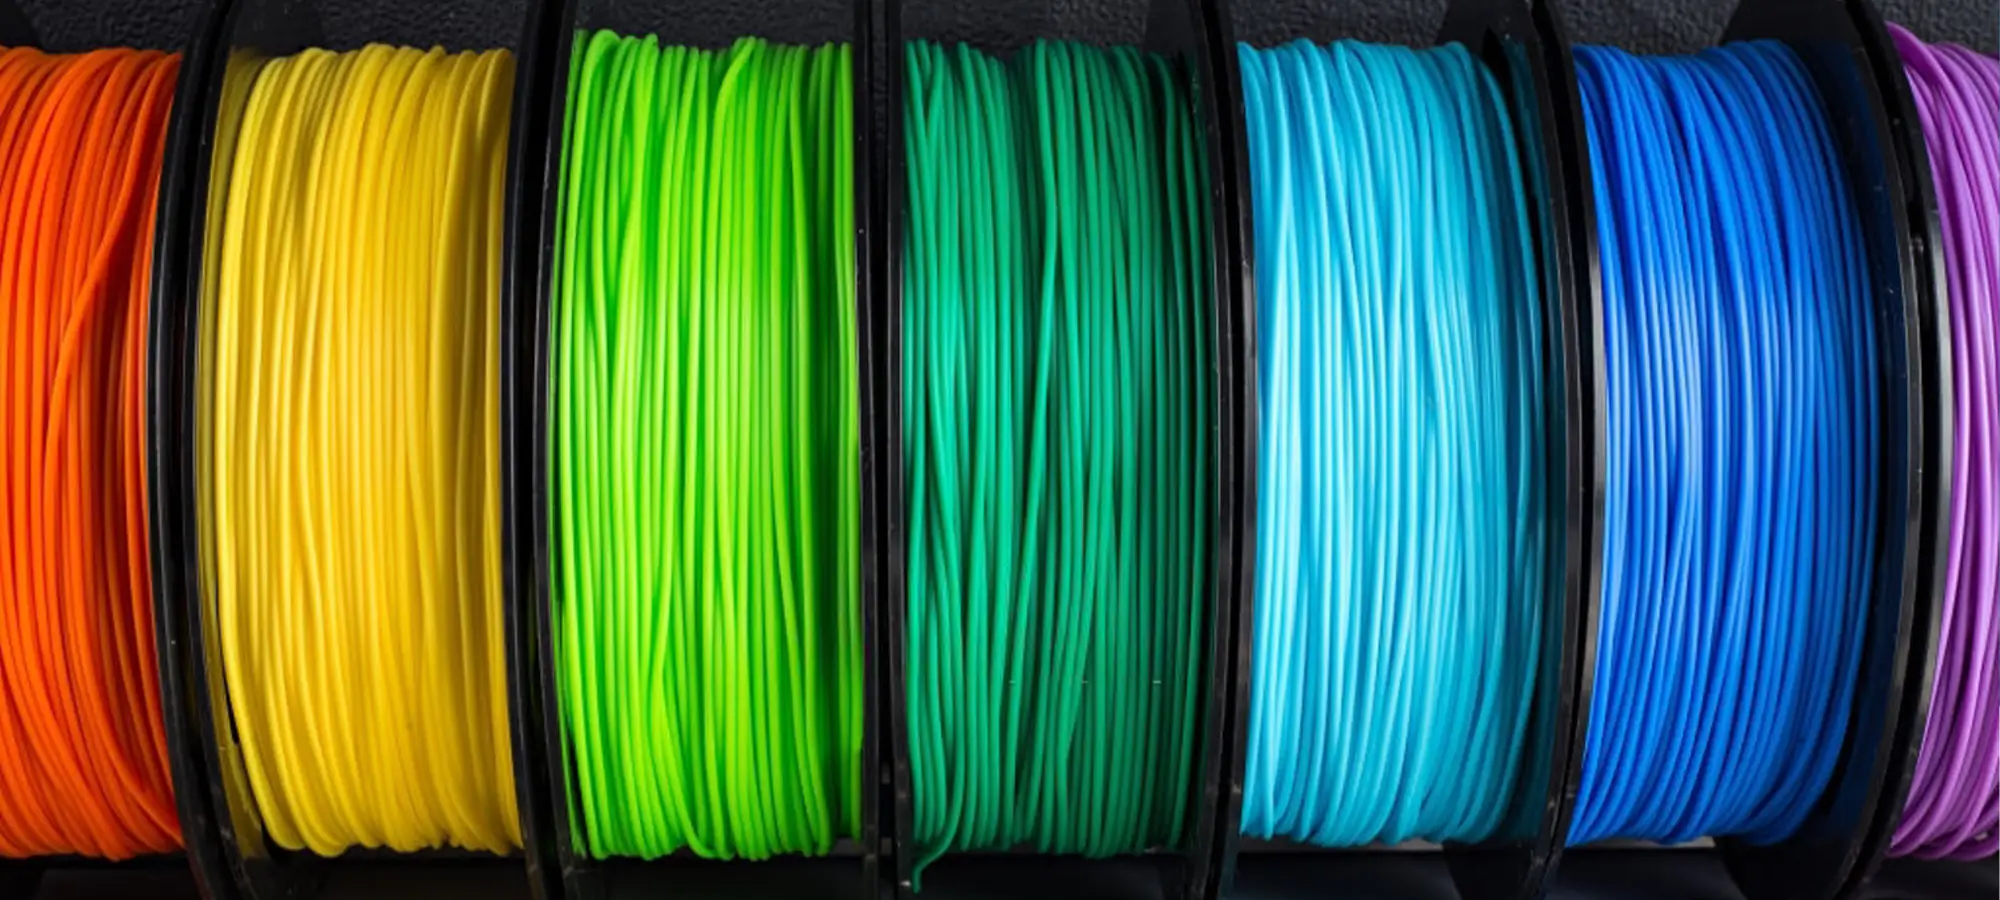
Filaments are used by FDM processes for 3D printing. A number of filaments can be utilized to do the printing. For example, PLA, PETG, ABS, Nylon, Polypropylene, PEEK, HIPS, ULTEM, Polycarbonate (PC), TPU, ASA, PVA.
The properties of filaments and their quality depends highly on the brands you choose.
Choosing a 3D Printer
There are many variants of 3D printers in the market and one is sure to feel difficulty in choosing the 3D printer for oneself.
However, by understanding one’s need and proper understanding of each process that the 3D printer works on, it is not an impossible job.
First, let us start with understanding which process one needs to select when planning to start 3D printing.
The below decision-making tools will help in accessing which process would help and ultimately which printer to choose:
• The Properties of Material:
Different material has different physical and mechanical properties. For example, you must consider its strength, impact strength, smoothness, hardness, and other properties while selecting a material.
This will help in choosing the technology that would support the material 3D printing. For instance, if you require metal, you cannot use the FDM process or SLS process.
• The Requirement of 3D Printing:
When I say the requirement of 3D printing, it suggests that the reason for 3D printing must be clear before you choose the process or the technology for 3D printing.
If you are looking to print something for visual appearance, you must go for processes that help achieve the smoothness of the surface.
However, for functional prototyping, a process that supports strong and heat resistance printing would be a clever choice.
• Mass Production or Single-Use:
Not every 3D printer can be used for mass production. Most of them can create one part at a time.
• The focus of 3D Printing:
Every process differs in terms of accuracy, print turnaround time, print volume and other specifications.
One should be clear about the main concern when targeting 3D printing.
All these decision-making tools will greatly help in deciding which process to go with.
Things to Consider When Choosing a 3D Printer
Once you have selected the process you are going with, it is time to choose the 3D printer.
• Build Area:
This is the maximum size of the part you can create using a specific 3D printer.
• Nozzle:
Many FDM printers come with an exchangeable nozzle. When printing parts, your nozzle diameter requirement may differ for different parts.
So, an FDM printer that provides such feasibility is a better choice.
If you are working to create parts with excellent visual appearance, you must choose a smaller nozzle.
This will result in a smoother finish. If you want fast printing, a bigger nozzle will be more useful.
• Extruder:
If you want colorful printing, multiple extruders will be the right choice. Or else, the single extruder will also be fine.
There are other features that you must consider while buying the 3D printer.
There are other things that you must compare when planning to buy an FDM or any other 3D printer.
Thumb Rule
- Start with prioritizing what matters most: Functionality over appearance
- If there is more than one process that can be utilized to build parts from a single material, you must compare costs and properties for both processes to conclude what will best fit your requirements. You can also check our article about Steps to Optimize 3D Printing Cost.
- If your preference is to print functional polymer parts, thermoplastic is a better option over the thermostat. For which, you can go with FDM or SLS. Again, you must compare both the processes for their cost and properties.
- In case you choose appearance over functionality SLA or material jetting would be the best choice, considering cost and properties for both the technologies.
- If your parts are made of metals, choose DMLS for high performance. However, if you want to cut cost and 3D print large parts, use binder jetting.
3D Printing Business Ideas
Being a beginner, you should concentrate on small businesses that can be made possible with the help of 3D printing. There are a lot of ways to make money with 3D printing. Here are a few business ideas that will help you kick start your business from scratch.
Customize Already Existing Products
There are many ways you can use 3D printing to customize already existing items by adding your flavor.
For example, think of a toy store. You can create animals like dinosaurs, mythological animals and characters, superheroes from favorite movies and much more.
By changing color and size, you can come up with hundreds of ideas. Being creative with your work would get you a good profit as a start-up. You can also sell these items online.
And, if you are able to attract the right audience, who knows you can convince crowdfunding companies to invest in your project.
If you can invest, you can even hire model designers and 3D print specialists to make this work even better.
You will not have to do all the jobs yourself. If you wish to sell online in a limited number, you can do it all yourself. A little learning and experimenting will go a long way.
Print Designer and Fashionable Products
Usually, designer products require customization the most. If you like to sell glasses or home décor items, you will have to think of creative designs that could lure your customers.
How about making some changes to the designs you came up with earlier and fit it according to your customer’s requirement is not so difficult?
This is possible with 3D printing. If your designs aren’t exactly what your customer is looking for, change it as they like it.
3D Print on Demand
There are already companies that print on demand and you can be one of them making a huge profit. If you can invest in a few 3D printers, you can take requests for 3D printing and print the items accordingly.
Either you ask for the blueprint or charge extra for designing for them. This way you can make extra profit.
Print Prototypes (Rapid Prototyping)
There are companies that always look for prototypes that come at a lower cost and can be tried on models to confirm the designing phase.
However, they do not want to invest time operating 3D printers themselves. You can offer your services (Rapid Prototyping) to these companies.
Either its motor parts, shoe design or designer costume, or even props for movie making, you can get many clients.
What you Need to Start a 3D Printing Business
Now you know that you can make miracles happen when considering 3D printing as your business option.
3D printers let you turn your imagination into tangible creations. The best part is that the business model is easily accessible helping everyone turn their ideas into reality.
There are certain basic things that you would require for starting a 3D printing business:
CAD and Slicing Software
There is two software that you would need very much. The first one is the CAD tool and the other one is the slicing tool. Both of the software can be accessed from the internet for free.
There are open-source versions available online. However, as you grow as a business, you must buy the licensed software for better designing and especially for slicing.
You need to consider the orientation available with the slicing tool as well as support structures generation.
Material
You cannot go ahead without the right material. You must check which material is compatible with which 3D printer.
Otherwise, you may end up destroying your printer. Also, check for the high-quality material if you are serious about printing high-end products.
Sample Kit: If you are not sure which material will be the best fit for your design, you can ask for a sample kit and try out various materials until you finally understand what you need.
3D Printer

MAKERBOT REPLICATOR+ DESKTOP 3D PRINTER

Services of a 3D printer can also be outsourced from a different firm, but getting it in-house would save you time and will lead to more margins. Depending on your usage and what you want to build, you can opt for the right 3D printer as suggested in the article above.
Training
While this is not necessary if you have money to spend on experts, you can always choose it to know your business better. Use online courses and guides to hone your information about 3D printing.
Make sure you know what are the basics of this business model to have an idea of what is going on in your company and if your employees are doing the right thing.
Experts
Now, if you are not able to invest time doing all the processes involved with 3D printing or you do not have enough knowledge and expertise to design or operate the 3D printer, you can always opt for experts.
Hire experts who can use software and 3D printer and can make things possible that are running in your ideas.
Funds
You will have to spend on a 3D printer, employees, material, software, and various other setup costs. Even if you wish to start as an individual, you will have to incur the cost of a 3D printer and material.
The funds will depend on how big you want to start and which 3D printer you wish to purchase. As there is a huge difference between certain choices.
Selling online will have website hosting costs, marketing costs, and other charges. So, staying steps ahead will only help you to keep your business running with no or minimum setbacks.


