The number of enthusiasts connecting with the 3D printing community is surging exponentially with time. As technology is shifting to the mainstream, an urge to learn about 3D Printing is also gaining popularity.
Some feel content only by learning how to operate a 3D printer, however, some like to build their own machine from scratch. With so much awareness and many users already traveling the same path, it is no more an impossible task.
You can make your own 3D printer and it is completely possible. The best part about building a 3D printer from start is that it provides the user with huge exposure to technology.
One can learn the basic design of the machine and can even come up with few upgradations to the existing features.
If you think that your innate passion is more about exploring the depth of technologies, you can definitely try hands-on building a 3D printer.
It would be incorrect to say that the overall experience would be smooth because it won’t be. Before you get into the nitty and gritty of the technology, you must expect to face many challenges.
There would be times when you would consider going back or giving up. However, you must try. The online community is huge and very supportive. You can also find online videos to make things possible. It is you who must decide to carry on.
How Do You Make Your Own 3D Printer?
There are two ways to build a 3D printer from the start.
Put Every Single Nut Yourself
The first way is to start building the 3D printer all by yourself. You must purchase all the parts yourself and connect them to complete the machine design.
From bolt to wiring to every possible connection and even the frame, you must do everything all by yourself. This would be a great learning experience.
However, you must be technically sound to complete the project on time. Or else, you may give up in between because of the complexity the job entails.
If you are a complete beginner with no technical background, you may like to skip this method and jump to the next one.
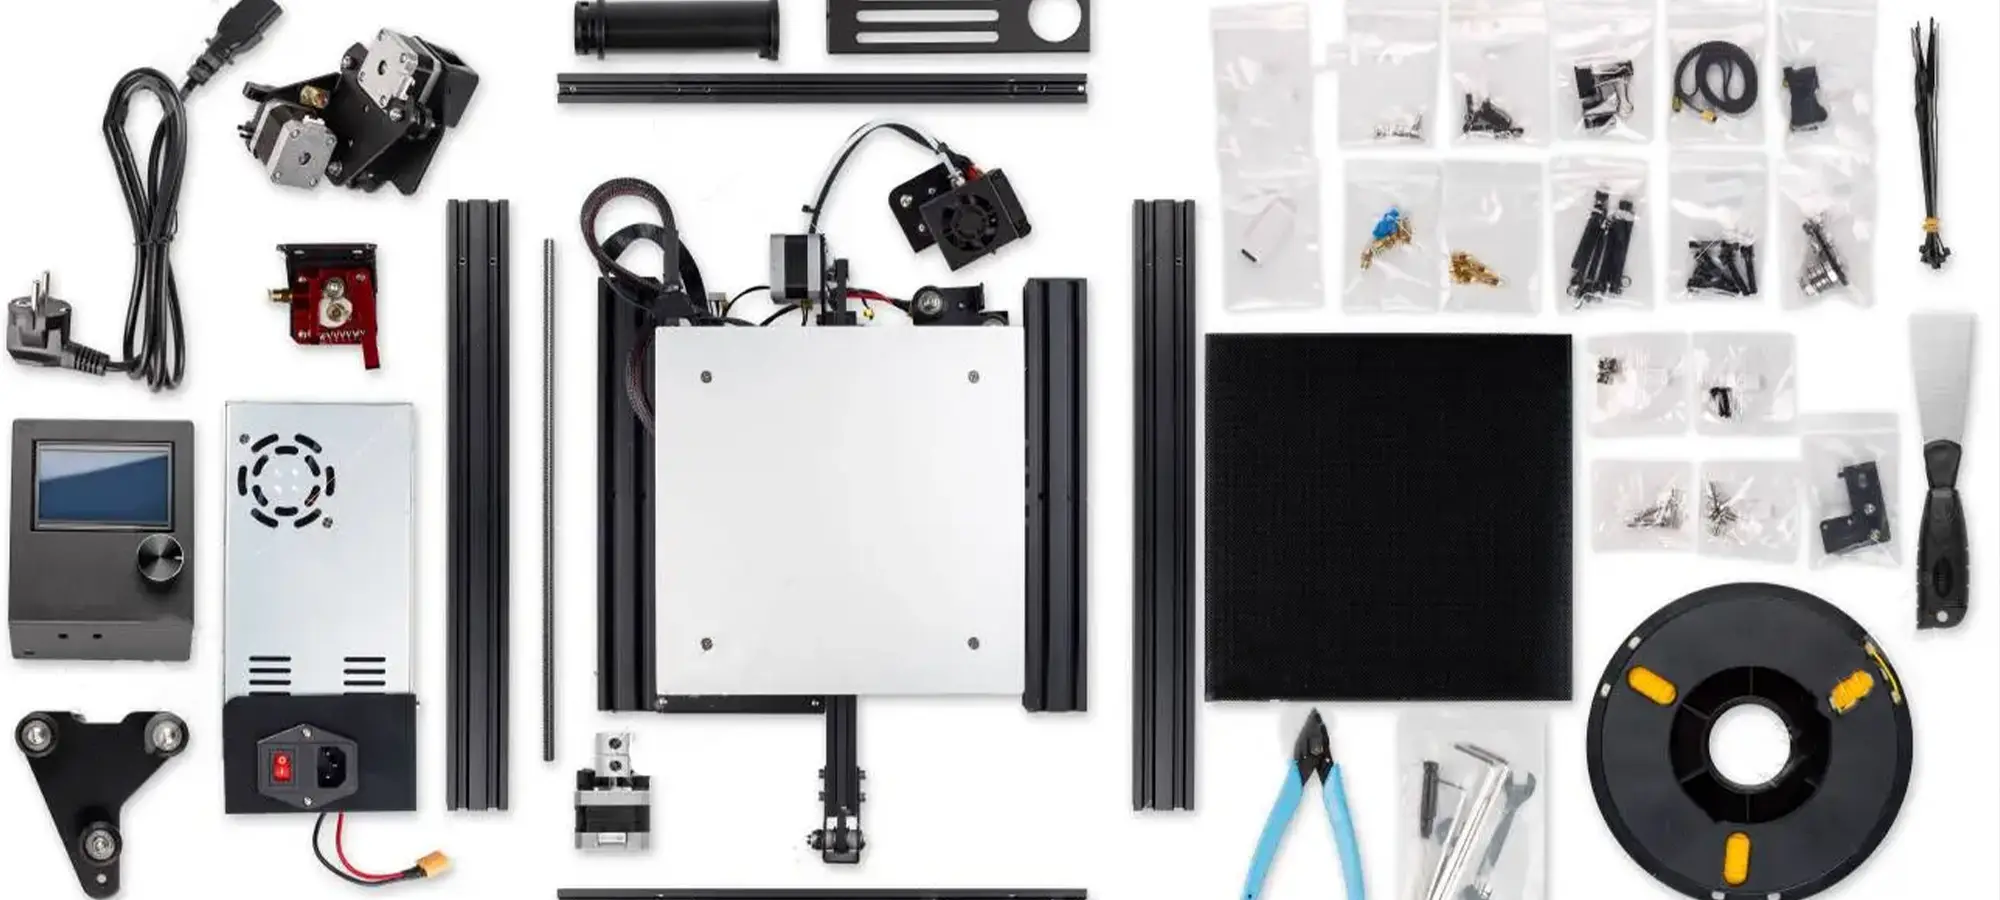
Use DIY Kits
There are different kinds of DIY kits offered by manufacturers. Some are mostly assembled and need some screws to tighten. However, others are completely unassembled.
This means that you would be working on everything yourself. However, you will have the entire part in one place.
Plus, the 3D printer guide and online help to get you through the challenges you witness in between of the 3D printer building project.
This makes a huge difference for those who want to learn deeply about 3D Printing. And, if you wish to do that, never opt for semi-assembled kits. Go for the completely unassembled ones.
Or else, why not buy an assembled 3D printer anyway? And, if you decide to go for kits, you would be able to save a few extra bucks as well. Hence, an affordable option, isn’t it?
What are The Steps to Make Your Own 3D Printer?
Building a 3D printer is not an easy task. Now that you know that, ensure to make proper plans and seek for right goals before jumping into the process.
Define the Design and Specs
As you want to make your own 3D printer, you may have a look and feel of the design in your head. You must plan the material for the outer frame, the design of the axes and many other things.
You can even draw and decide for better. Moreover, there are different features that make 3D printers unique. Some have dual extruders. Some even boast closed frame with HEPA filters.
So, you must decide on the features that you wish to include in your 3D printer. However, as a beginner, you must satisfy your cravings to the bare minimum.
Instead of deciding a complex spec and design, you must think of the minimum requirement that would accomplish your job.
List and Buy Parts
You will find many online websites listing the parts required to build the 3D printer. The parts can be bought directly, online. However, you can also try other alternatives to keep the cost low.
For example, you can check with users on common forums who are willing to sell parts at a reduced rate. Or, you can even use a few parts from other scrapped devices that would do the trick.
Such as the stepper motors from old school DVD drives and power supply from an old computer. These would work just fine for your DIY 3D printer as well.
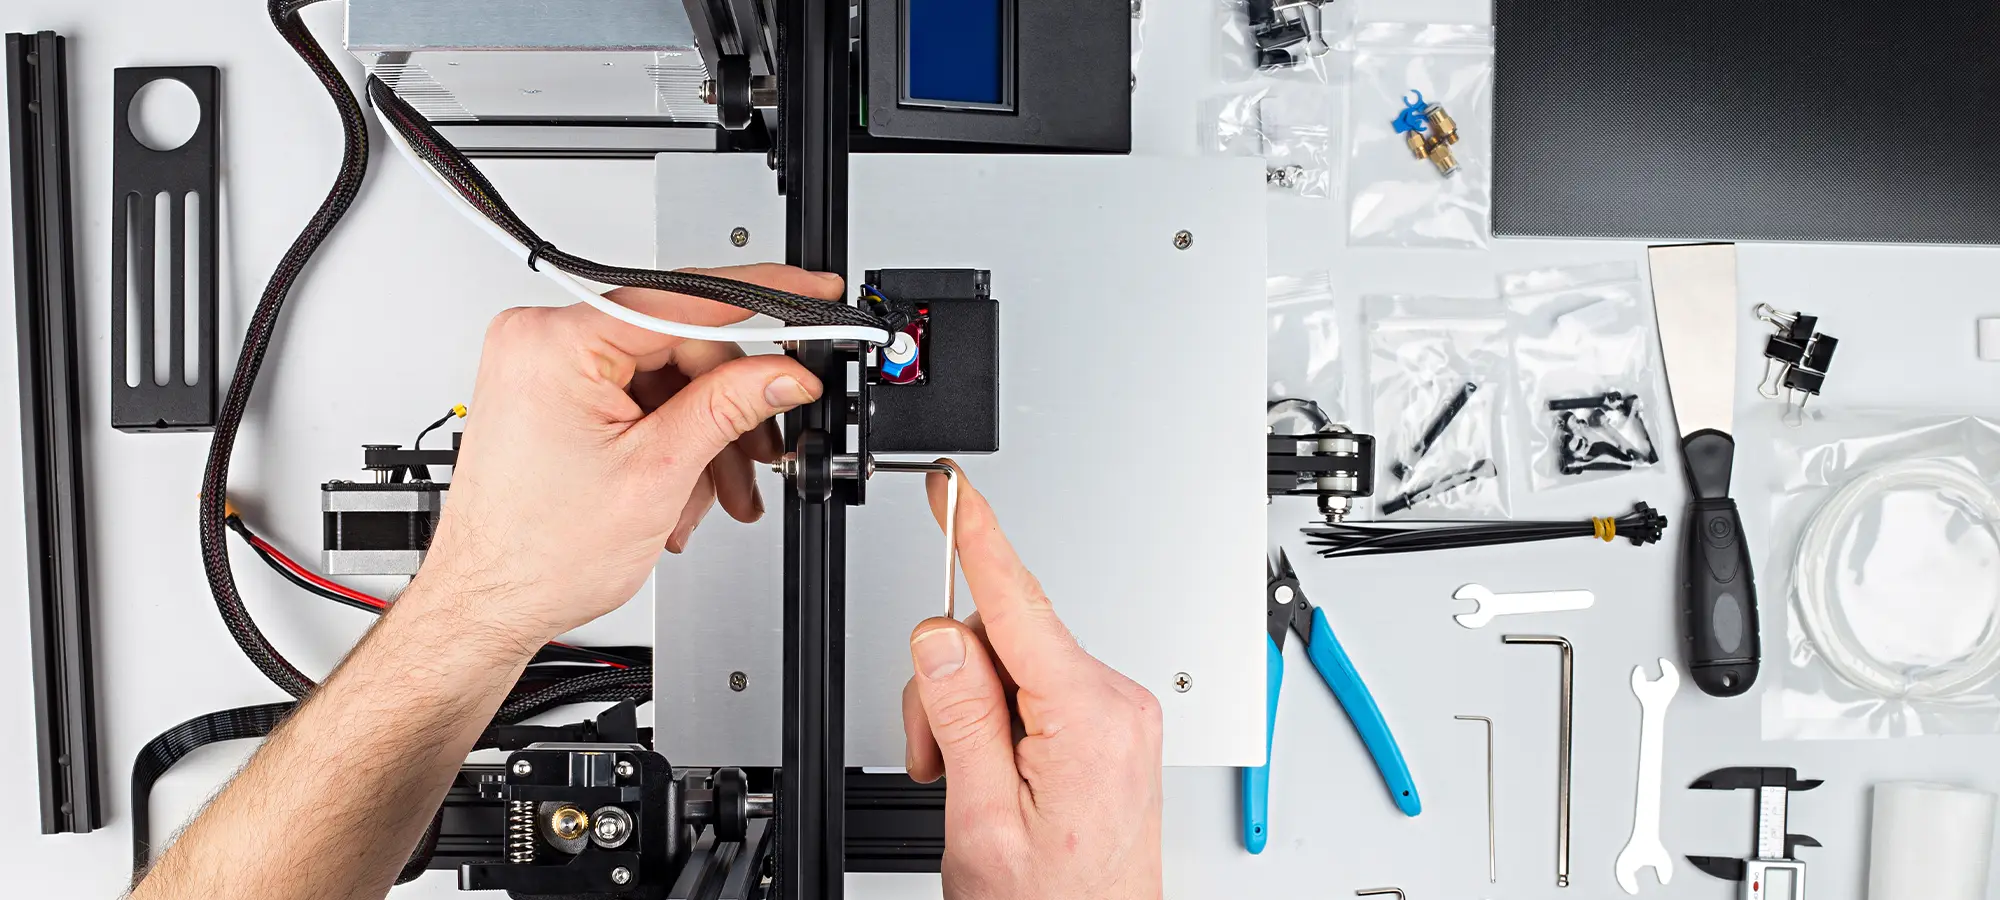
Take it Slow
You must understand that the project won’t complete in a week. It can take up to a month or a few months, depending on the average time you invest every day.
Endure you have the tools to complete the job such as soldering wires, electrical wires, and many others. Expect to get into trouble every now and then.
Do not sit and sulk, rather click pictures of the completed machine and parts giving you trouble. Seek help from online communities by uploading images.
This would help others to understand and resolve the problem right away. Do not stop before you complete your 3D printer.
Test it
Now comes the testing phase. You must calibrate the bed and extruder and test the first design.
Try simple ones and see how things work out. If you need any assistance, you can again reach out to the experts online. If there still things are undone, fix it and test things again.
Important Tips to Follow
When building a 3D printer on your own, you may need some great tips to make the work smoother. Although these do not guarantee trouble-free experience, you may save yourself from one or two hassle.
Aim for Sturdy Frame
After you have completed building the 3D printer, it would be disheartening to find the shaking frame being the root problem for failed prints.
Hence, when deciding the design of the machine, you should concentrate on the right design of the frame and the material used to create it.
For example, if it’s a cube-style printer from aluminum extrusion, you must include angle brackets. Or else, if it’s from the Prusa i3 family, get the frame from stabilizers. Or else, your shaky frame would end up running your design.
Thought out Belt and Spindle Drive Systems
The 3D printer is a composite of various components that work in conjugation to provide desired results. Similar is the drive system.
However, the drive system’s longevity depends a lot on the involved parts. From eccentric pulleys to couplings to the parts that result in a backlash, could become the reason for major problems.
Hence, you must ensure that the components forming the drive system are well configured.
Ensure that the belts are not being diverted from their path because of the vibration caused by grinding belt teeth.
Also, make sure that the belts are not rubbing against other parts by using flanged idlers. Alternatively, you can also use washers to prevent the same.
In the case of the Z-axis, for a better stepper motor performance, use integrated ACME lead screw shaft instead of the threaded-rod-on-a-flex coupling.
Look for Powerful Controller Board
Mostly, the decision would depend on the functionality of the 3D printer you are trying to achieve.
However, in case you are looking to create a complete plug and play device, that does not ditch you with the change in environment, avoid products that use cheap USB-to-serial bridge replacements.
Look for the right controller board that makes you pat your back every time you start your 3D printer for designing desired models.
Include LCD Controller and SD Card Reader to the Design
Want to make your 3D printer a standalone device, needing no help from external devices? If that is so, plan to include the LCD controller with an SD-card reader.
This could transform your device into a standalone machine, capable of working without any connection to the external source. You can choose the RepRap Discount SmartController.
This has a non-graphical display, however, it can cater to most of the configurations required to start the printing process.
Use 0.9° Step Angle Stepper Motor
If you are on a tight budget, you may feel like using a 1.8° step-angle stepper motor. Don’t do that ever. You must be planning to take work from your 3D printer and not store it at a corner as an accomplishment.
Use 0.9° step angle stepper motor instead, for X as well as the Y-axis. If the extruder included in ungeared, make use of 0.9° step angle stepper motor.
These would help enhance the mechanical resolution of the machine to a completely different level. Also, ensure that the multiple stepper motors aren’t wired or connected to the same driver.
When not to Use Linear Guides
Is your 3D Printer design is bulky and more than the size of a typical desktop 3D printer? If not, do not use linear ball bearings in X as well as the Y-axis.
These could, otherwise, become a huge problem later when printing. Although you can get the best quality linear guides available in the market, these won’t be capable of holding the quality for long.
These are susceptible to blocking, sooner or later. So, what to use instead of these linear guides? Polymeric slide bearings are the alternative for these linear guides that work better and efficiently for long. Being self-lubricating, these are not prone to blocking and are completely maintenance-free.
Use Trustworthy Temperature Sensors
Before you plan to order temperature sensors, remember to check the quality and get it from a renowned brand. Make sure these are accompanied by trustworthy datasheets.
Or else, you may not be able to measure the temperature precisely. Why get into guesswork when you can accurately measure the temperature?
Also, the temperature sensor must provide a decent thermal coupling to the hot-end heater block. This would allow maintaining a steady temperature. The best option is the thermal compound.
Choose an Enclosed 3D Printer Design
You may be thinking to stick to an open-frame design being a beginner and the experience is the first of its kind for you.
Although you must keep the complexities away and stick to the basic design, this is something that must be included. If not, you may end up repenting later.
A closed design is very helpful in increasing the potential of your 3D printing. You do not want to stuck with just PLA.
Using a closed frame would help you print with more specialized materials such as ABS and many others. Hence, giving you more options to create different models with varying physical characteristics.
The Conclusion
Making a 3D printer is a great experience. As the matter of fact is that a lot of enthusiasts wish to create their own 3D printers. Some lack time management and some aren’t confident about their skills.
The task is not easy, but completely possible. Because of the unlimited help available online, it is no more just a dream. Many have already come up with unique designs that work better than the ones sold by manufacturers of 3D printers.
The videos and tutorials available online are very helpful in assisting individuals to carry the project with successful results without any prior knowledge of the field.
The learning experience that the DIY projects add is very useful in understanding the nitty and gritty of the 3D printing niche. Many users have made it possible and so can you.
But planning is very important. You cannot just decide a day to make your own 3D printer and start putting different parts together.
Concentrating on what you wish to achieve with the machine and assembling the pre-requisite tools and parts come beforehand.
You must take note of everything that you already have and the ones that you must buy. And, things would be simpler this way. Or else, you can simply order the DIY kits online from the manufacturers of 3D printers.


