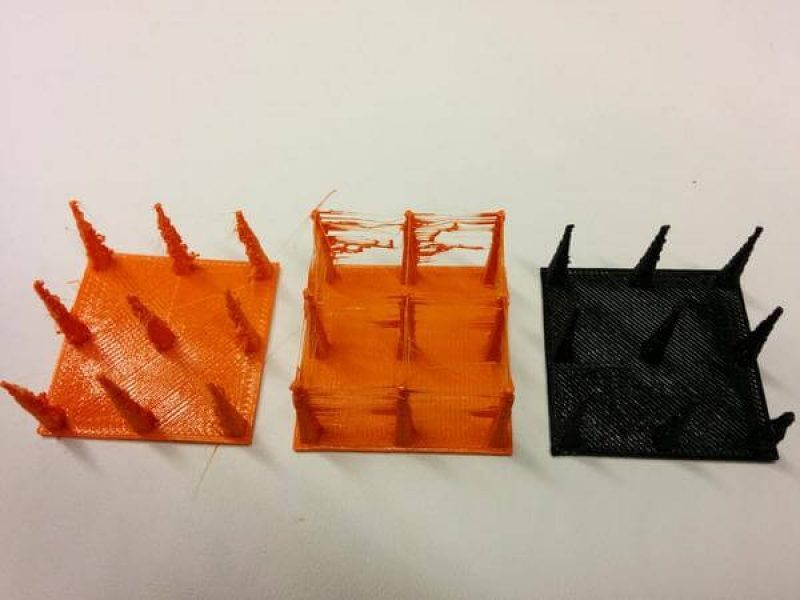
Small strands of plastic are seen on 3D prints at places where they should not be seen. These unwanted strands of plastic are called strings. And the prints which have them are called stringy 3D prints.
Stringing is something that can be material dependent, but here in this article, we describe some general things you could do when dealing with strings. Something we also do in this article is that we list down factors on which stringing is dependent. And how by increasing or decreasing the factors, the stringing can increase and decrease.
We will also tell you, how, these factors are related to other scenarios like stringing and by increasing and decreasing them, what effect is this going to have on those scenarios. But first, let’s understand what stringing exactly is.
What Exactly are Stringy 3D Prints?
 Credit: twimg.com
For explaining the scenario we are taking an example of an FDM 3D printer. When the nozzle is traveling across an open space to get to the next point, it may sometimes ooze melted plastic of the filament.
This oozed out melted plastic of the filament then solidifies and sticks to the printed parts forming lines of plastic-like strings connecting one part to the other. These plastic-like lines are known as a 3D printer stringing, and it leaves your 3D printed parts with thin strands of plastic that resemble cobwebs or strands of hair.
This is something that is only observed in practice, so if you read theories about 3D printing, this does not exist anywhere. In theory, the nozzle of your printer nozzle should not deposit plastic as it travels through open air. Although because the nozzle consists of molten plastic it will often leak onto parts where it shouldn’t, leaving your prints with what looks like “whiskers”.
One of the most obvious causes of stringing in FDM printers are using incorrect retraction settings and setting the hot end temperature too high.
However, it depends on the filament to the filament. For example, when you are using PETG the required temperature would be relatively high for melting and is notorious for stringing. But when you are printing PLA and ABS, they have no such issue.
What Causes Stringy 3D Prints?
As discussed in the introduction there are some factors that influence stringing. And by increasing and decreasing these factors you can increase or decrease the stringing. So, let’s have a look at those factors.
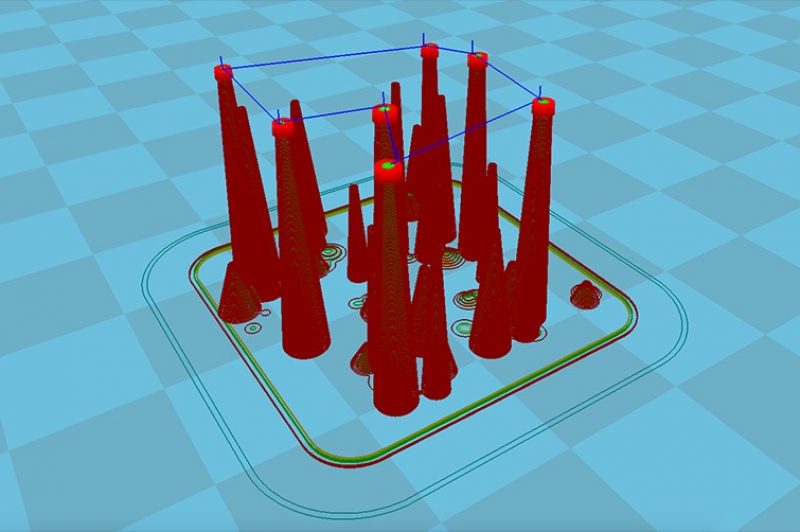
Retraction
 Credit: ultimaker.com
There are times when the printer’s head travels at the places in a print were moving between two printed parts is more and you want to ensure that there is no plastic part left between.
This is the time when you use retraction. What this would do is, when the travel is more, the filament will be pulled back a little bit by the feeder, so that it doesn’t leak from the nozzle over the places where do not want any plastic during the travel. Isn’t this a great option to prevent stringing?
Retraction is a setting that can be found in a slicer named Cura and fortunately it is in the default settings of this software. If you doubt about the retraction setting is on, you can always check it before starting to print.
Another place where you should also be able to see this setting is in the Layers view that slicer Cura offers. It will be visible in small dark blue vertical lines that represent the retractions in the print.
Sometimes while printing some parts, although retraction may be turned on, there are chances that small strands of plastic show up on places where you don’t want it. In such scenarios, you can always alter some other parameters from the ones mentioned below to balance the complete case.
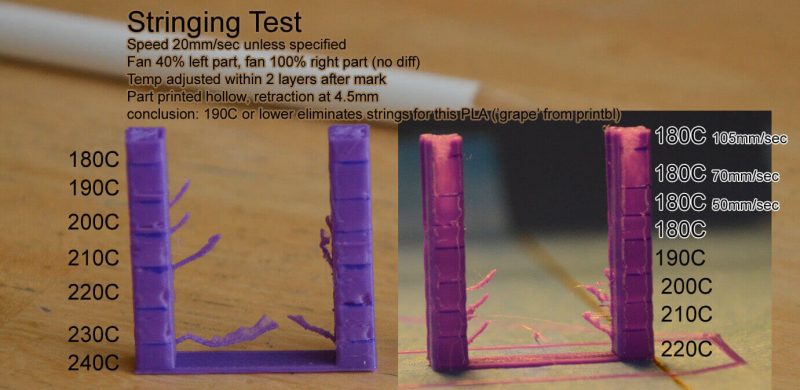
Temperature
 Credit: all3dp.com
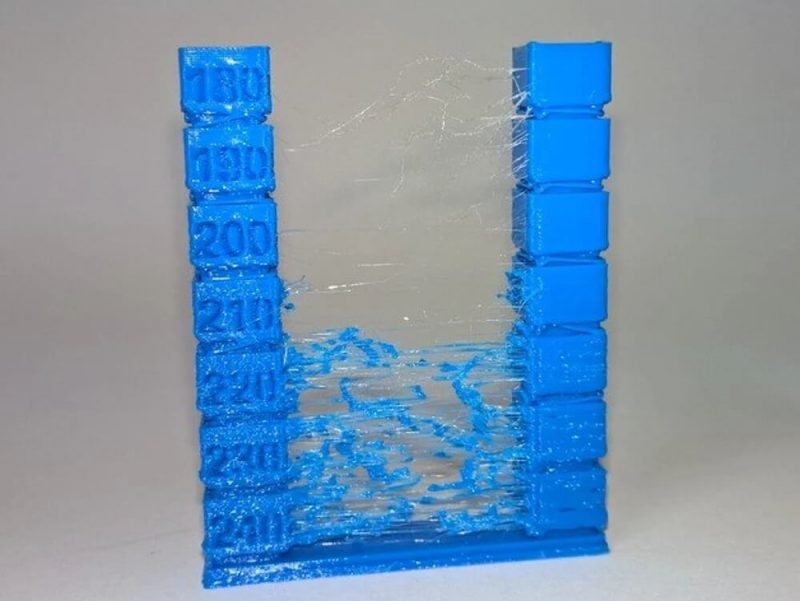
Temperature is one of the most important parameters for reducing the number of strings. Remember, it is observed that a high temperature means that the material will be more liquid.
This in turn means that there are more chances that while the travel is happening, the liquid is dropped on the print head even if you are using retraction. In this case, by using a lower temperature the material is less liquid and thus less likely to string.
To avoid stringy 3D prints, keep the temperature as low as possible. Although it is not possible for us to mention one temperature that will work for all the materials because different materials have different melting points.
So, it’s hard to say which temperature to use exactly, temperature not just differs according to the material that you are using, but also according to the color of the material that you are using. So, check out various types of print settings that are mentioned for various types of materials and the color of the material that you are using.
If you are someone who always notices stringing on your print, we would recommend lowering the temperature in steps of approximately 10 degrees.
This is to find out what the best setting for your material is, it is a kind of experiment. And it is not true to say that prints of some materials are only available at some temperatures, for example, we figured out that for some prints in PLA we were even able to lower the temperature to 180 degrees.
Speed

Lowering the temperature is one thing, and lowering print speed is the other. If you have understood the stringing phenomenon as a whole, it might not be hard for you to guess that speed also plays the role. By speed here, we mean the print head’s speed.
The print head of the printer travels at a specific speed from one end of the layer to the other end. And it is this speed that we need to control the stringing.
If you lowered the temperature there’s a chance that your material starts under extruding when still printing at a very high speed.
Therefore it’s recommended to reduce the print speed accordingly. This way you should for example be able to reach a low temperature of 180 degrees for PLA with a print speed of approximately 20 mm/s.
Furthermore, it could help to increase travel speed. This way the print head will travel a bit faster so that the material has less time to drip from the nozzle while traveling. A travel speed of 200 mm/s should be fine for most prints.
Making Sure your filaments are free from moisture
 Credit: all3dp.com
Every 3D printing filament is prone to moisture pickup whenever they are exposed to open air. Now, this moisture can be present in microscopic bubbles inside the filament and that can expand.
This expansion can lead to bursting of filament when the filament is subjected to the temperatures of a hot end nozzle. Although the most common result of using a high-moisture filament is a pockmarked print, these moisture bubbles can also increase the chances of stringing.
Generally, a bubble of moisture can expand and also burst inside the hot end nozzle. Here the point to note is that as the bubble expands, it exerts pressure in all directions.
The portion of molten filament that is barely hanging on to the nozzle is also included here. This pressure may be enough to cause the molten filament to flow out the nozzle, creating the stringing effect.
For avoiding stringing and hosting other problems associated with moisture in filaments, the best choice is to store them in airtight containers with a few packets of desiccant.
The other possibility is to dry filaments in an oven or inside a food dehydrator. All you need to ensure is that you use an oven that can hold a set temperature, as the last thing you would want is to overheat your filament and fuse them together.
Cleaning of nozzle
Once you have done the printing and hours have passed, the filament material will tend to leave a thin residue on the inner surface of your nozzle and this is the case with all the filaments.
Continuous printing using a nozzle that has such a layer of residue can reduce the ability of your new filament to hold on to the nozzle and this can result in stringing.
Stringy 3D prints are an outcome of the molten filament freely flowing out of the nozzle. Even if this might not be the scenario every time, but it is the scenario most of the time and this increases the chances of stringing.
For avoiding this problem completely happen, we recommend cleaning your nozzle after every printing session that lasts several hours or days. And if you think that cleaning can only be done in one way, you are wrong because there are several ways to do this.
However, we will tell you the easiest one i.e. to brush the nozzle using a brush with metal wires. You can also use a piece of filament to do the cold pull method or disassemble your nozzle and soak it in acetone.
Cleaning of the nozzle ensures that you are taking the utmost care for the stringing to not happen. However, there isn’t any guarantee that doing this would not produce any strings.
Stringy 3D prints depend on other factors too. As you can see, some of them are mentioned above too. All you need to do is apply the correct factor at the correct time and this can be done by observing and asking yourself, after getting a stringy 3D print that,” why did this happen?”
Checking your printer settings
 Credit: gr5.org
After getting so many things all right, you should at least check your printer settings and ensure they are correct. And this goes before starting to print every design that you are willing to 3D print. After all, doing trial and error on full designs can not only waste a lot of filament but is also time-consuming.
Luckily, now you also have websites from which you can download design for retraction cubes. Designs on these websites simply consist of several identical cubes separated by gaps of varying sizes. Such designs are a good torture test for determining if you have the most optimal settings for your printer or not.
This involves checking printing temperature, retraction, and printhead travel speed which are the most important ones when it comes to ensuring how to not get stringy 3D prints?
Because the retraction cubes in these designs are generally very small, the whole design can be printed in just a few minutes and uses up a very small amount of filament.
This enables you to know within minutes of your time whether you are going to get a print without strings or not. So, you can correct the other parameter, which is wrong, because of which you are getting the stringy 3D prints.
The Conclusion
If you haven’t professional 3D designers at work, let us tell you that they are the masters of troubleshooting. And the other thing that we would like to tell you is, there is no single combination of 3D printer settings that will work across different filaments, designs, and environments.
You will have to keep on experimenting hoping the stringy 3D prints won’t come. 3D printing professionals constantly adapt and understand problems, which is why they always come up with solutions.
There are many problems related to 3D printing just as stringing. Addressing them is an as multi-pronged approach, as much as approaching stringing is.
The condition of your filament and nozzle are the two main factors that can cause stringing, and so we recommend you address them first. Only after addressing them, you can play around with printer settings, with temperature and retraction taking the spotlight.
Finally, you can look at the printer’s travel speed as the print head is moving across gaps. To be fair, getting stringy 3D prints is far from being one of the more complex issues you’re bound to encounter in 3D printing. As long as you understand the complete process of 3D printing, stringing should be one of the easiest problems to solve.


