3D printing has given us the provision to build anything that we can think of. However, what is the point when we do not have the expertise to bring our designs on 3D files?
A 3D printer can only work if it is fed with a digital file. Hence, if you have been thinking that 3D modeling isn’t that necessary when 3D printing, you need to reconsider that thought. When getting to learn 3D printing,
3D modeling seems to be the most challenging task. Many newcomers who have never worked with a 3D designing tool, may find it completely confusing when trying to realize a 3D object through a 2D screen. It does sound a little weird. However, not anymore.
3D Slash has made the entire process fun and at the same time productive. Specially designed for kids and beginners, the 3D Slash learning curve is simple and easy to understand.
If you have been ignoring the plethora of benefits 3D printing can provide to your business only because you do not know how to 3D model, try 3D Slash.
You would be astonished by the user-friendly interface that would lead your way to the final STL file smoothly.
Those who have tried their hands on other alternative tools would know the difference right away. If you have failed a lot of times and 3D modeling seems not your forte, this could be your ticket to success.
What is 3D Slash Software?
Have you played Minecraft ever? 3D Slash is a modeling software, however, it feels like it has been a lot inspired by the Minecraft game which is played by placing and breaking blocks. Somewhat using the same concept, 3D Slash uses the building blocks to create models.
3D slash software makes it easy to work with the basics of 3D modeling. Once you master that, which won’t take more than a couple of hours, you can start delving into the expert’s zone.
The software is free to use and can assist you through the first few phases of 3D modeling in the simplest way possible.
Adding and removing the pixelated blocks to create models does sound like an easy job. However, you can definitely increase the complexity of the models as you like.
The thing that makes 3D Slash so amazing is its ability to be as simple as a piece of cake and turning completely complex when desired. This helps in creating difficult models as well with ease.
Not just that, if you are a complete beginner, and you aren’t confident enough to start from scratch, you can always use the existing files for editing. Simply by downloading the tons of online STL files available for free, you can start editing your first model in a matter of minutes using 3D Slash.
The 3D Slash website has all the necessary information and tips related to its use. If you witness some trial and errors, do not be overwhelmed.
It happens to everyone who starts for the first time. But things get easier quickly when its 3D Slash you are trying on for 3D modeling.
The tool is as good as for experts as it is for beginners. Those already equipped with skills of 3D modeling can learn the tool with little different than the other popular software such as FreeCAD, SketchUp, etc.
For example, extrusion is replaced by ‘Copy and Paste’ and ‘Push’ buttons. Other commands such as sweep, revolution can be done using the imitated buttons.
Once you are done with 3D modeling, you have got three options. Either you can export the model to websites that provide 3D printing services or upload to the online digital file repository.
You can even save it as an STL file and send it to the 3D printer for printing the model right away.
You can work with either the software download version or the web-based one. To access any of these, you can simply visit the website of 3D Slash.
How to Work with 3D Slash
As already mentioned, it is not at all a rocket science to work with 3D Slash, even when you trying it for the first time.
To start, select a cuboid which is a solid box. You can further divide it into eight blocks of identical size. Each of these boxes can be divided further into identical eight boxes and so on.
There are two tools available with the 3D Slash to remove or add blocks. The hammer tool can be used for removing excess blocks and the Trowel tool can be accessed for adding blocks. You can easily select the size of the blocks.
The maximum size of the original block is equal to the print size. And, you won’t be able to add any blocks that do not fit the original block.
This helps in avoiding failed prints. The other tools available are Chisel that removes all the cubes in a row, Pulpwood that adds the cubes to row, Drill that erases all the cubes from the selected area, and Undo or Redo buttons.
If you are working with Version 1.1 and not the prior one, you will find few more buttons unavailable with the older version:
Paintbrush: You can select the desired color and paint the cubes just by clicking on it.
Pipette: If you wish to select the color from the model, you just need to use this tool and click on the model’s color. It will pick the color click on the model instantly without you needing to go searching through the entire color palette.
Bucket: To color the selected area, you can use this button.
There are various other buttons and are easy to process through. The picture painted here about how to work with 3D Slash may inspire you to give it a try. After all, it seems so similar to the paint tool we used on our computers when young.
3D Slash is an easy concept to understand. Even when you are not great with computers, this specific software isn’t that difficult.
You would be surprised to see your progress taking the steep up the graph in no time. Moreover, it is fun to work with this tool which makes it even more simpler.
3D Slash Review: Know-How
Apart from the different buttons and commands, managing the size and getting through the design completion is also made convenient with 3D Slash.
While it may be daunting to expand or zoom in the models while designing them, with 3D Slash, it is just so easy.
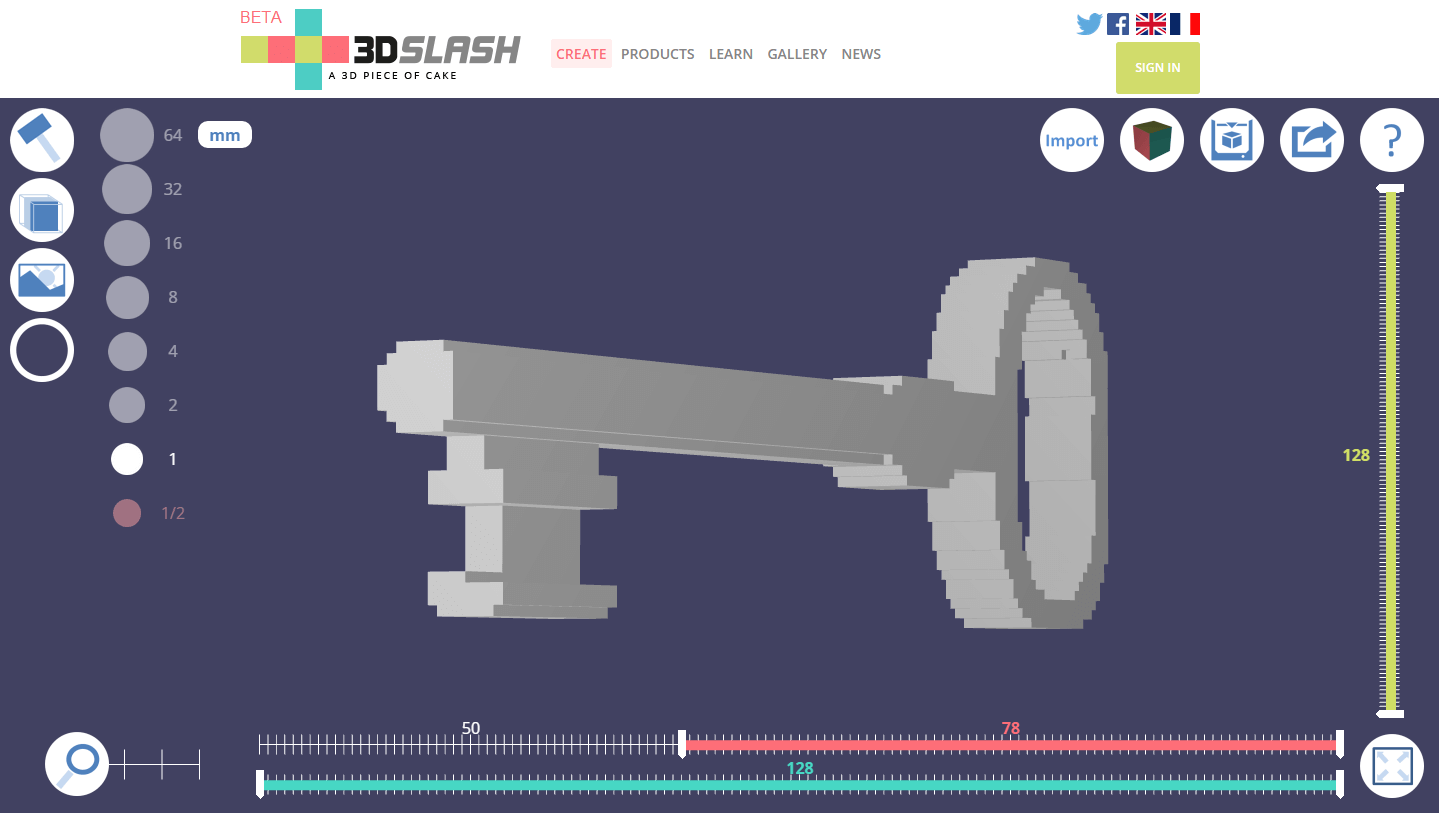
Selecting an Area:
The selection of the area works intuitively with the help of three different rulers with color codes. At the bottom of the design window, you will find two rulers: Red and Blue.
To define the width of the area, use the red one and to select the depth, blue ones come handy. You also have a green ruler to select the height of the model.
This can be found on the right end of the design window. By using the two cursors for each ruler, one can define the coordinated properly for every selection area.
The tool offers three rendering modes as well. One of the solid model. This shows the model as it would look from the outside.
The other two modes are ‘in-between’ modes. One mode shows the selected area as per the instructions mentioned right above and the other one shows the wireframe, the area apart from the selection area. One can switch between these two modes.
There is a lot of things one can accomplish using the commands available with 3D Slash. By exploring the software, you get to know the nuances of things possible with 3D Slash.
Only because it is simple, doesn’t make it any less productive than any other complex tools available for 3D modeling.
3D Slash 2.0 – What’s New?
The new version is even better. The release of 3D Slash 2.0 got us more features and shades of 3D modeling to work with.
The new release has made 3D modeling even easier and accessible than before. One can do things that weren’t possible with the older version.
By adding new features to the already awesome tool, the benefits have been doubled.
So, let us find out what has been improvised to the next level with version 2.0.
Introduction of Logo Mode to the Desktop Application:
Before the release of version 2.0, logo mode was only available with the web-based application. However, after the 3D Slash 2.0 released, the desktop application got the benefit of logo mode too. What is a logo mode though and why everyone is so excited about it?
Through Logo mode, one can simply import a 2D logo image file and let the software create the 3D logo for it.
However, the text mode is still only with the web-based application and not with the desktop-based tool. Similar to logo mode, text mode can be used to create a 3D text just by typing in the formatted text.
Selection Using Color:
A new feature has been introduced in the software. Now, one can select the area choosing the color. This is really helpful practically. And, saves a lot of time in the selection of areas with one color.
One-Click Task:
Commands like resize, move, combine and flip can be carried out with one click. Can it get any better now?
Introduction of High Definition Mode:
With the older versions, the standard mode was the only option available. This allowed the cube size of 1/2 to 32 mm. This was available as the basic model with the older versions. However, with the high definition mode, one can select smaller sizes by adding 1/8 and ¼ to the toolbar.
No More Switching:
Now, with the latest version, one does not have to switch often between the basic and the expert mode when 3D modeling.
This is because the features available with the expert mode have been added to the toolbox. Hence, desktop and web applications have similar features sets, except the text mode that is unavailable with the desktop application.
Easy Insertion:
With the new update, you can easily insert a rounded shape as well as OBJ or STL file to the model.
With all the new features, there has been a huge improvement in the way the software worked before. It has been made easier for everyone.
Either it’s the selection of area or the copy-pasting commands, everything has been made simpler. One can work with the software without worrying about holding prior experience.
In short, you can start right away and keep progressing as you grow with your experience of 3D modeling. This is possible with 3D Slash.
The Conclusion
Have you ever tried using a 3D modeling tool and have felt completely blacked out? This is very common. Although the skill isn’t even close to rocket science, it is pretty difficult.
And, when it comes to learning on your own, you may not find the idea very helpful. Many beginners who have not tried 3D designing before, still depend on free repositories to download the STL files and compromise with the design already created by someone else.
Those who like doing it themselves, dislike the idea of copying someone else’s designs. And, what if the design you like does not fit the print area of your 3D printer? Even for the simplest of edits, you may have to depend on someone else.
All this happens because of the complexity of the 3D modeling software we are scared to face. But, with 3D Slash, you can forget about those worries and start creating your designs only by using it for a few days or even hours.
The fun-filled software, designed to spread 3D learning, has successfully been accepted as one of the simplest 3D modeling tools.
Also, for experts, this tool is a great choice. With so many features and advantages, one can get acquainted with the know-how of the tool while having fun exploring the software. Just begin and 3D Slash will lead you to your most awaited design in simple steps.


