Among all the difficult settings, the one that nudges the most is the calibration settings of a 3D printer. Although these days, manufacturers are welcoming the idea of automated calibration, learning about how 3D printer calibration works is a must for every serious user.
The nuances of possibilities can only be exploited when one knows everything about the working of a 3D printer, including calibration. While this is one of the most important settings that decide the final print result, it also is helpful in achieving a variety of results and solutions.
Knowing how to calibrate a 3D printer may sound tricky at first. However, the good news is that the settings are mostly repetitive. Once you have gathered the expertise to calibrate one motor, the rest would fall in a similar fashion, hence, making it easier for you to complete the job.
What is 3D Printer Calibration?
Every setting plays an important role in reaching the desired output with 3D Printer. The same goes for the calibration settings. A 3D printer when not calibrated properly can even end up creating failed prints.
There is a lot of things that depend on this setting. Mostly, it drives the parts towards higher accuracy. Without accuracy, your designs won’t be useful at all. And, this can only be achieved if you played well with the calibration settings.
The setting decides the readings of the 3D printer laid against a standard to ensure the consistent accuracy of the machine.
How to Calibrate a 3D Printer?
These are some of the steps you would require for calibrating your machine. Follow the stepwise for the best results.
Proper Deposition of First Layer
The first layer is very important to ensure that the entire print is problem-free. If the nozzle placed too close to the print bed, the first layer may squeeze too much, destroying the entire print.
You may have to cancel the print in such a scenario. On the other hand, if the nozzle is set too far, first layer adhesion would be a huge challenge. If that is the case, the print would fail anywhere in between. So, starting to level the first layer is what you should focus at first.
The question is: how to level that? This can be done by working and fine-tuning the Z offset. The Z offset value instructs the 3D printer about the distance to maintain while moving the Z-axis from the bed.
Thankfully, you do not have to do a lot of work for this setting. The majority of the 3D printers let you set a value directly in the settings.
You start with the recommended values, however, with time, you must decide if the settings are working perfectly or you would need to make smaller changes to the value and see for yourself. If the first layer starts squeezing, increase the Z offset.
Or, if the first later isn’t staying on firmly on the bed, lower the Z offset. And, you would know which setting works best for your specific 3D printer.
Fine Tuning the Stepper Motor
Stepper motors are the ones that guide the axes and extruders to move the specific distance. This further helps in obtaining precise results. In terms of a 3D printer, the stepper motor is the one that drives the relationship between the steps taken and the distance actually covered. This is carried in a few steps.
Preparing the Values
We start by calibrating the extruder. This means that you must ensure that the extruder is depositing the correct amount of filament every time. But first, you need the current printer’s settings which can be retrieved by sending command M503 to your 3D printer.
Using this command, you would receive some output and part of which would tell you the steps per unit. You would require this value further. So, keep the note of it.
Among the output, the three units from start would tell you the number of steps taken by the stepper motors for moving 1 mm along X, Y, and Z directions, respectively. Although this value isn’t needed right away, you may need it later. So, keep them handy.
As of now, we must work on the last value. This value determines the number of steps the extruder takes per mm of the filament extruded from the nozzle.
To start with the process, feed a small amount of filament and keep marking on the extruder right make note of the distance measuring from the of the extruder until you reached the previously marked point.
By subtracting the previous marked value on the extruder to the currently marked value, you will know the amount of filament extruded. If this difference is 10 mm, then you do not need to calibrate the extruder as it already is. If this isn’t the case, you must calibrate the extruder.
The correct value can be determined by multiplying the last value from the 3D printer’s output string by 10 and dividing it with the difference value obtained by extruding the filament.
This value is the correct steps per mm. For greater precision, you can even obtain this value a few numbers of times and use the average to get to the most suitable value.
Calibrating the Extruder
Once you have obtained the right value for steps per mm, you must send it to the 3D printer. To do so, you can use command M90 E(The determined value). Later save this value by sending the command: M500.
Calibrating the Axes
Now, it’s time to calibrate the axes. Thankfully, it is similar to calibrating the extruder, however, you would need a 3D printer for that. You can use a pre-existing model or can design yourself.
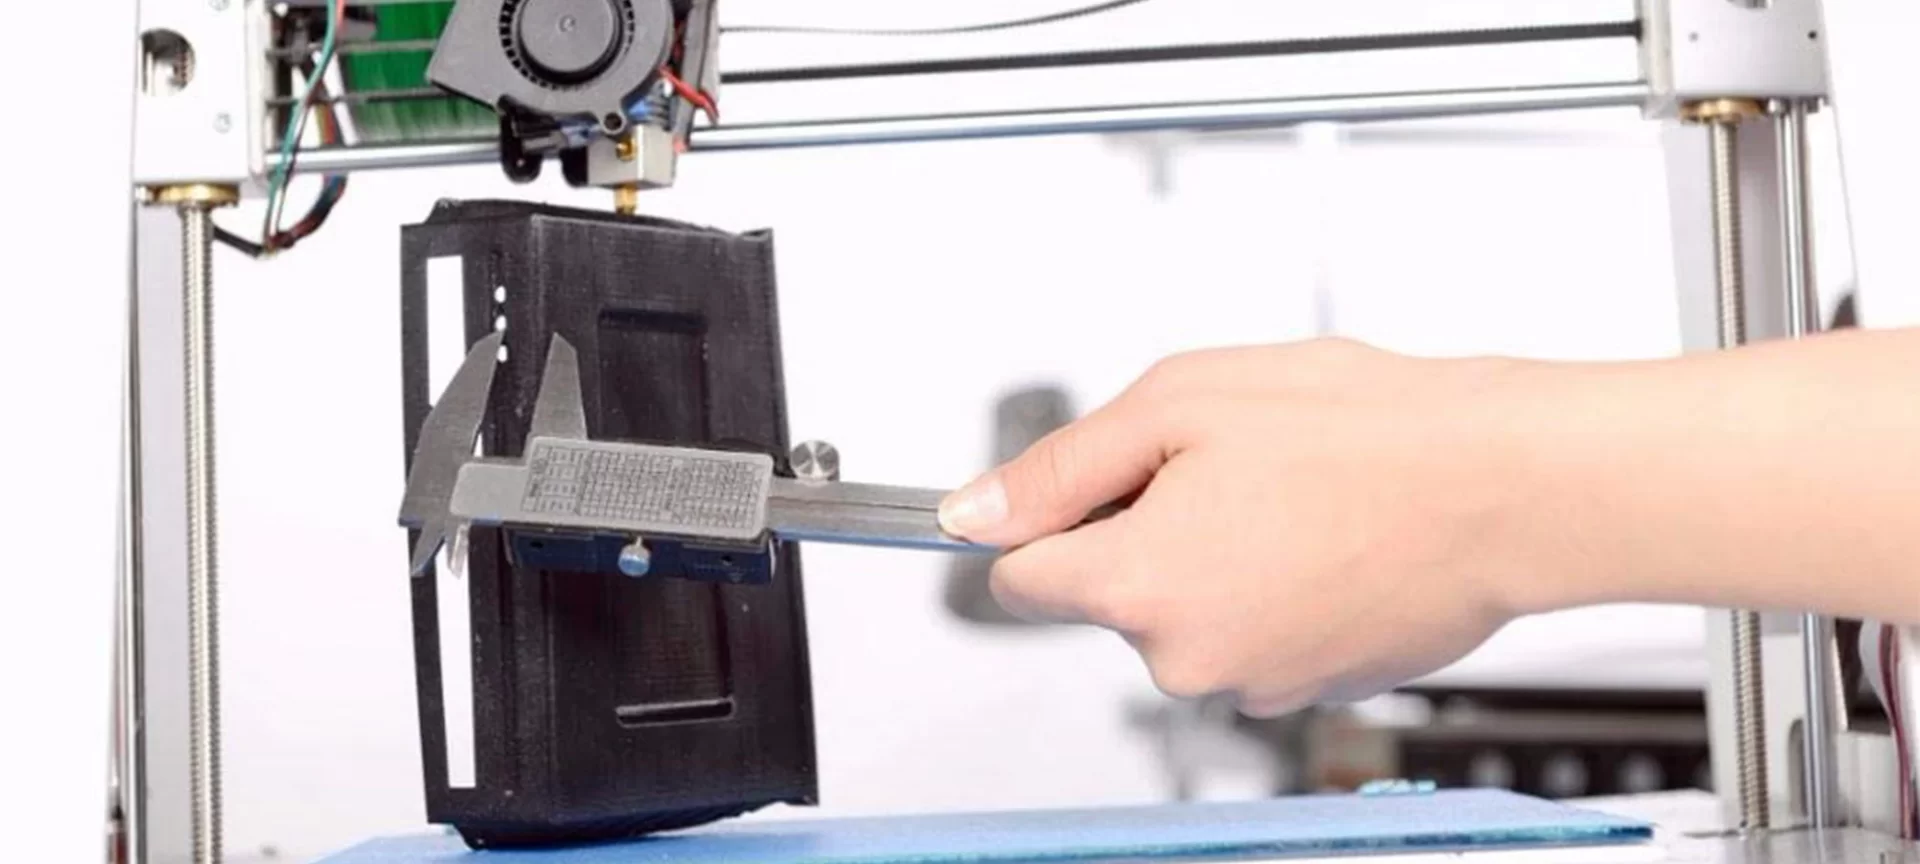
So, print the model first and take measurement of dimensions for each axis as we did for the extruder.
This time, replace the difference in the extruder by the measurement for the axis, the number 10 by your target value and the last measurement from the 3D printer’s output string by the first three values of the string, as discussed earlier. Later send the same M92 command to the printer and save the same by using M500.
To get a more precise value, you may print the model multiple times (three times is enough) and take the average of the values for finding the aptest one.
The process is very similar to the extruder calibration, hence, it would not take much of your time as it was the case with extruder settings. You can learn how to calibrate axes by performing the tasks a few times.
Working with the Filament Settings
Filaments have different properties. Even the same ones with different manufacturers can vary a little bit according to their quality. So, it is crucial to check the settings before you start printing with the filaments.

You also can use the recommended settings from the manufacturers. In case, you are not getting desired results, you can try some hands-on editing the settings and find the one that suits your printing needs.
Measurements of the filament
Filament diameter is very important to value. Hence, keeping a note is always useful for realizing the best filament settings. To calculate the diameter, using calipers.
Use that caliper to take measurement of the diameter along at least three places of the spool and obtain the average for those values. Add that value to the slicer.
You may find the filament diameter information already with the spool of the filament, however, there are often small differences by few percentages in the exact diameter from the one mentioned on the spool.
The tolerance is also outlined on these spools. Hence, it is a necessary step when setting the filament for printing.
3D Printer Temperature Calibration
The best way to find out the temperature for printing is by 3D Printing a temperature tower. The tower is designed with separate blocks created at different heights.
Moreover, each block requires a different printing temperature for the best results. Hence, the resulting model can be analyzed for finding out the best-suited temperature.
It may sound easy, but there are challenges though. Not every slicer lets you print at different temperatures in a single model. In case, yours doesn’t, you must edit the G-code manually before starting the print process. Use command M104 for setting the extruder temperature.
To begin with, measure each block’s height. Later, you must find the G-code in the editor you use. The commands that determine the movement of the printer starts with G1.
You will find a lot of these codes in the format G1 Z[H]. These codes may also contain the X and Y movements. If you find this line, add command M104 S[T]. Here, T stands for the block’s temperature that you need for the specific height of the block.
Once you know how to do that, all you have to do is repeat the same process for other blocks. This will update the G-code with a suitable temperature.
Use this G-code for printing and you will experience the difference. After the tower is printed, you can analyze the same for finding the best-suited temperature for your models.
The Final Step
The above steps are a basic calibration regimen that users must undergo to find the most suitable settings to start with. However, there are a number of other settings as well that must be included for the best results.
Some users prefer to undergo some torture tests to envision if their 3D printer is working perfectly or would need some more fine-tuning with their settings.
These torture tests after being 3D printed provide more areas for correction. These help users to concentrate on other challenging areas such as the creation of bridges and overhangs. In addition, they do help obtain other problems that may arise with the prints later.
To start the with torture test, you can select the STL file available online on the free repositories. You will also find ways to print them and create marvelous models using those files.
Printing a few of these models would help you better judge the settings of your 3D Printer, and if, they at all need any more changes in their values. In short, these test results help you hone your skills as well.
These tests are prepared to help users get a hold of the many skills needed for printing correctly. And, these would help you too. If you are doing it for the first time, you would find it very much helpful in building your expertise in 3D printing.
The Conclusion
3D printing isn’t just about feeding the filament and turning the 3D Printing on. There are lots of steps that fall in between. It is not easy to start printing like a pro on the first day itself.
However, learning printing with these machines is an ongoing process. The more you experiment with the settings, the closer you get to the best results.
This is the reason why people often like to edit and work with the calibration themselves, even when the company provides then with auto-calibration options.
This helps the user to fine-tune their expertise as well. 3D printing entails a huge number of challenges, which make it even more enthralling to work with.
This also is one of the reasons why 3D printers are being used for multiple applications. It is because of the freedom they provide to set the printer settings to different parameters for realizing diverse results.
With 3D Printer Calibration know-how, one can make the best use of the 3D printers. Many users may not realize that there is much more they can obtain using a 3D printer.
Only because they rely on auto settings or the ones recommended by the manufacturers. However, a lot lies within those settings and getting to twig those numbers could add versatility to your projects.
So, go ahead and keep experimenting with your printer settings, ensuring not to damage it by being cautious at every step possible.


