Cookies are everyone’s favorite. Whether it’s a birthday party or a Christmas celebration, cookies are welcome on every occasion. And, what’s fascinating is that one can create different shapes of these sweet delights. The fun doubles when it is possible to create your own 3D printed cookie cutter. Isn’t that exciting?
While the traditional shapes taste as good as the customized ones, it becomes easy to impress your guests with your creative cooking skills. If you do resonate with that feeling, it’s time to 3D print your own cookie cutter and designs it as you please. Choose a shape, design the file using your preferable CAD software and let the printer do the rest.
And, if you need help, go through the stepwise process for creating the 3D printed cookie cutter. The process is not only simple, but it’s also highly rewarding too. So, without further ado, let’s get started.
How to Make 3D Printed Cookie Cutters?
3D printing is a simple but highly efficient technology that allows its users to customize almost every design. Not only does additive manufacturing allows the production of complex geometries with ease, but also eliminates design standardization. Offering room for customization, 3D printing happens to be one of the most revolutionary innovations to date.
And, in order to design your cookie cutter, you may choose from various online software available for 3D designing. A standard example of one of the most renowned 3D design applications is Autodesk Fusion 360. In case you are a student, the application is available for free. So, download it from Autodesk’s website and install it on your laptop or PC.
Also, being open-source software, Fusion 360 is compatible with most basic 3D printers. Moreover, it’s easy to use and doesn’t have a complicated interface. The navigation is simple and intuitive.
So, without keeping you waiting, let’s start with the stepwise process of creating 3D printed cookie cutters using Fusion 360.
Step 1: Finding a Suitable Shape
To 3D print a cookie-cutter, at first you must choose a suitable shape. It could be anything. Either an animal or your favorite fruit, feel free to pick what you like. And, the easiest way to do so is to search it online. Just type the name of the shape you wish to print on Google search. Look into the clip art section and choose the one you like the most.
For beginners, we suggest going with simple designs. In addition, you must ensure to choose the correct license. And, do not forget to remember the location where the image was saved. You will need it later when importing the image to the CAD software.
Step 2: Importing the Image to Fusion 360
As explained, the next step is to import the image to the Fusion 360 software. To do so, just click on import available at the top of the application’s interface. And, choose the location in the dialogue box to open the desired file.
There you go. Right after clicking on the selected file, the image will be uploaded on the design plane you choose to work with. These were just the preparation steps. From here, the customization process begins. And, there is still a lot of work remaining before you can actually use the 3D printed cookie cutter.
Step 3: Tracing the Line Around the Object Present in the Image Using Spline
Say, you have chosen and imported a Santa Claus image for creating 3D printed cookie cutters. To start with the customization process, you must select its borders and trace the lines around it.
For doing so, you can use the Spline tool of Autodesk Fusion 360. It easily adjusts to the shape of any object immediately. You can see the dotted line around the image right after the tracing completes.
Step 4: Creating an Outline of the Recently Made Line
Now that you have traced the line around the selected image, it’s time to create the shape’s outline. This again is easy and can be completed by just pressing a key.
Use the Spline tool to select the recently traced line and press O on your keyboard. This will help you create an outline of the trace you created in the previous step. Please note, it is important to have the correct outline size in order to achieve accurate print.
For instance, if the size of your nozzle is 0.4 mm, you must set the outline to 0.8 mm which is exactly double the size. In case you are using a different nozzle size, the doubling rule will still apply.
Step 5: Extruding the Cutting Wall
Having traced the line of the object and creating its outline, it’s time to extruder the cookie cutter’s cutting wall. Being a simple job, it can also be done by pressing a single key on your keyboard.
Do not forget to select the entire parts of the wall responsible for shaping your cookies and press E. This will allow users to extrude the cutting wall of cookie cutters’ design. We recommend using a 15 mm wall height. However, you are free to enter the number you like.
Step 6: Extruding Embossing Parts
Now that you have extruded the cutting wall, it’s time for the parts that engrave things on it. If you have chosen 15 mm to be the cutting wall’s height, you can keep the height setting for these parts as 14.2 mm.
The difference of 0.8 mm will ensure that these selected parts from the design won’t cut the cookie but only emboss shapes as intended.
Step 7: Adding some Supports for Bodies
This one’s more like a touch-up step. In case you are printing a Santa Claus-shaped cookie cutter, you’ll notice how the mouth, eyes, and nose of that Santa Claus are separate from its main body. And this is why you are required to connect these separate parts together by adding a few lines. This will make the design printable in one go.
Step 8: Joining Everything
Who doesn’t like connecting the dots? This is a fun step to implement. It is also the last step of the designing phase. For implementing this step, all you need to do is select the complete body and then click on the Combine option present in the software.
Before choosing “ok,” ensure that join is selected. After you press on OK, all the bodies will be connected into one single unit that can be converted into 3D printed cookie cutters thereafter.
Find Cookie Cutter 3D Designs Online
What if you do not want to get into all the extra work to design your cookie cutters? In such a case, it’s always simpler to look for repositories like Thingiverse, MyMiniFactory, Cults3D, Yeggi, etc.
These websites have paid as well free versions of 3D Designs that you need. You can download the STL files of those 3D models and get straight to 3D printing.
Once you have the file, you can use it to print the cookie cutter using the recommended settings. Here are some of the wonderful recommendations that are popular and are easy to print for beginners.
Batman Cookie Cutter
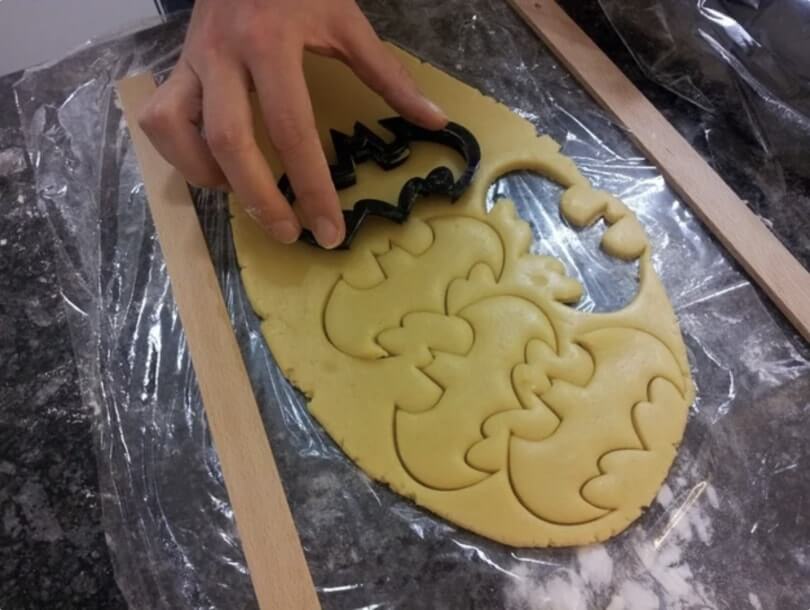
Are you a fan of superheroes? If yes, you must check this amazing Batman cookie-cutter design for your next baking adventure. Not only it’s easy to print but looks fascinating as well. One of the best choices for moms wishing to surprise their kids. The best part is that the file is available for free. So, you can just download and start printing.
Rudolph the Reindeer Cookie Cutter
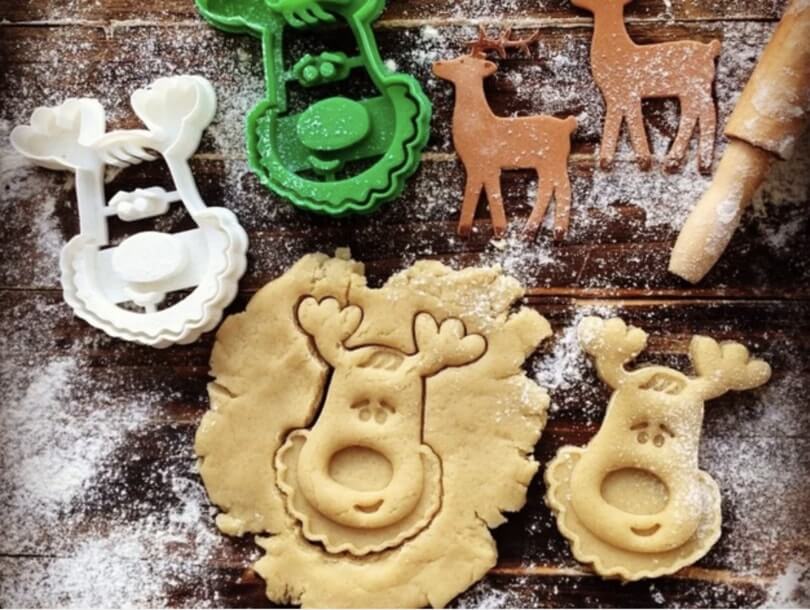
Is Christmas already around? To make the occasion fun and exciting, bake your cookies with Rudolph the Reindeer Cookie Cutter.
Eat Me Cookie Cutter
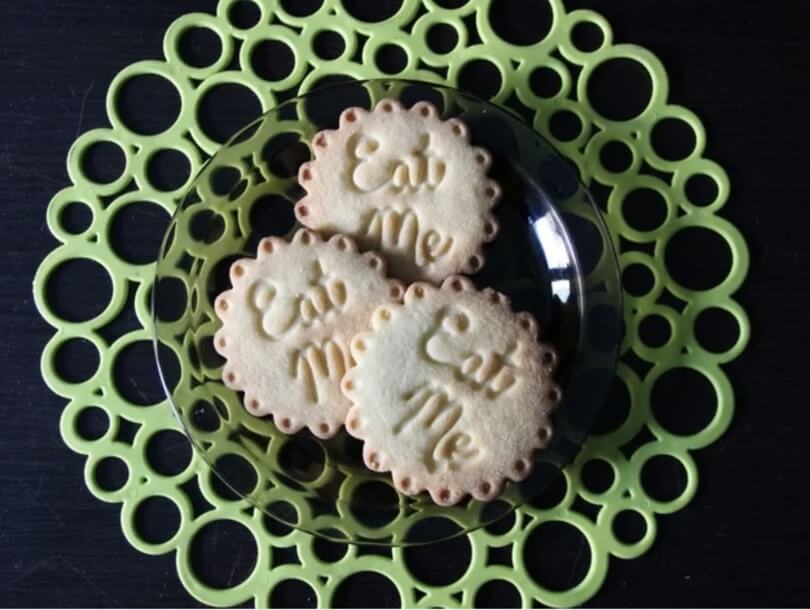
A cookie-cutter for all occasions. A simple engraving of ‘eat me’ could bring such a huge difference to your preparation. Isn’t that wonderful? If you think that too, use this file to get the 3D Printed cookie cutter that lets you shape some great smelling sweet delights at home. Eat me cookie cutter is a simple design, but quite impressive.
The Conclusion
Apparently, customizing 3D printed cookie cutters is not that difficult. As you can notice, it just needs some basic 3D designing skills. Starting with the software download, selecting the image of your choice to prepare the design for print. All it takes is a little effort from your end. And, you can create a 3D printed cookie cutter of any shape you like.
So, if it sounds like a simple job, we would recommend giving these steps a try. And, make your preparations, even more, heart whelming when you invite your guests the next time. Everyone is definitely going to love the extra efforts you took to make those tasty cookies.


