3D Printing, also known as additive manufacturing, is looked at by the Financial Times and many other renowned sources as something that has the potential of progressing larger than the Internet.
Others are critiquing it to be just any other manufacturing technology that was famous during the time they were trending.
There are many aspects of this technology, and many parts are involved in the printing of part or functional prototype, using this technology, and 3D printing brim is one such!
We will share with you in this article about the method for printing a brim. But before getting into what is a brim and when is it used, and how to print it, let’s know in general about the basics of 3D printing technology and what makes it very famous.
Overview of 3D Printing
Overall, the term “3D printing” consists of various processes and technologies that offer a complete spectrum of capabilities for producing parts and functional prototypes in different materials using different mechanisms.
One thing that can be called a trademark of 3D printing is the fact that no matter which technology do you start printing with, every technology prints part and functional prototype layer after layer with an additive process that contradicts the view of traditional manufacturing methods that required one to print using subtractive manufacturing technique.
This technology is slowly finding its application in almost every industry, and with the growth of this technology specializations in it are also available in 3D printers.
Introduction to 3D Printing
The process of making a part or functional prototype using a three-dimensional model, by laying one after the other layers of a material that you wish to 3D print with.
To get a general idea about this technology you can think of the light bulb or a steam engine or cars or airplanes which are considered the most breakthrough inventions of traditional manufacturing technology.
Manufacturing all of these takes time which is uncertain. On the contrary, 3D printing technology gives you certainty and reduces the time for creating a particular part or functional prototype.
Because this method is based on the concept of additive manufacturing, it generates no waste, and because, it lessens human intervention in manufacturing, it produces a more accurate part or functional prototype compared to traditional 3D printing technologies.
Stereolithography, DLP, Extrusion, Inkjet, Selective Deposition lamination, and EBM are the name of the process with which you can manufacture parts and functional prototypes using 3D printing technology.
Now that you have got enough brief about 3D printing technology, let’s start with basics about brim and when and how to 3D printing it.
3D Printing Brim
We will start with knowing the definition of the brim and continue by stating when to use the brim.
What is Brim?
If you have printed a part or functional prototype before reading this, you probably know what is brim is because you might have needed that to print your part or a functional prototype.
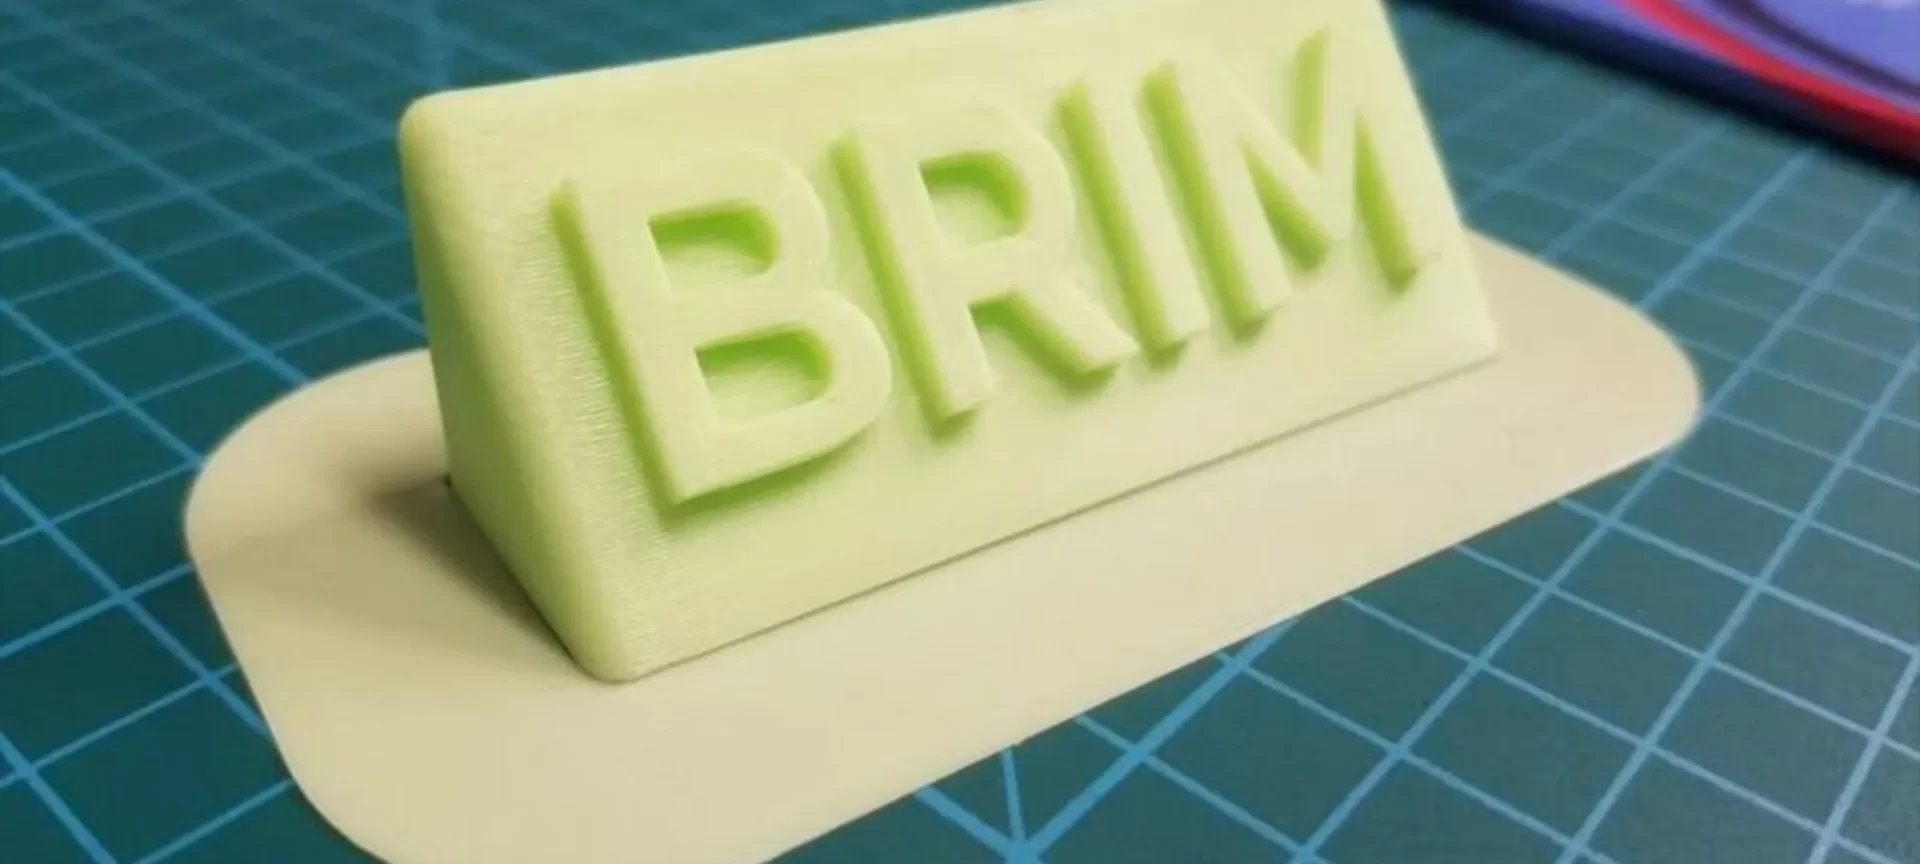
Anyways, in case you do not know, here it is. Extending along the print bed of your 3D printer, a 3D printing brim is a layer of material that is produced from the edges of the part of a functional prototype.
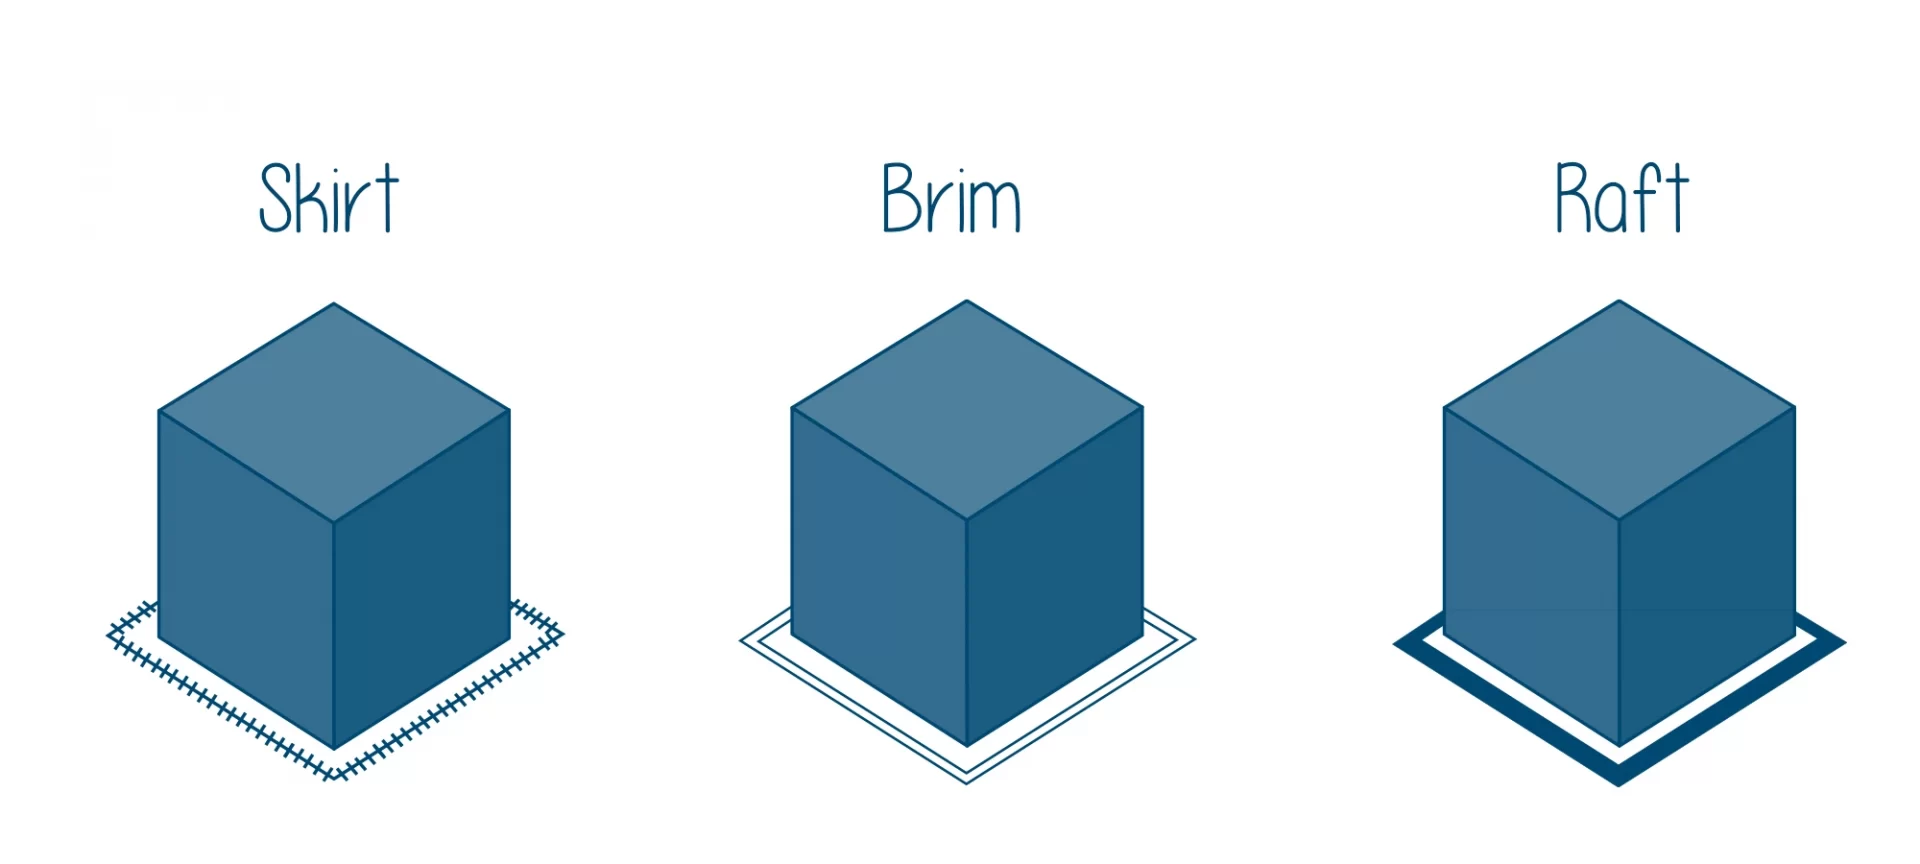
There is another terminology that you might easily confuse brim with and that is a raft.
However, it is important to note that like a raft, the brim does not reach below the print, whereas a raft does reach below the print.
There is a mentality that exists in the mind of users generally i.e. to only use raft for improving their chances of a successful printing of part or functional prototype, but that is simply not correct.
Because the use of either brim or raft depends on the part or functional prototype’s design.
In fact, researchers say that in the creation of some parts or functional prototypes, a brim is even more useful than rafts.
A brim is easier to remove than a raft, it wastes less material than a raft and also does not affect the bottom layer finish of the print.
When Should You Use a Brim?
After 3D printing brim, it is important for you to know when to use it and when not to.
Because by using it at irrelevant places, it may cause damage to the parts or functional prototypes and by not using it at relevant places, you might not be able to get the accuracy that you can by using a 3D printed brim.
There are some scenarios that we recommend to use a 3D printed brim with.
For example, if you have warping while printing ABS, it is recommended to use a brim after 3D printing it.
Below mentioned are five such scenarios.
- By attaching a 3D printed brim to the outer edges of the print and its width the print is adjustable. The brim line count around the print increases the overall surface contact of the part or functional prototype that you are willing to 3D print with the build platform thereby improving the bed adhesion. So, increasing bed adhesion results which in turn leads to a higher percentage of successful prints, you must use one after 3D printing a brim.
- In terms of a safety measure before using a brim, you must know that after 3D printing brim, it can be added to every print for ensuring better bed adhesion as mentioned above. A brim is not required when you are 3D printing parts and functional prototypes with filaments like PLA but, because a brim is easy to remove, adding one doesn’t harm either.
- When you are printing a part or functional prototype that is big and the support structure is only required for a small part at the top of the print, the support structures that are created for supporting are really tiny and these structures can easily break while the printing process of the part or functional prototype takes place. Therefore it always helps to provide support for the support structures especially in these kinds of prints wherein there are weaker supports.
- As you now know how 3D printing brim functions similarly to a raft and yet how differently from it, you are recommended to use it while printing with ABS. There is an inherent characteristic of ABS filaments i.e. they are prone to warping issues. After 3D printing brim, if you use it, it can reduce warping by holding onto the outer layer of the print and keeping it firmly in place during the printing process is going on.
- Brims are also recommended to be used for printing a part or functional prototype that has a narrow base like a tower or a char. Using brim while printing such a structure helps increase the strength of the entire structure.
These are the five situations wherein using the brim after 3D printing, is recommended. In the next section of this article, we are going to look at the pros and cons of using a brim in your part or a functional prototype.
What are the Pros and Cons of Using a Brim?
- As mentioned above, printing with a brim prevents issues of warping especially with filaments such as ABS more than any other filaments.
- Using brim while printing parts and functional prototypes improves bed adhesion and increases your closeness with the dimensional accuracy that you require in your part or a functional prototype.
- A 3D printed brim is easier to remove than it is to remove a 3D printed raft.
- A brim structure does not interfere with the bottom layer of the print.
- 3D printing brim requires a lesser amount of material compared to 3D printing a raft.
- Adding brim to your part or functional prototype produces a small amount of waste material more than while you are printing a part or functional prototype in general.
- For getting a smooth surface finish in parts and functional prototypes the touchpoints of the brim must be sanded.
- There is also a little possibility for breaking a part of a functional prototype when you are removing the brim from it.
Slicer Settings for 3D Printing Brim
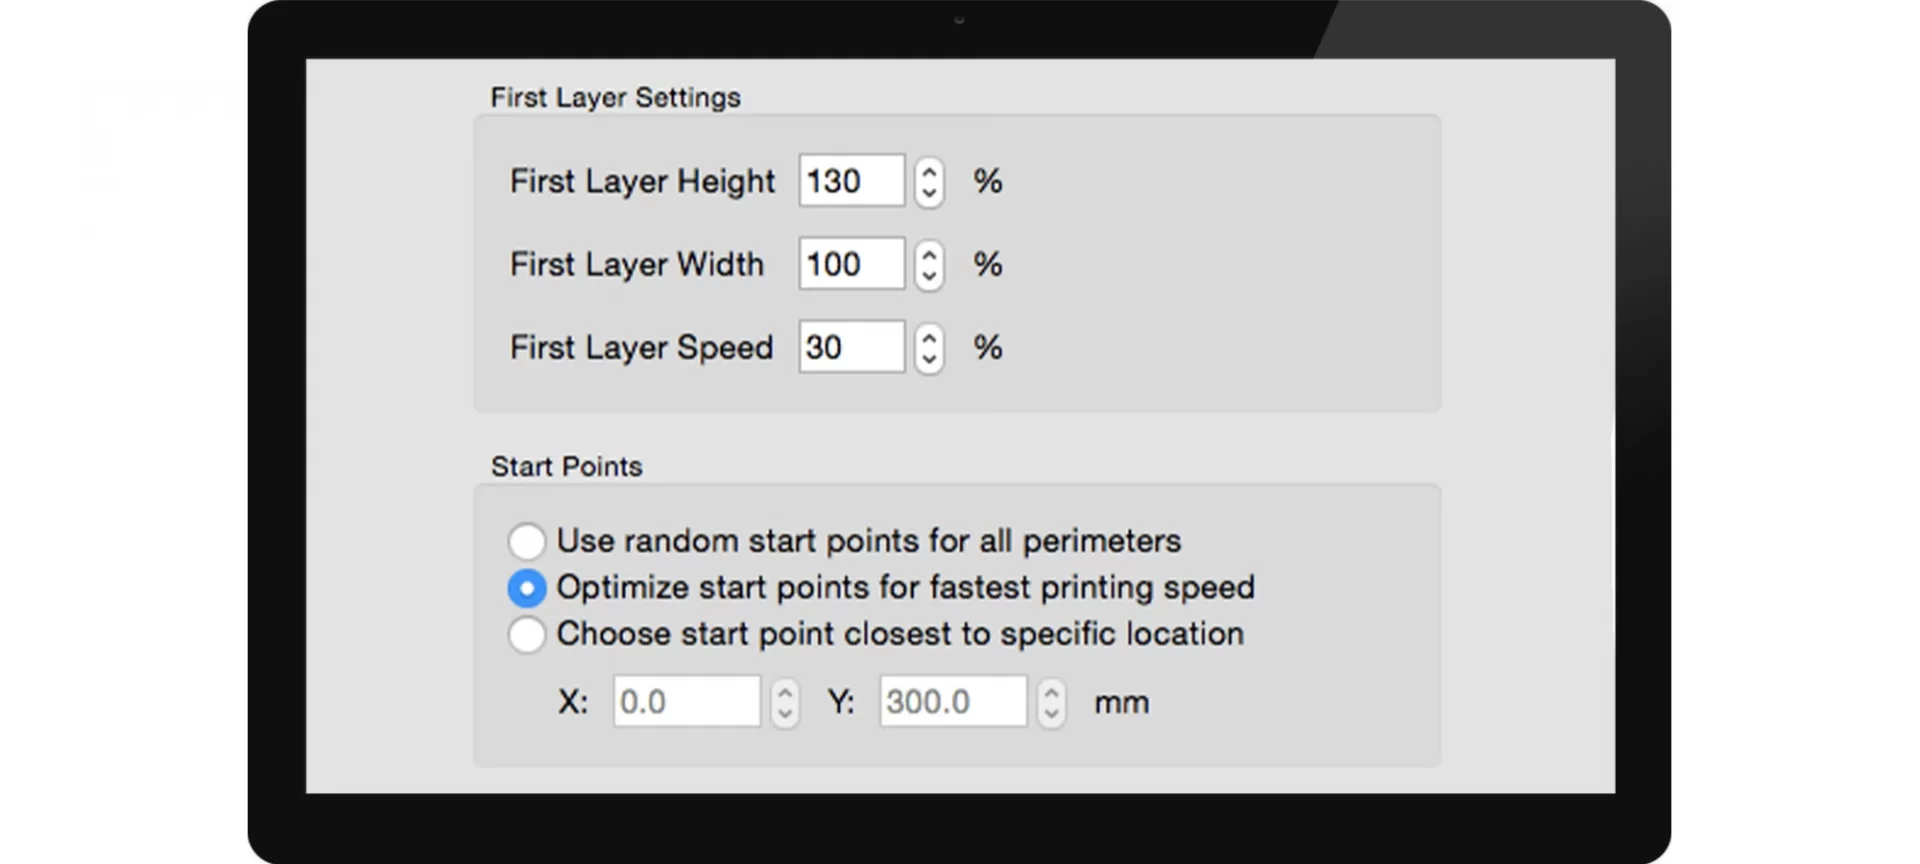
Apart from what you have read in this article about points to take care of while 3D printing brim, its pros, and cons, there are also some basic slicer settings that you should know for successfully 3D printing a brim that leads to dimensional accuracy in a part or functional prototype.
Generally in the slicer settings for 3D printing a brim, there are two important settings that you should take care of:
- Brim width.
- Line count.
Brim width is defined in millimeters like most of the dimensions of the parts of the printer as well as the part that is to be printed is calculated.
Whereas the line count is defined as the number of contour lines in the brim.
So essentially the simple logic is that the more the lines, the better the strength of the brim, and hence the part or functional prototype will tend to be, at least up to a certain distance.
However, you should not forget that this can also lead to making difficulty removing the brim because it becomes harder.
A commonly used brim line count which is recommended by many websites is three to five lines around the print.
This line count is known to have generated a good result, but it is not compulsory and therefore should be modified depending on the design of your part and functional prototype as well as the bed temperature and your 3D printer.
Before concluding this article we will go through a quick difference between Brim and the raft.
What is the Difference Between Brim and Raft?
A raft is defined as a flat piece of mesh material that you wish to 3D printing serving as the substrate on which the 3D printed object is then built.
A raft typically measures just slightly wider than the initial layer of the part of the functional prototype being built.
Prior to building a part or functional prototype using a 3D printer, a manufacturing company may lay down a raft.
Also, it is important for you to remember that once you’ve placed it in the appropriate area, the manufacturing company can begin to build the part or functional prototype by depositing layers of material onto the raft.
Like a raft, a brim is also one of the substrates used for 3D printing. Additionally, like rafts, brims too generally consist of a mesh material.
Based on their similarities, it is quite possible for you to assume that they are the same.
The difference between them, however, is that the former go underneath the printed object, whereas the latter goes around the printed object.
A brim is known to give the best result as a flat and horizontal expansion of the printed object’s initial layer.
While rafts are known to be generally placed underneath the printed object, and brims are placed around the printed object, because of which you can also refer to the brim as essentially creating the appearance of a skirt.
The Conclusion
Requiring less effort than rafts, 3D printing brim is a stronger go-to option as they also provide much more support than skirts. All this is available to you at the cost of a small amount of extra waste material.
3D printing brim can do a lot to mitigate problems with bed adhesion and warping guaranteeing you a stronger print of accurate parts and functional prototypes.
And because it doesn’t reach out under the 3D print as the rafts do, the post-processing of parts and the functional prototype is much easier than with a raft.
It is not mandatory to 3D print a brim but is definitely a good idea if you have even a small amount of doubt, you can always print it and expect a better result than otherwise plainly printing a part or functional prototype using a 3D design file.


