Snapmaker 2.0 is a multi-functional 3D printer that also allows users to CNC carve as well as laser cut parts and functional prototypes. The machine is an improvement of the Snapmaker Original.
Built for the workshop, the printer provides operators with all sorts of manufacturing capabilities that any DIY enthusiast would generally want.
Users of the printer can easily switch from the single 3D printing head to a CNC tool or a laser diode without posing any sort of hindrance when it comes to measuring one’s creative potential.
Also, the construction of Snapmaker 2.0 is very simple. All the setup steps are listed in the comprehensive instruction manual and the necessary tools can be found in the box.
But where exactly does the printer stand when compared to other 3D printers in the same price range in terms of quantity and quality? Well, let’s find out by going in-depth about various facts regarding the printer.
Features
Snapmaker 2.0 sports a general cartesian coordinate system. The printer features a sleek and notably sturdy anodized aluminum chassis with an open forum.
Among the three available variants, the A350 offers the largest build volume i.e., 320 mm * 350 mm * 330 mm. Such a huge build volume allows users to print parts in one go. The system’s single printhead is lightweight and very well-designed with a magnetic sensor as the metric.
The machine has many different striking features, some of which are mentioned and explained below.
Option to Choose From Three Different Build Volumes
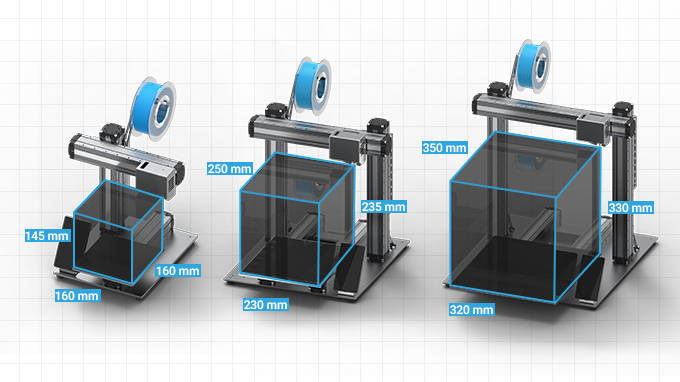
The Shenzen-based 3D printer manufacturer Snapmaker has made the choice full of variants by offering different models. Snapmaker 2.0 is available in three sizes and price points starting from the smallest i.e. A150 offering 160 mm * 160 mm * 145 mm.
The other variant A250 offers a maximum build volume of 230 mm * 250 mm * 235 mm. And lastly, the A350 option allows users to go up to 320 mm * 350 mm * 330 mm.
All in all, operators get enough choice to choose a variant from different kinds of build volume offerings depending on their use.
Sturdy Design
The machine is designed around a solid H frame wherein each metal column contains all the electronics along with movable parts internally. This makes the printer look smart as if it’s taking a shape and transforming.
Because Snapmaker 2.0 is constructed, the design and manufacturing of it stand out with the machined metal, and hardly any expense being spared on its finishing as well as on anodizing.
The printer sits on a sturdy metal base wherein everything is bolted. The H frame is not only large but also solid with the tool head that’s present on the cross beam and beneath the built platform.
Touch Screen Interface
The machine’s body contains a five-inch 720 * 1280-pixel touch screen interface which can be used for selecting various options such as:
- Previewing models.
- Calibration.
- Opening the stored files.
It increases the overall usability of the machine, especially making the working a lot easier for the new operators. Also, the touch screen interface runs on a standard Android OS, featuring a Quad-core A7 CPU @ 1.1 GHz.
Multiple functions can be controlled via this component, moreover, important print settings can be altered even while the 3D printing process is on.
Efficient Laser Cutting
The power of the laser source used in Snapmaker 2.0 is more than enough to cut or etch into the materials like wood, leather, plastic, fabric, paper as well as non-transparent acrylic. Files with file formats like SVG, JPEG, JPG, PNG, BMP as well as DXF are handled by the printer’s software.
Another feature of the laser cutting system is the in-built camera that permits users to see the size of the material that’s being used against the design before starting the cuts on various materials.
Straightforward Setup
The initial setup of Snapmaker 2.0 takes about half an hour to an hour which involves right from the start unpacking the printer, to assembling all the parts that come along.
The complete construction is easy to do. How to set up the printer? And what are the things that users must take care of while doing so are available in the form of instructions as well as video tutorials?
The machine connects to Snapmaker Luban software with either the USB or Wi-fi. Even setting up the touch screen interface is an easy process and doesn’t take much of your time. Above all, once done, it connects with your place’s Wi-fi and that’s it.
Easy Calibration
Although the tool head calibration of Snapmaker takes a few minutes, it’s not that you need to go through the complete process on your own. You are constantly guided along the process which takes around 10 minutes of your time.
The calibration for Laser as well as CNC tool heads takes a while especially with the CNC as there are other processes to work on dealing with the difference in material densities, heights, and sizes.
Overall, the setting up and switching between the tooling is an uncomplicated process provided users have enough time to get the swapping properly.
Compatibility with various materials
Snapmaker has a standard 0.4 mm nozzle that is suitable with all standard materials such as PLA, ABS, TPU, Wooden PLA, and much more.
The printer is capable of reaching 275 degrees Celsius without much of a hassle. This is a reason why the machine is compatible with a wide range of filament options.
Moreover, Snapmaker 2.0 also lets users deal with Wood, leather, plastic, fabric, paper, and another non-transparent acrylic when it comes to laser engraving. Lastly, CNC machining operators have an option to choose from wood, acrylic, carbon fiber sheet, jade, and a lot more.
Specifications
 Credit: Snapmaker
The frame of Snapmaker 2 is made from Aluminum alloys that grant the printer stability while 3D printing and ensures its vibration-less.
Users can connect with the printer via Wi-fi as well as USB for file transfer. A five-inch-long touchscreen interface enables operators to control several print settings via a gentle tap.
The machine is available in three different build volumes:
- A150: 160 mm * 160 mm * 145 mm.
- A250: 230 mm * 250 mm * 235 mm.
- A350: 320 mm * 350 mm * 330 mm.
These three variants i.e. A150, A250, and A350 feature heated beds that can withstand printing temperatures such as 110, 110, and 80 degrees Celsius respectively. Parts and functional prototypes manufactured using Snapmaker 2.0 possess a layer resolution ranging anywhere between 50 to 300 microns.
The nozzle temperature of the printer can withstand anywhere up to 275 degrees Celsius. It features a nozzle diameter of 0.4 mm which supports multiple filaments such as PLA, ABS, flexible filaments, and much more. The file formats supported by the machine are STL and OBJ.
Snapmaker 2.0’s laser and CNC work areas varies from 160 mm * 160 mm, 160 mm* 160 mm * 90 mm for A150 variant; 230 mm * 250 mm, 230 mm * 250 mm * 180 mm for A250 variant; and lastly 320 mm * 350 mm, 320 mm * 350 mm * 275 mm for A350 variant. A laser source of 1.6 Watts power and 450 nanometers wavelength is used to treat various materials.
Whereas, a shank diameter ranging from 0.5 to 6.35 mm can be used with spindle speeds of 6000 to 12000 RPM when CNC machining on Snapmaker 2.0.
Price
The A150 variant of Snapmaker 2.0 is available for a price of $1199. Whereas the A250 variant is marketed at $1499. And lastly, users can get Snapmaker 2.0 at $1799.
First Impression
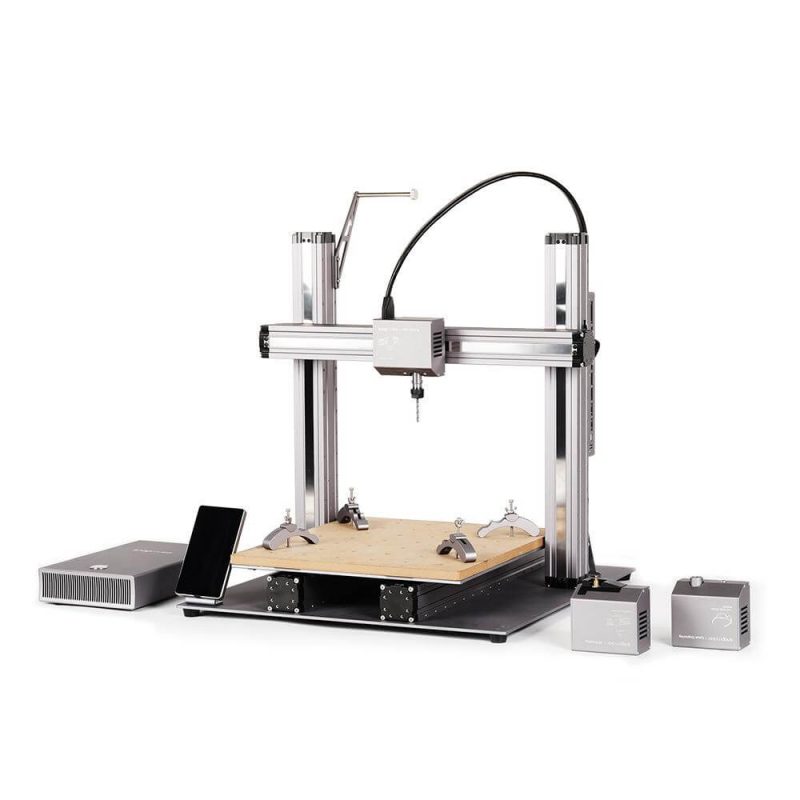
A standard cartesian type arrangement of Snapmaker 2.0 gives it a strong appearance along the lines of general desktop 3D printers.
The linear modules are supported on a strong base and the gantry has rails attached to them which allows the print head to move up and down thereby giving it an H-shape structure.
Each metal column present on the machine features all the electronics as well as the movable parts internally that make Snapmaker 2.0 look very smart as it takes shape.
The complete machine sits reliably on the sturdy metal base. Its H frame is not only large but also solid with the tool head on the cross beam and beneath the platform.
Setup
Snapmaker 2.0 is not like other plug-and-play 3D printers. It needs at least half an hour-long setup process that can last as long as an hour. The time involves unpacking as well as assembling all the components.
The printer manufacturer has kept the construction process of the machine straightforward with instructions and video tutorials that makes the entire process free from hassles.
It connects well with the Snapmaker Luban software through USB or Wi-fi. Even setting up the touch screen interface does not consume much time and is easy to do.
Print Type/Cost
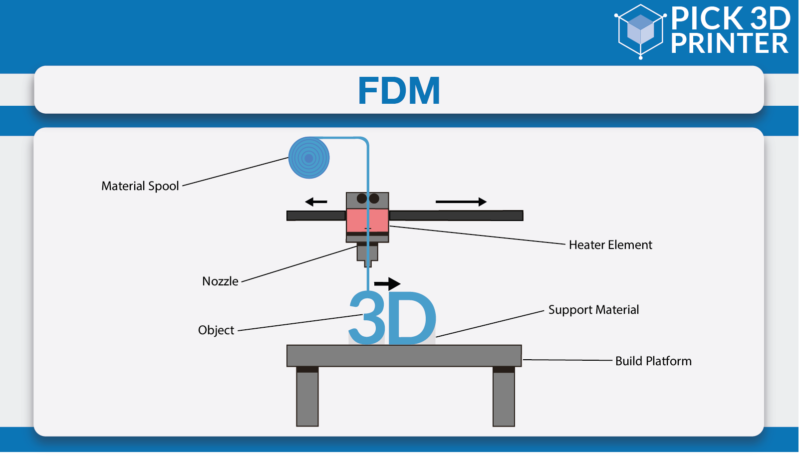
FDM 3D printing technology is the most simple and affordable 3D printing compared to other techniques. It starts with increasing the temperature of the filament present on the spool holder beyond its glass transition.
Till then, the print head of the printer reaches a point wherein the laying of melted filament on the print bed becomes possible. Layer after the other, the melted filament is laid on the print bed which is then cooled to become a part of a functional prototype.
The cost of 3D printing a part or functional prototype using FDM 3D printing technology is generally lower compared to other 3D printing technologies. However, it depends on various factors such as; the part geometry, the type of material with which the part has to be printed, as well as the level of infill, support structures, etc.
Print Quality
 Credit: Snapmaker
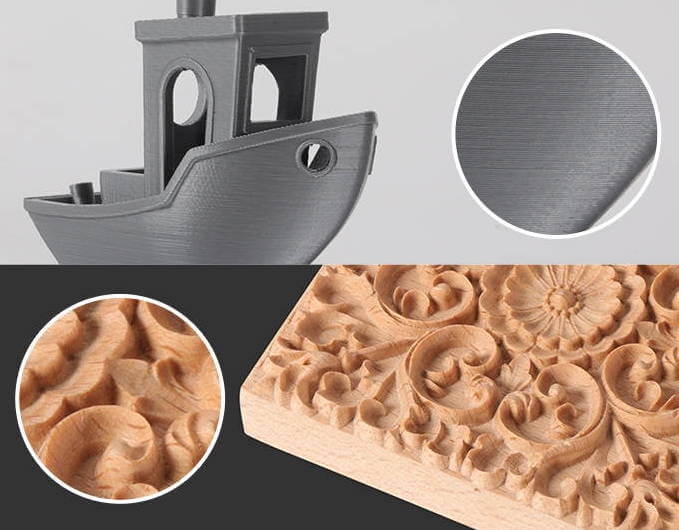
Objects with layer resolution ranging from 50 to 300 microns can be printed using Snapmaker 2.0 which is above average when compared to other 3D printers in the same price range.
The printer’s nozzle can withstand a temperature of 275 degrees Celsius which makes it possible for users to print with PLA, ABS, flexible filament, etc.
Software
 Credit: Snapmaker
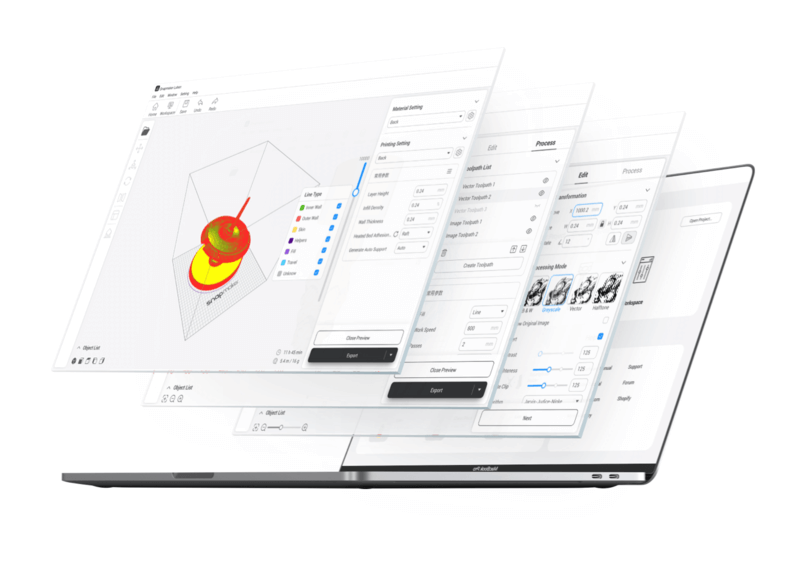
The machine comes integrated with Snapmaker Luban software which is an evolution of the modified CNCJS software. It offers dedicated workspace areas for each of the main tool heads. Moreover, you get a general area from which piping tasks to the printer via wifi is a lot easy.
Also, the workspace permits users to send G-code commands as well as observe vital information not only about the machine but also about the tasks in progress.
Customer Support
A quick start guide, user manual, video tutorials, and FAQs about the printer are available online on the website of Snapmaker. Apart from this, users can contact for technical support by email or call via phone for any sort of solution.
Parameters Influencing Buying Decision
The most important factors that shouldn’t be ignored while buying a 3D printer are mentioned below.
3D Printer Cost: Considering the multi-functionality of the device, Snapmaker 2.0 is extremely affordable.
3D Print Speed: While operating the machine with any of the manufacturing techniques, it offers a considerable amount of speed.
3D Print Quality: Being an FDM 3D printer, Snapmaker 2.0 manages to offer a layer resolution ranging from 50 to 300 microns which is outstanding.
3D Printer Capability: The printer is able to print with multiple 3D printing filaments such as PLA, ABS, Flexible filament, etc. So, users can easily juggle up with materials for the creation of varying parts and functional prototypes.
3D Printer Practicality: The nozzle of Snapmaker 2.0 can withstand high temperatures, the aluminum frame gives it stability during the 3D printing process, apart from these two too there are some features that guarantee users a smooth 3D printing experience.
3D Printer User Expectations: The printer is primarily meant for users who are not only interested in one form of manufacturing but multiple ones. Intermediate level operators who have exposure to 3D printing and can take it one step forward using CNC machining and Laser engraving can make wonders with the machine.
Best 3 in 1 3D Printers
Best FDM 3D Printers – The Ultimate Buyer’s Guide
The Verdict
By offering three different variants for 3D printing, the printer manufacturer has made the decision of users much easier. In a nutshell, Snapmaker 2.0 is for those who wish to have exposure to 3D printing or take a leap in the same by also using Laser engraving and CNC machining at a very affordable cost.


